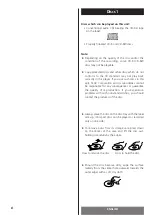
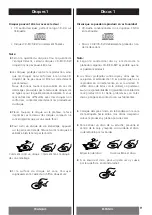
background image

22

ENGLISH

Playing a CD 1

2

5

1

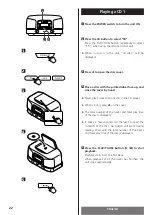
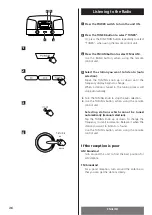
Press the POWER switch to turn the unit ON.

Press the CD button to select “CD”.

Press the FUNCTION button repeatedly to select
“CD”, when using the remote control unit.

<

When no disc is in the unit, “no dISC” will be
displayed.

Press 

L

to open the disc cover.

Place a disc with the printed label face up, and
close the cover by hand.

<

Never place more than one disc in the CD player.

<

When closing, press 

L

on the cover.

<

The total number of the tracks and total play time
of the disc is displayed.

<

It takes a few seconds for the unit to read the
contents of the disc. No button will work during
reading. Wait until the total number of the tracks
and total play time of the disc is displayed.

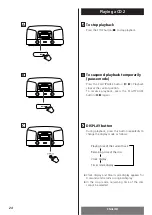
Press the PLAY/PAUSE button (

y

/

J

) to start

playback.

Playback starts from the first track.
When playback of all the tracks has finished, the
unit stops automatically.

5

4

3

2

1

1

5

4

3

2

Содержание SL-D96

Страница 1: ...9A10228900 SL D96 AM FM Stereo Radio CD Player with Digital Clock Z OWNER S MANUAL MANUEL DU PROPRI TAIRE MANUAL DEL USUARIO...

Страница 2: ...his product should be operated only from the type of power source indicated on the marking label If you are not sure of the type of power supply to your home consult your product dealer or local power...

Страница 3: ...he label required in this regulation is shown Optical pickup Type CMS B35VG6 Manufacturer SAMSUNG ELECTRO MECHANICS CO LTD Laser output Less than 0 5 mW on the objective lens Wavelength 760 800 nm 17...

Страница 4: ...nit 6 Discs 8 Remote Control Unit 12 Connections 14 Names of Each Control 17 CD Playing a CD 22 Playback from a Specific Part 26 Programmed Playback 28 Repeat Playback 32 Shuffle Playback 34 Intro Che...

Страница 5: ...e libros o similares Sommaire 5 Avant Utilisation 7 Disques 9 Bo tier de t l commande 13 Connexions 15 Nomenclature 19 CD Lecture du CD 23 Lecture partir d un point sp cifique 27 Lecture programm e 29...

Страница 6: ...t in damage to the circuitry or electrical shock If a foreign object should get into the unit contact your dealer or service company When removing the power plug from the wall outlet always pull direc...

Страница 7: ...r le disque Ensuite appuyez sur le bouton POWER pour couper la cha ne D branchez le c ble lectrique Si vous d placez cet appareil alors qu il contient un disque vous risquez d endommager cet appareil...

Страница 8: ...rporation and its subsidiaries cannot be responsible for any consequences or guarantee the quality of reproduction If you experience problems with such non standard discs you should contact the produc...

Страница 9: ...disque Si la surface du disque est sale l essuyer soigneusement l aide d un chiffon doux et sec Comment sortir un disque de son emballage Comment tenir le disque Coloque siempre el disco en la bandeja...

Страница 10: ...tored in a location where direct sunlight will fall on them and away from sources of heat such as radiators or heat generating electrical devices Printable CD R discs aren t recommended as the label s...

Страница 11: ...liser de CD ayant une forme irr guli re octogonale en forme de coeur etc ceux ci risquant d endommager l appareil En cas de doute quant la manipulation des CD R lire les instructions fournies avec le...

Страница 12: ...ke sure that the batteries are inserted with their positive and negative _ poles positioned correctly 3 Close the cover Battery Replacement If the distance required between the remote control unit and...

Страница 13: ...gue p riode pluss d un mois retirer les piles du bo tier de t l commande pour viter des fuites de pile Si elles coulent essuyer le liquide dans le compartiment des piles et remplacer les piles par des...

Страница 14: ...ay need to be repositioned if you move your unit to a new location FM Outdoor Antenna In an area where FM signals are weak 75 ohm unbalanced type outdoor FM antenna 3 elements or more is recommended D...

Страница 15: ...ordons RCA Veillez brancher la fiche blanche q la prise blanche L voie gauche la fiche rouge q la prise rouge R voie droite Cordon d alimentation CA Branchez ce cordon d alimentation dans une prise de...

Страница 16: ...A B Q C D F E P J J O I R P S T C N N M L K H G I D F K L O B H M 16 SIDE TOP FRONT REMOTE CONTROL...

Страница 17: ...clock TUNING knob Turn this knob to tune in a station CD operation buttons When TUNER or AUX is selected these buttons won t work STOP button H Use this button to stop playback M L K J I H G F E D C B...

Страница 18: ...A B Q C D F E P J J O I R P S T C N N M L K H G I D F K L O B H M 18 DESSUS C T DEVANT T L COMMANDE...

Страница 19: ...a syntonisation d un poste L K J I H G F E D C B A Touches d op ration du CD Si le TUNER ou le AUX est choisi ces touches ne fonctionnent pas Touche STOP H Utiliser cette touche pour arr ter la lectur...

Страница 20: ...20 A B Q C D F E P J J O I R P S T C N N M L K H G I D F K L O B H M VISTA LATERAL VISTA FRONTAL MANDO A DISTANCIA VISTA SPERIOR...

Страница 21: ...staci n L K J I H G F E D C B A Botones de operaci n de CD Cuando se selecciona TUNER o AUX estos botones no trabajar n Bot n STOP H Utilice este bot n para detener la reproducci n Bot n PLAY PAUSE y...

Страница 22: ...r by hand Never place more than one disc in the CD player When closing press L on the cover The total number of the tracks and total play time of the disc is displayed It takes a few seconds for the u...

Страница 23: ...premi re piste Quand toute les pistes ont jou es l appareil s arr te automatiquement 5 4 3 2 1 Oprima el interruptor POWER para encender la unidad Oprima el bot n CD para seleccionar CD Oprima el bot...

Страница 24: ...mode display Clock display and timer mode display appears for 4 seconds and returns to original display In the stop mode remaining time of the disc cannot be selected C B A To stop playback Press the...

Страница 25: ...co Desplegado de reloj Desplegado de modo de despertador El desplegado de reloj y el desplegado de modo de despertador aparecen durante cuatro segundos y despu s regresan al desplegado original En el...

Страница 26: ...played from the beginning In the stop mode press the SKIP button m or repeatedly until the desired track is found and press the PLAY PAUSE button y J to start playback from the selected track When the...

Страница 27: ...a section de piste d sir e Exemple Pour lire partir du 5 me morceau Pour lire partir du 23 me morceau Para saltar a la siguiente o a una pista Previa Durante la reproducci n oprima el bot n SKIP m o r...

Страница 28: ...se press the SKIP button to select a track number and then press the MEMORY CLOCK ADJUST button while MEMORY is blinking on the display Repeat step to program more tracks You can program up to 20 trac...

Страница 29: ...l bot n AUX TUNER o se desactiva la energ a 3 2 2 1 29 FRAN AIS ESPA OL Lecture programm e 1 Reproducci n programada 1 Jusqu 20 pistes peuvent tre programmer dans l ordre d sir La lecture al atoire ne...

Страница 30: ...unit is disconnected from the power supply for more than 3 minutes the programmed contents will be cleared E To cancel the program playback mode Press the STOP button MEMORY indicator disappears but...

Страница 31: ...temps que le num ro de piste changer est affich Choisir un nouveau num ro de piste en appuyant sur les touches num riques C Para verificar el orden programado En el modo de paro oprima el bot n MEMORY...

Страница 32: ...ng played will be played repeatedly If you press the SKIP SEARCH button or the numeric buttons and select another track the track you select will be played repeatedly It is also possible to select a t...

Страница 33: ...ou es dans l ordre r p t tivement Cada vez que se oprime el bot n REPEAT PRESET el indicador REPEAT se enciende o parpadea y el modo se cambia de la manera siguiente Si se oprime uno de los siguientes...

Страница 34: ...e of the following buttons is pressed or the disc cover is opened shuffle mode will be canceled STOP H POWER AUX TUNER FUNCTION Intro Check The Intro Check function allows only the beginning of each t...

Страница 35: ...de los siguientes botones o se abre la cubierta del disco se cancelar el modo de reproducci n al azar STOP H POWER AUX TUNER FUNCTION Fonction de contr le d introductions Comprobaci n de introducci n...

Страница 36: ...a station is tuned in the tuning process will stop automatically Turn the TUNING knob to stop the auto selection Use the TUNING button when using the remote control unit Selecting stations which cann...

Страница 37: ...tes AM Transmission FM Pour am liorer la r ception orientez l antenne jusqu ce que vous captiez parfaitement les stations d sir es Oprima el interruptor POWER para ENCENDER la unidad Oprima el bot n T...

Страница 38: ...CLOCK ADJUST button If you press the numeric buttons 1 0 of the remote control unit you can store the station directly In this case you don t have to press the MEMORY CLOCK ADJUST button To store more...

Страница 39: ...e vous pouvez choisir une station pr r gl e directement Pour choisir le pr r gl num ro 10 appuyez 0 sur la t l commande En cada banda se pueden almacenar hasta 10 estaciones en memorias preestablecida...

Страница 40: ...dly until the desired time appears on the display The sleep time can be changed at 10 minute intervals Listening to the External Sources You can connect external sources such as VCR deck or TV to the...

Страница 41: ...uede cambiarse en intervalos de 10 minutos apagado 90 80 10 70 Ecoute partir d une source externe C mo escuchar Fuentes externas Il est possible de connecter des appareils externes tels qu une VCR ou...

Страница 42: ...H or 24H If you select 12H AM indicator appears in the morning and PM indicator appears after noon In the TUNER mode use the TUNING knob Press the MEMORY CLOCK ADJUST button Press the mor button to se...

Страница 43: ...e devront tre r gler de nouveau Si l appareil est d branch pour moins de 3 minutes il est possible que l heure affich e est inexacte 8 7 6 5 4 3 2 3 1 En el modo CD o en el modo TUNER oprima el bot n...

Страница 44: ...it Within 4 seconds press and hold the MEMORY CLOCK ADJUST button for 2 or more seconds to change the timer setting mode The TIMER and hour blinks on the display Press the m or button to set the start...

Страница 45: ...K ADJUST Le r glage de l heure est termin et le clignotement du t moin TIMER s arr te 6 5 4 3 2 1 Ajuste el reloj antes de ajustar el despertador Ajuste del despertador Oprima el bot n DISPLAY para ca...

Страница 46: ...he timer won t work The stop time cannot be set When the timer playback has been finished press the POWER switch to turn the unit off If the unit is disconnected from the power supply for more than 3...

Страница 47: ...fonction sommeil est activ e Vous pouvez utiliser cette fonction plusieurs fois B A Activaci n del despertador Oprima y mantenga as el bot n TIMER SLEEP durante 2 m s segundos y oprima el bot n POWER...

Страница 48: ...urface to avoid vibration and shock e If the disc is dirty clean the surface of the disc e Don t use scratched damaged or warped discs Remote Control Unit Remote control doesn t work e If the batterie...

Страница 49: ...disques CD R ne joueront pas e Disques d fense de copie ne joueront pas Le son n est pas stable e Placez l appareil sur un support stable de fa on viter les vibrations et les chocs e Si le disque est...

Страница 50: ...ohibida Saltos en el sonido e Coloque la unidad en un lugar estable para evitar vibraciones y golpes e Si el disco est sucio limpie la superficie del disco e No utilice discos rayados da ados o pandea...

Страница 51: ...p dance 4 ohms L et R G N RALIT Puissance de sortie 3 W 3 W Alimentation 120V CA 60Hz Consommation 25 W Dimension L x H x P 340 x 190 x 238 5 mm Poid net 4 6 kg Accessoires Standard T l commande RC 85...

Страница 52: ...ace Street Mississauga Ontario L4Z 1Z8 Canada Phone 905 890 8008 TEAC MEXICO S A De C V Campesinos N 184 Colonia Granjas Esmeralda Delegacion Iztapalapa CP 09810 M xico DF Phone 525 581 5500 TEAC UK L...

Отзывы: