background image

52

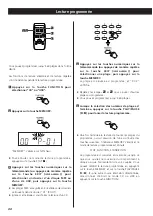
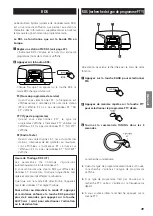
Réglez l’horloge avant de régler la minuterie.

La fonction de minuterie peut être réglée sur heure
ON, heure OFF, source et volume respectivement.

Heure ON

Appuyez sur la touche CLOCK/TIME pour afficher
“ON”.

Appuyez sur la touche TIME SET.

La valeur de l’heure se met à clignoter.

<

Si vous n’appuyez sur aucune touche dans les 8
secondes, le mode de réglage de minuterie est
annulé.

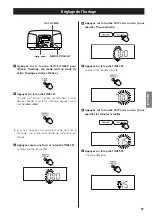
Appuyez sur la touche SKIP (

.

/

/

) pour

régler l’heure, puis appuyez sur la touche TIME
SET.

La valeur des minutes se met à clignoter.

3

2

1

Réglage de la minuterie 1

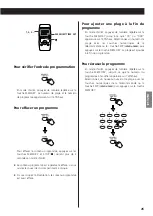
Appuyez sur la touche SKIP (

.

/

/

) pour

régler les minutes, puis appuyez sur la touche
TIMER.

Appuyez sur la touche TIME SET.

L’heure ON est maintenant réglée.

Lorsqu'aucune touche n'est enfoncée pendant 8
secondes, l'heure est alors réglée et l'afficheur revient
au mode normal.

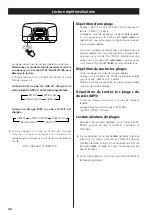
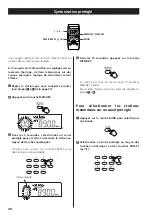
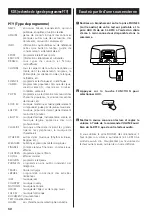
Heure OFF

Appuyez sur la touche CLOCK/TIMER pour
afficher “OFF”.

Appuyez sur la touche TIME SET.

Appuyez sur la touche SKIP (

.

/

/

) pour régler

l’heure, puis appuyez sur la touche TIME SET.

La valeur des minutes se met à clignoter.

3

2

1

5

4

CLOCK/TIMER

MEMORY/TIME SET

Содержание SL-D910

Страница 1: ...ENGLISH FRAN AIS DEUTSCH NEDERLANDS 046 SD910010 R SL D910 CD Clock Radio Z OWNER S MANUAL MANUEL DU PROPRI TAIRE BEDIENUNGSANLEITUNG GEBRUIKSAANWIJZING...

Страница 2: ...rounding type plug has two blades and a third grounding prong The wide blade or the third prong are provided for your safety If the provided plug does not fit into your outlet consult an electrician f...

Страница 3: ...s or splashes Do not place any objects filled with liquids such as vases on the apparatus Do not install this apparatus in a confined space such as a book case or similar unit The apparatus draws nomi...

Страница 4: ...t Also avoid locations subject to vibrations and excessive dust heat cold or moisture Do not place the unit on an amplifier receiver Do not open the cabinet as this might result in damage to the circu...

Страница 5: ...hours with the power turned on The unit will stabilize at the temperature of its surroundings Disposal of your old appliance 1 When this crossed out wheeled bin symbol is attached to a product it mea...

Страница 6: ...rs with this unit will damage the mechanisms and cause them to malfunction Do not use irregular shape CDs octagonal heart shape etc CDs of this sort can damage the unit If you are in any doubt as to t...

Страница 7: ...folders are recorded on the disc the unit might not be able to play it correctly Mono or stereo MPEG 1 Audio Layer 3 format 44 1 or 48 kHz fixed bit rate Audio encoded at 128 Kbps should sound close...

Страница 8: ...er before making connections Read the instructions of each component you intend to use with this unit Be sure to insert each plug securely To prevent hum and noise do not bundle the connection cords C...

Страница 9: ...t the volume level of the SL D910 to a comfortable listening level FM antenna Extend fully and position for the best reception Keep antenna away from metallic objects electrical equipment and cords AC...

Страница 10: ...10 Names of Each Control 1 A B C D F G H E T L L S R Q R P O N M J I K F N S T O D K J H M C TOP FRONT REMOTE CONTROL...

Страница 11: ...s used to display the clock and the timer TIMER ON SLEEP Use this button to set sleep timer When in the standby mode this button is used to turn on or off the timer function Speakers stereo L K J I H...

Страница 12: ...he TUNER mode use this button to select preset stations During playback of a MP3 disc or from a USB memory card use this button to select a folder in the disc or USB memory card V U REAR REMOTE CONTRO...

Страница 13: ...ake sure that the batteries are inserted with their positive and negative _ polarities positioned correctly 3 Close the cover Battery replacement If the distance required between the remote control un...

Страница 14: ...remaining time press the SLEEP button once If you press the SLEEP button twice the sleep timer is set 90 again Press the STANDBY ON switch to turn the unit on 1 Headphones For private listening conne...

Страница 15: ...e total play time of the disc are displayed When no disc is loaded in the CD player NO DISC is displayed When a CD is loaded Press the PLAY PAUSE button y J to start playback 4 Playback starts from th...

Страница 16: ...s found The selected track will be played from the beginning In the stop mode press the SKIP button or repeatedly until the desired track is found Press the PLAY PAUSE button G J to start playback fro...

Страница 17: ...ALBUM scrolling folder name file name scrolling Direct playback While in the stop or playback mode you can use the numeric buttons of the remote control unit to select a track Press the numeric butto...

Страница 18: ...eatedly to select a track then press the MEMORY button The track is programmed and P 02 is displayed Repeat steps and to program more tracks You can program up to 60 tracks When the selection of track...

Страница 19: ...is added to the end of the programme To overwrite the programme In the stop mode press the MEMORY button repeatedly until the programme number to be changed appears on the display Select a new track...

Страница 20: ...t a track to be repeated in the stop mode Press the PLAY MODE button select a track using the SKIP button or and then press the PLAY PAUSE button G J to start playback REPEAT REPEAT ALL REPEAT FOLDER...

Страница 21: ...TUNING knob up or down to change the frequency in small increments Release it when the station you want to listen to is found Use the TUNING button when using the remote control unit FM MODE button Ea...

Страница 22: ...n 10 seconds press the MEMORY button 4 The station is stored and the MEMORY indicator goes off To store more stations repeat steps to 4 1 preset channel Within 5 seconds select a preset channel to sto...

Страница 23: ...ls will be displayed The RT indicator will light on the display If there is no RT data NO TEXT will be displayed 2 1 RDS Clock Time CT The clock setting will be automatically adjusted according to the...

Страница 24: ...ls CLASSICS orchestra including great operas symphony chamber music and so on OTHER M other music styles Rhythm Blues Reggae and so on WEATHER weather reports forecast FINANCE financial reports commer...

Страница 25: ...cancelled Press the TIME SET button again The hour value blinks 3 CLOCK TIMER MEMORY TIME SET Press the TIME SET button 12 HR or 24 HR blinks on the display If you want to change the hour mode press...

Страница 26: ...SKIP button to set the hour and then press the TIME SET button The minutes value blinks 3 2 1 CLOCK TIMER MEMORY TIME SET Press the SKIP button to set the minute and then press the TIMER button Press...

Страница 27: ...essed for 8 seconds the source is set and the display will go back to normal mode When the source is set to CD set a CD When the source is set to USB plug the USB memory card into the USB connector Wh...

Страница 28: ...ton and the unit will turn off for 5 minutes then turn on again You can use this function repeatedly 28 Setting the Timer 2 Specifications TUNER Section Frequency Range FM 87 50 MHz to 108 00 MHz Freq...

Страница 29: ...ut replace a new one e Use remote control unit within the range 5 m and point at the front panel e Clear obstacles between the remote control unit and the unit e If a strong light is near the unit tur...

Страница 30: ...iffon propre et sec Conservez ce manuel d instructions dans un endroit s r pour une r f rence ult rieure NE D PLACEZ PAS CET APPAREIL PENDANT LA LECTURE Pendant la lecture le disque tourne grande vite...

Страница 31: ...umidit Quand l appareil ou un disque est d plac d un endroit froid dans un endroit chaud ou utilis apr s un changement brusque de temp rature il y a risque de condensation d humidit la vapeur dans l a...

Страница 32: ...risquent de provoquer des d g ts irr parables sur la surface en plastique du disque Rangez les disques dans leur tui apr s utilisation afin d viter de les rayer ou que de la poussi re ne se d pose cec...

Страница 33: ...e ISO 9660 Si vous enregistrez plus de 200 fichiers ou r pertoires MP3 sur un disque l appareil risque de ne pas les lire correctement Format audio mono ou st r o MPEG 1 Layer 3 44 1 ou 48 kHz d bit b...

Страница 34: ...es raccordements Lisez les instructions qui accompagnent chaque appareil que vous avez l intention d utiliser en association avec cet appareil ci Assurez vous d ins rer chaque prise jusqu au fond Afin...

Страница 35: ...ez le volume de du SL D910 un niveau d coute appropri Antenne FM D ployez enti rement l antenne et orientez la pour obtenir la meilleure r ception loignez l antenne des objets m talliques des cordons...

Страница 36: ...36 A B C D F G H E T L L S R Q R P O N M J I K F N S T O D K J H M C DESSUS DEVANT T L COMMANDE Nom des commandes respectives 1...

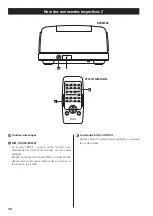
Страница 37: ...is e pour afficher l horloge et la minuterie J I H G F E D C B A TIMER ON SLEEP Utilisez cette touche pour r gler la minuterie d arr t diff r En mode de veille cette touche est utilis e pour activer o...

Страница 38: ...es sur les canaux pr r gl s Pendant la lecture d un disque MP3 ou d une cl USB utilisez cette touche pour s lectionner un dossier sur le disque ou la cl USB V U Nom des commandes respectives 2 Comman...

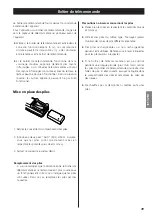
Страница 39: ...AA R03 UM 4 Assurez vous que les piles sont correctement mises en respectant les polarit s plus et moins _ 3 Fermer le couvercle jusqu au d clic Remplacement des piles Si vous remarquez que la distanc...

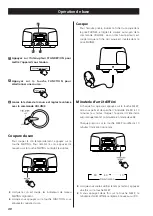
Страница 40: ...son Lorsque vous voulez v rifier le temps restant appuyez une fois sur la touche SLEEP Si vous appuyez deux fois sur la touche SLEEP la minuterie d arr t diff r se r glera nouveau sur 90 90 80 10 D sa...

Страница 41: ...emps total de lecture du disque s affichent Lorsque aucun disque n est charg dans le lecteur CD NO DISC s affiche Lorsqu un CD est charg Appuyez sur la touche PLAY PAUSE y J pour lancer la lecture 4 L...

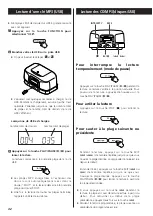
Страница 42: ...e la cl USB s affichent Lorsqu une cl USB est charg e Pour interrompre la lecture temporairement mode de pause Pour arr ter la lecture Appuyez sur la touche STOP H pour arr ter la lecture Pour sauter...

Страница 43: ...UM d filement nom de dossier nom de fichier d filement Acc s direct des plage sp cifiques En mode d arr t ou de lecture les touches num riques sur la t l commande servent s lectionner des plages Appuy...

Страница 44: ...ression de l une ou l autre des touches suivantes l indicateur MEMORY s teint et le mode de lecture programm e est annul STOP FUNCTION STANDBY ON Le programme est conserv en m moire jusqu ce que vous...

Страница 45: ...MEMORY La plage est ajout e la fin du programme Pour craser le programme En mode d arr t appuyez de mani re r p t e sur la touche MEMORY jusqu ce que le num ro du programme modifier apparaisse sur l...

Страница 46: ...yez deux fois sur la touche PLAY MODE REPEAT FOLDER s allume Lecture al atoire de plages Appuyez de mani re r p t e sur la touche PLAY MODE jusqu ce que SHUFFLE s allume sur l afficheur Si vous appuye...

Страница 47: ...vers le haut ou vers le bas pour changer la fr quence par petits incr ments Rel chez la quand vous avez atteint la station d sir e Utilisez la touche TUNING quand vous utilisez la t l commande Chaque...

Страница 48: ...nnez un canal pr r gl pour y mettre en m moire la station au moyen des touches num riques On peut aussi utiliser les touches PRESET pour s lectionner un canal pr r gl 3 canal pr r gl Dans les 10 secon...

Страница 49: ...me sur l afficheur S il n y a pas de donn es RT NO TEXT s affiche 2 1 Heure de l horloge RDS CT Les param tres de l horloge s ajusteront automatiquement selon les donn es CT Si vous syntonisez une sta...

Страница 50: ...des non professionnels CLASSICS musique orchestrale incluant les grands op ras les symphonies la musique de chambre etc OTHER M autres styles musicaux Rhythm Blues Reggae etc WEATHER bulletins et pr v...

Страница 51: ...Appuyez sur la touche TIME SET La valeur des minutes clignote 5 Appuyez sur la touche SKIP ou pour sp cifier les minutes actuelles 6 Appuyez sur la touche TIME SET L horloge d marre 7 Appuyez sur la...

Страница 52: ...appuyez sur la touche TIME SET La valeur des minutes se met clignoter 3 2 1 R glage de la minuterie 1 Appuyez sur la touche SKIP pour r gler les minutes puis appuyez sur la touche TIMER Appuyez sur l...

Страница 53: ...dant 8 secondes la source est alors r gl e et l afficheur revient au mode normal Quand la source est r gl e sur CD mettez un CD en place Lors que la source est r gl e sur USB branchez la cl USB dans l...

Страница 54: ...tteinte appuyez sur la touche SNOOZE et l appareil s teindra pour 5 minutes pour ensuite se remettre en marche Vous pouvez utiliser cette fonction plusieurs fois Section SYNTONISEUR Gamme de fr quence...

Страница 55: ...isez la t l commande dans les limites de sa port e 5 m et pointez la vers le panneau avant e Enlevez tout obstable entre la t l commande et l unit principale e Si une lumi re puissante est proche de l...

Страница 56: ...nnenbestrahlung oder die Einwirkung einer anderen W rmequelle Betriebsorte die Ersch tterungen hohem Staubaufkommen Hitze K lte oder Feuchtigkeit ausgesetzt sind sind ebenfalls zu vermeiden Platzieren...

Страница 57: ...en M beln wie etwa einem B cherschrank oder einem geschlossenen Regalsystem Auch im Bereitschaftsmodus der STANDBY ON Schalter befindet sich in der Stellung Standby bezieht dieses Ger t einen geringen...

Страница 58: ...wie Benzin oder Verd nner da diese Substanzen irreparable Sch den an einer CD anrichten Zur Vermeidung von Kratzern und Staub die den Laser Pickup aus seiner Bahn werfen k nnten sollten CDs nach Gebr...

Страница 59: ...44 1 oder 48 kHz und fester Bitrate werden unterst tzt Die Wiedergabequalit t einer mit 128 Kbps codierten Datei entspricht nahezu Audio CD Qualit t Obwohl der SL D910 MP3 Dateien deren Bitraten niedr...

Страница 60: ...die Bedienungsanleitungen aller Komponenten die Sie am SL D910 betreiben m chten C D A B E F 1 2 3 Anschl sse Achten Sie beim Anschlie en auf korrekten Sitz der jeweiligen Stecker Zur Vermeidung von B...

Страница 61: ...den Ausgangspegel des Mini Players bis Verzerrungen nicht mehr auftreten Regeln Sie die gew nschte Wiedergabelautst rke nun mittels Lautst rkeregler des SL D910 UKW Antenne Ziehen Sie die Antenne auf...

Страница 62: ...62 Bezeichnungen der Bedienelemente 1 A B C D F G H E T L L S R Q R P O N M J I K F N S T O D K J H M C OBEN FRONTANSICHT FERNBEDIENUNG...

Страница 63: ...d des Timers TIMER ON SLEEP Diese Taste wird zum Einstellen der Einschlaffunktion ben tigt Im Standby Betrieb dient diese Taste zum Ein oder Ausschalten der Timer Funktion Lautsprecher Stereo L K J I...

Страница 64: ...rgabe einer MP3 Disc oder USB Speicherkarte dient diese Taste zur Auswahl eines auf der Disc befindlichen Ordners Folder V U BASS CONTROL Drehregler Mittels dieses Drehreglers k nnen Sie die Lautst rk...

Страница 65: ...ch Abdeckung 2 Legen Sie zwei AAA R03 oder UM 4 Batterien unter Beachtung der Polarit ten _ ein 3 Bringen Sie die Abdeckung wieder an Batteriewechsel Sollte es erforderlich werden den Abstand zwischen...

Страница 66: ...gte Abschaltintervall 10 Minuten wie folgt 90 80 10 AUS Bet tigen Sie die FUNCTION Taste zur Auswahl der gew nschten Signalquelle 2 Starten Sie die Wiedergabe der gew hlten Signalquelle und stellen Si...

Страница 67: ...ne Funktion Warten Sie bitte bis Gesamttitelanzahl sowie Gesamtwiedergabedauer der Disc angezeigt werden Sofern sich keine Disc im Laufwerk befindet wird die Meldung NO DISC angezeigt Wenn sich eine A...

Страница 68: ...er Gesamttitelanzahl MP3 INTRO PTY Pause zum kurzzeitigen Unterbrechen der Wiedergabe Aufsuchen eines nachfolgenden oder vorangegangenen Titels Bet tigen Sie w hrend der Wiedergabe die jeweilige SKIP...

Страница 69: ...Normale Anzeige Ordnernummer Dateinummer TITLE ARTIST ALBUM scrollen Ordnername Dateiname scrollen Direktwiedergabe Im Stopp oder Wiedergabe Modus k nnen Sie die Zifferntasten verwenden um einen Tite...

Страница 70: ...ie programmierte Titelfolge aufgenommen und im Display erscheint die Meldung P 02 Wiederholen Sie zur Programmierung weiterer Titel bitte die Bedienschritte und Auf diese Wiese k nnen Sie die Wiederga...

Страница 71: ...lge hinzugef gt berschreiben einer programmierten Titelfolge W hrend sich das Ger t im Stoppmodus befindet bet tigen Sie wiederholt die MEMORY Taste bis die Nummer des Titels den Sie ersetzen m chten...

Страница 72: ...dus ausgew hlt werden Bet tigen Sie hierzu bitte zuerst die PLAY MODE Taste w hlen Sie mittels SKIP Taste oder den gew nschten Titel aus und bet tigen Sie zum Starten der Wiedergabe die PLAY PAUSE Tas...

Страница 73: ...che Tippen Sie den TUNING Drehregler in der jeweiligen Richtung UP oder Down lediglich kurz an so dass sich die Frequenzanzeige in kleinen Schritten ndert Bei Verwendung der Fernbedienung bet tigen Si...

Страница 74: ...bitte die Bedienschritte bis um weitere Empfangsfrequenzen von Sendern in Presets zu speichern 4 1 Bet tigen Sie innerhalb von 10 Sekunden die MEMORY Taste 4 Sender Presets MEMORY TIME SET BAND 1 2 3...

Страница 75: ...Falls der eingestellte Sender RT nicht unterst tzt erscheint die Meldung NO TEXT 2 1 RDS Istzeit CT Die Uhreinstellung wird automatisch entsprechend der CT Daten reguliert Wenn Sie einen RDS Radiosen...

Страница 76: ...Wirtschaftswelt B rsenmeldungen CHILDREN Kinder und Jugendprogramm SOCIAL Soziale Belange RELIGION Programme mit religi sen Inhalten PHONE IN Programme mit telefonischer Zuh rerbeteiligung TRAVEL Rei...

Страница 77: ...bitte die oder Taste 4 Bet tigen Sie die TIME SET Taste Der Minutenwert blinkt 5 Bet tigen Sie zum Einstellen des aktuellen Minutenwertes bitte die oder Taste 6 Bet tigen Sie die TIME SET Taste Die Uh...

Страница 78: ...automatisch abgebrochen Dr cken Sie die SKIP Taste um die Stunden einzustellen und anschlie end die TIMER Taste Der Minutenwert blinkt 3 2 1 CLOCK TIMER MEMORY TIME SET Dr cken Sie die SKIP Taste um d...

Страница 79: ...eingestellt und das Display wechselt wieder zum normalen Betrieb Wenn die Quelle auf CD gestellt ist legen Sie eine CD ein Schlie en Sie die USB Speicherkarte an der USB Buchse an wenn die Audiosignal...

Страница 80: ...n den Standby Betrieb Schlafmodus versetzen bevor er sich erneut automatisch einschaltet Sie k nnen diese Funktion wiederholt verwenden Technische Daten TUNER Teil Frequenzbereich UKW 87 50 MHz bis 10...

Страница 81: ...halter STANDBY ON e Ersetzen Sie verbrauchte Batterien in der Fernbedienung durch neue e Der Funktionsradius der Fernbedienung betr gt ca 5 m Richten Sie das vordere Ende der Fernbedienung auf den Sen...

Страница 82: ...raadplegen Kies de plek waar u het toestel wilt opstellen zorgvuldig uit Plaats het toestel niet in direct zonlicht of dicht bij een warmtebron Vermijd ook plekken die blootstaan aan trillingen en pl...

Страница 83: ...oten meubel zoals bijvoorbeeld een boekenkast of een soortgelijk gesloten opbergsysteem In de standby stand de STANDBY ON schakelaar staat op Standby verbruikt deze component een geringe hoeveelheid n...

Страница 84: ...discs schoon te maken Dergelijke chemicali n zullen het plastic oppervlak van de disc onherstelbaar beschadigen Berg discs direct na het gebruik op in het doosje om beschadiging en vervuiling te voor...

Страница 85: ...op de disc zijn opgenomen worden deze vermoedelijk niet goed afgespeeld Mono of stereo MPEG 1 Layer 3 audio indeling 44 1 of 48 kHz vaste bit rate Geluidsbestanden die op 128 Kbps zijn gecodeerd hebbe...

Страница 86: ...T OP Schakel de netstroom uit voordat u de aansluitingen maakt Zorg ervoor dat alle kabels goed zijn aangesloten Zorg ervoor dat u de pluggen correct in de aansluitingen steekt Bundel de aansluitkabel...

Страница 87: ...uid optimaal klinkt en regel dan de gewenste weergavegeluidssterkte met de volumeknop van de SL D910 FM antenne Trek de antenne volledig uit en draai de antenne tot de beste ontvangstkwaliteit is verk...

Страница 88: ...88 Beschrijving van de bedieningselementen 1 A B C D F G H E T L L S R Q R P O N M J I K F N S T O D K J H M C BOVENKANT VOORKANT AFSTANDSBEDIENING...

Страница 89: ...ON SLEEP Met deze toets kunt u de Sleep Timerfunctie instellen Wanneer het apparaat standby staat kunt u met deze toets de timerfunctie in en uitschakelen K J I H G F E D C B A Luidsprekers stereo ME...

Страница 90: ...cteren Tijdens weergave van een MP3 disc of USB geheugenkaart kunt u met deze toets een op de disc of USB geheugenkaart voorkomende map selecteren V U BASS CONTROL knop Gebruik deze knop om het weerga...

Страница 91: ...Breng het deksel weer aan Vervangen batterijen Wanneer de maximale afstand tussen apparaat en afstandsbediening waarop deze werkt terugloopt zijn de batterijen aan vervanging toe Vervang de batterijen...

Страница 92: ...om de resterende tijd te controleren Als u tweemaal op de SLEEP toets drukt komt de inslaaptimer weer op 90 te staan Druk op de STANDBY ON om het apparaat aan te schakelen 1 Hoofdtelefoon Als u een ho...

Страница 93: ...e aantal tracks en de totale weergavetijd van de disc in het display verschijnen Als geen disc geladen is wordt NO DISC in het display weergegeven Als een CD geladen is Druk op de PLAY PAUSE toets y J...

Страница 94: ...e aantal tracks en het totale aantal mappen van de USB geheugenkaart in het display verschijnen Als een USB geheugenkaart geladen is Weergave tijdelijk onderbreken pauzestand Weergave stoppen Druk op...

Страница 95: ...3 Druk op de MP3 FOLDER toets om naar de volgende op de disc voorkomende map te gaan Directe weergave In de stop stand of tijdens weergave kunt u de nummertoetsen van de afstandsbediening gebruiken om...

Страница 96: ...aarna op de MEMORY toets De geselecteerde track is nu geprogrammmeerd en P 02 verschijnt in het display Herhaal de stappen en om meer tracks te programmeren U kunt op deze manier tot 60 tracks program...

Страница 97: ...programma worden toegevoegd 1 2 3 MEMORY TIME SET Een geprogrammeerde selectie overschrijven Druk in de stop stand herhaald op de MEMORY toets totdat het tracknummer dat u wilt vervangen in het displa...

Страница 98: ...n worden Het is ook mogelijk om een te herhalen track te selecteren terwijl de SL D910 in de stopstand staat Druk op de PLAY MODE toets selecteer een track met de SKIP toets of en druk daarna op de PL...

Страница 99: ...omlaag om de frequentie in kleine stappen te veranderen Laat de knop los als u de zender waar u naar wilt luisteren gevonden hebt Gebruik de TUNING toets als u de afstandsbediening gebruikt FM MODE t...

Страница 100: ...et behulp van de nummertoetsen een preset kanaal om de gewenste zender op te slaan U kan ook de PRESET toetsen om een preset kanaal te selecteren 3 MEMORY TIME SET BAND 1 2 3 MP3 PRESET Druk binnen 10...

Страница 101: ...is verlicht Als er geen RT data beschikbaar is wordt NO TEXT weergegeven 2 1 Kloktijd CT De klok wordt automatisch ingesteld overeenkomstig de CT gegevens Als u op een RDS zender hebt afgestemd die de...

Страница 102: ...Rhythm Blues Reggae enz WEATHER weerberichten vooruitzichten FINANCE financi le berichten commercie handel CHILDREN kinderprogramma s SOCIAL sociale aangelegenheden RELIGION religieuze programma s PH...

Страница 103: ...ets De uur aanduiding knippert 3 CLOCK TIMER MEMORY TIME SET Druk op de TIME SET toets en houd deze toets ingedrukt De indicatie 12 HR of 24 HR knippert in het display Als u de instelling van de uren...

Страница 104: ...de SKIP toets om het uur in te stellen en druk dan op de TIME SET toets De minuten aanduiding knippert 3 2 1 CLOCK TIMER MEMORY TIME SET Druk op de SKIP toets om de minuten in te stellen en druk dan...

Страница 105: ...steld en verschijnen weer de normale display aanduidingen Wanneer voor de geluidsbron CD is gekozen plaatst u een CD Wanneer voor de geluidsbron USB is gekozen steekt u de USB geheugenkaart in de USB...

Страница 106: ...toets Het afspelen zal 5 minuten worden onderbroken daarna begint het afspelen opnieuw U kunt deze functie meerdere keren achter elkaar gebruiken Technische gegevens TUNER gedeelte Frequentiebereik FM...

Страница 107: ...Gebruik de afstandsbediening binnen 5 meter en richt deze op de sensor in het voorpaneel e Verwijder obstakels tussen de afstandsbediening en het apparaat e Als er naast het apparaat een fluoriserend...

Страница 108: ...NC 7733 Telegraph Road Montebello California 90640 Phone 323 726 0303 TEAC CANADA LTD 5939 Wallace Street Mississauga Ontario L4Z 1Z8 Canada Phone 905 890 8008 TEAC MEXICO S A De C V Campesinos N 184...

Отзывы: