background image

7

ENGLISH

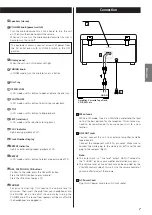
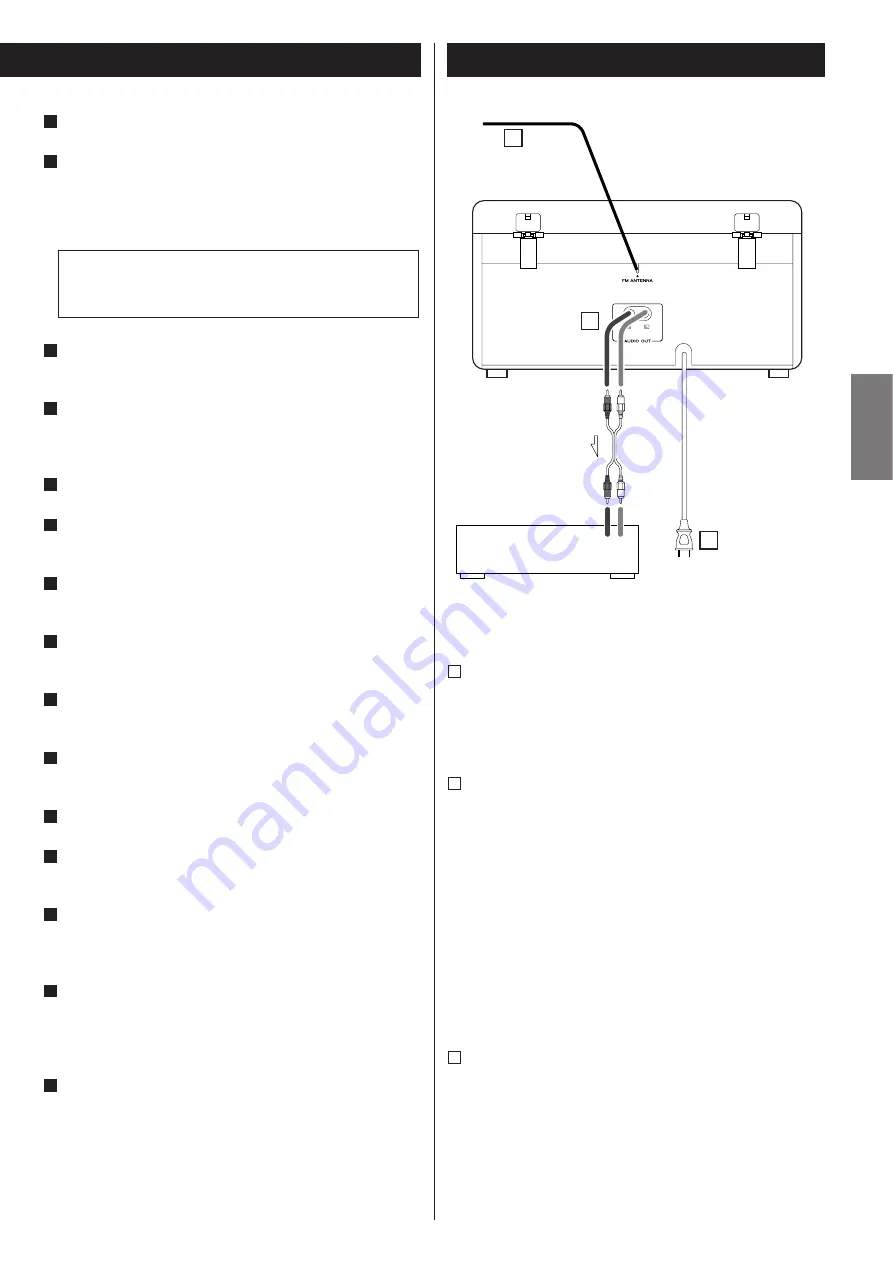
Connection 

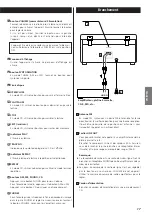
FM antenna

While in FM mode, tune in an FM station and extend the lead
to find the best position for the reception. This antenna may
need to be repositioned if you move your unit to a new
location.

LINE OUT jacks

You can connect this unit to an external amplifier, cassette
tape deck, etc.
Connect the component with RCA pin cords. Make sure to
connect the white plug to the white jacks (Left) and the red
plug to the red jacks (Right).

Note:

<

This output jack is a “line level” output. Do NOT connect to
the “PHONO” jack on your amplifier or distortion may occur.

<

The volume level of line output cannot be adjusted by the
VOLUME control knob of this unit. Use the volume control of
your amplifier to adjust the volume.

AC Power Cord

Plug this AC power cord into an AC wall socket.

c

b

a

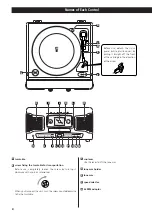
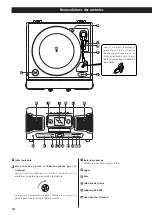
Speakers (stereo)

VOLUME knob (power switch)

Turn the knob clockwise till a click is heard to turn the unit
on. Then turn the knob to adjust the volume.
When not in use, turn the knob counterclockwise till a click is
heard to turn the unit off.

Display panel

When the unit is on, this display will light.

TUNING knob

In TUNER mode, turn this knob to tune in a station.

Disc Tray

OPEN/CLOSE

In CD mode, use this button to open and close the disc tray.

PLAY/PAUSE

In CD mode, use this button to start or pause playback.

STOP

In CD mode, use this button to stop playback.

SKIP (

.

/

/

)

In CD mode, use these buttons to skip tracks.

PLAY indicator

Lights during playback of CD.

Track Number Display

REPEAT indicator

Lights or blinks during repeat playback of CD.

REPEAT

In CD mode, use this button to select a repeat mode of CD.

AM, FM, PHONO, CD buttons

To listen to the radio, press the AM or FM button.
Press the PHONO button to play a record.
Press the CD button to play a CD.

PHONES

For private listening, first reduce the volume level to
minimum. Then insert the plug from your headphones into
the PHONES jack, and adjust the volume by turning the
VOLUME knob. The sound from speakers will be cut off while
the headphones are plugged in.

V

U

T

S

R

Q

P

O

N

M

L

K

J

The equipment draws a nominal amount of power from
the AC outlet even with its POWER switch in the OFF
position.

I

H

Amplifier, Cassette Tape Deck, 
CD-R, MD, etc.

LINE IN

R L

c

b

a

Содержание SL-A200

Страница 1: ...9A10075100 OWNER S MANUAL MANUEL DU PROPRI TAIRE AM FM Stereo Radio CD Player with Turntable Z SL A200 ENGLISH FRAN AIS...

Страница 2: ...Do not expose this apparatus to dripps or splashes Do not place any objects filled with liquids such as vases on the apparatus Do not install this apparatus in a confined space such as a book case or...

Страница 3: ...the best performance from this unit Contents 3 Before Use 4 Handling Records 4 Discs 5 Names of Each Control 6 Connection 7 Listening to a Record 8 Listening to a CD 10 Listening to the Radio 12 How t...

Страница 4: ...a cold to a warm place or used after a sudden temperature change there is a danger of condensation vapor in the air could condense on the internal mechanism making correct operation erratic or impossi...

Страница 5: ...damage the unit Do not stick papers or protective sheets on the discs and do not use any protective coating spray Use a soft oil based felt tipped pen to write the information on the label side Never...

Страница 6: ...dge in the direction of the arrow turntable screw fixing the turntable for transportation Before use completely loosen the screw by turning it clockwise with a coin or screwdriver When you transport t...

Страница 7: ...k is heard to turn the unit off Display panel When the unit is on this display will light TUNING knob In TUNER mode turn this knob to tune in a station Disc Tray OPEN CLOSE In CD mode use this button...

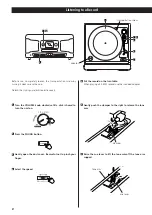
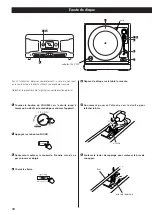
Страница 8: ...the unit on 1 Press the PHONO button 2 Gently open the dust cover Be careful not to pinch your finger Select the speed 4 3 Put the record on the turntable When playing a 45 RPM record use the include...

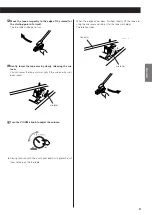
Страница 9: ...ge of the record or the starting point of a track The turntable will begin to turn 8 Gently lower the tone arm by slowly releasing the cue lever You can lower the tone arm manually if the cue lever ha...

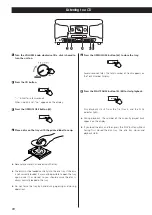
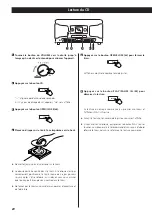
Страница 10: ...s the OPEN CLOSE button L to close the tray 5 Press the PLAY PAUSE button y J to start playback 6 Disc playback starts from the first track and the PLAY indicator lights During playback the number of...

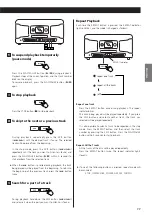
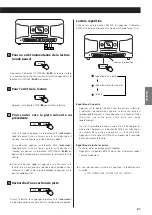
Страница 11: ...ck C Repeat Playback Each time the REPEAT button is pressed the REPEAT indicator lights or blinks and the mode is changed as follows Repeat one track Press the REPEAT button once during playback The r...

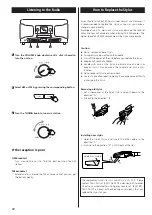
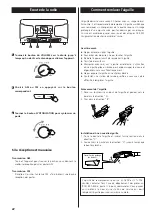
Страница 12: ...the stylus Removing old stylus 1 Set a screwdriver at the tip of stylus and push down to the direction A 2 Pull out to the direction B A B Guide Pins inside Installing new stylus 1 Hold the tip of sty...

Страница 13: ...side to side e Clean the surface of the record disc e Don t use scratched damaged or warped records discs CD Player Cannot play e Turn the VOLUME knob clockwise and press the CD button e Load a disc...

Страница 14: ...ntation de l appareil consultez un lectricien Choisir l emplacement de l appareil soigneusement vitez de l exposer directement aux rayons solaires ou pr s d une source de chaleur vitez aussi des endro...

Страница 15: ...lle de protection sur le disque ne pas utiliser de spray destin d poser sur le disque une couche de protection Utiliser pour crire des informations sur la face portant l tiquette un feutre utilisant u...

Страница 16: ...che table tournante Visse tenant en place la table tournante pour le transport Avant l utilisation d serrer la visse en la tournant vers la droite avec une pi ce de monnaie ou tournevisse Quand vous t...

Страница 17: ...jusqu temps q un d clic est entendu pour teindre l appareil Panneau d affichage Quand l appareil est allum ce panneau d affichage est allum bouton SYNTONISATION En mode TUNER AM ou FM tournez ce bout...

Страница 18: ...oite jusqu temps qu un d clic est entendu pour allumer l appareil 1 Appuyez sur le bouton PHONO 2 5 7 9 6 8 4 2 1 10 visse adapteur 45 RPM Doucement soulever le couvercle Prendre soin de ne pas coince...

Страница 19: ...t d une piste La table tournante commence tourner 8 Doucement abaisser le bras en rel chant doucement le levier de re p rage Vous pouvez abaisser le bras manuellement si le levier de rep rage n a pas...

Страница 20: ...N CLOSE L pour fermer le tiroir 5 Appuyez sur le bouton PLAY PAUSE y J pour d marrer la lecture 6 La lecture du disque commence au premier morceau et l afficheur PLAY s illumine Durant la lecture le n...

Страница 21: ...que le bouton REPEAT est appuy e l indicateur REPEAT s allume ou clignote et le mode est chang tel qu il suit R p tition d une piste Appuyer sur le bouton REPEAT une fois durant la lecture L indicate...

Страница 22: ...s enlever ou plier l aiguille Pour viter des blessures ne pas toucher l aiguille teindre l appareil avant de remplacer l aiguille Tenir loin des enfants Manipuler avec soin car l aiguille est d licate...

Страница 23: ...e Nettoyez la surface du disque e Ne pas utilisez des disques gratig s endommag s ou gondol s Lecteur de dispue compact Ne peut pas lire e Tournez le bouton VOLUME vers la droite et appuyez sur le bo...

Страница 24: ...ne 905 890 8008 TEAC MEXICO S A De C V Campesinos N 184 Colonia Granjas Esmeralda Delegacion Iztapalapa CP 09810 M xico DF Phone 525 581 5500 TEAC UK LIMITED 5 Marlin House Croxley Business Park Watfo...

Отзывы: