background image

IT

ALIANO

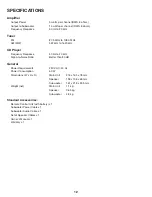
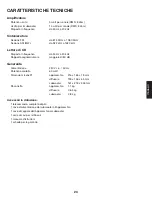
CARATTERISTICHE TECNICHE

Amplificatore

Potenza uscita

5 watt per canale (RMS, 8 ohm)

Uscita per il subwoofer

15 watt per canale (RMS, 8 ohm)

Risposta in frequenza

da 50 Hz a 20 kHz

Sintonizzatore

Sezione FM

da 87,5 MHz a 108,0 MHz

Sezione AM (MW)

da 522 kHz a 1620 kHz

Lettore di CD

Risposta in frequenza

da 50 Hz a 20 kHz

Rapporto segnale/rumore

maggiore di 80 dB

Generalità

Alimentazione

230 V c.a. / 50 Hz

Potenza assorbita

60 watt

Dimensioni (LxAxP)

apparecchio

216 x 165 x 78 mm

diffusore

193 x 156 x 65 mm

subwoofer

161 x 218 x 355 mm

Peso netto

apparecchio

1,1 kg

diffusore

0,65 kg

subwoofer

 4,8 kg

Accessori in dotazione:

1 telecomando, completo di pila

1 cavo d’alimentazione dal subwoofer all’apparecchio

1 cavo di segnale dall’apparecchio al subwoofer

1 serie di cavi per i diffusori

1 manuale d’istruzioni

1 scheda per la garanzia

23

Содержание MC-DX10

Страница 1: ...Z MC DX10 9A09899100 ITALIANO ENGLISH MICRO Hi Fi SYSTEM OWNER S MANUAL MANUALE D ISTRUZIONI ...

Страница 2: ...2 Drive the screws into the wall 3 Hang the main unit speaker using the holes on the back on the protruding screws Make sure that the screws securely connect with the narrow parts of the holes IMPORTANT The wall on which the unit and speakers are to be attached should be capable of supporting 15 kg 33 lb per screw When in doubt consult qualified service personnel Confirm that all screws are fasten...

Страница 3: ...ts can damage the mechanism Don t force compartment open Keep compartment closed when not in use to prevent dirt and dust from settling inside Never place multiple discs into compartment at same time USING THE REMOTE CONTROL To use the remote point it at the REMOTE SENSOR window on unit to control stereo from your listening position NOTE Even if remote control is within effective range operation m...

Страница 4: ...p for a certain radio station in Tuner mode set time for clock in Clock mode 9 PLAY PAUSE button Plays and pauses playing a disc in the CD mode 10 STOP button Stops disc play or clears program setting the total number of tracks and the total playing time will appear on the display panel to indicate that the player in Stop mode 11 OPEN button Opens or closes CD compartment 12 POWER button Switches ...

Страница 5: ...button Selects FM AM mode 9 AUX button Selects AUX input 10 RPT PRESET button Act as a repeat button in CD mode Tunes up the preset station in RADIO mode 11 RDM PRESET button Playing the entire disc in random order in CD mode Tunes down the preset station in RADIO mode 12 TREBLE buttons To adjust the high frequencies 13 BASS buttons To adjust the low frequencies 14 VOLUME buttons To adjust the sou...

Страница 6: ...INSTALLATION CONNECTION 6 ...

Страница 7: ... displayed the clock time Press SET PGM button and the hour digits will flash on the display 2 Press the or buttons to set the hour and then press SET PGM button to confirm and hours stop flashing 3 Minute digits begin to flash Press or buttons to set the minute and then press SET PGM to confrim 4 The time stops flashing and your clock is set Remarks The unit can be displayed 12 hour mode clock Th...

Страница 8: ...dicator will appear on the display Press the button again to resume play 5 Play stops automatically after all tracks on all loaded CDs have been played Display will show the CDís total number of tracks and total play time 6 To stop CD play at anytime press STOP button Note When playing the disc press PGM SET button to show the clock time on the LCD display around 8 sec and turn back to the normal ...

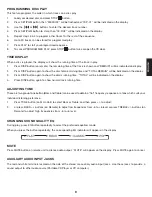
Страница 9: ...on the display 3 Press DISP button again to show the discís running time TOTAL will be indicated on the display 4 Press DISP button again to show normal track running time ADJUSTING TONE These are two group Tone button Bass and Treble can be used to obtain a flat frequency response or a tone which suits your individual listening preference 1 Press TONE button on Main Unit to select Bass or Treble ...

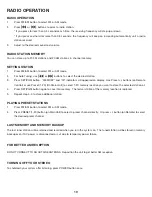
Страница 10: ...ote Control or use Preset 1 20 On Main Unit to select 1 20 memory location you want to store the selected station at 4 Press SET PGM button again to save into memory The former station at the memory location is replaced 5 Repeat step 3 5 to store additional station PLAYING PRESET STATIONS 1 Press FM AM button to select FM or AM mode 2 Press PRESET 1 20 button on Main Unit to select a preset channe...

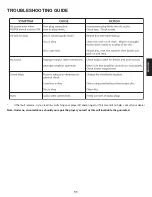
Страница 11: ...DE If the fault remains try to clear it by switching your player off and on again If this also fails to help consult your dealer Note Under no circumstances should you repair the player yourself as this will invalidate the guarantee ...

Страница 12: ...Hz to 20 kHz Signa to Noise Ratio Better than 80 dB General Power Requirements 230 V AC 50 Hz Power Consumption 60 W Dimensions W x H x D Main Unit 216 x 165 x 78 mm Speaker 193 x 156 x 65 mm Subwoofer 161 x 218 x 355 mm Weight net Main Unit 1 1 kg Speaker 0 65 kg Subwoofer 4 8 kg Standard Accessorires Remote Control Unit with battery x 1 Subwoofer Power Cable x 1 Subwoofer Audio Cable x 1 Set of ...

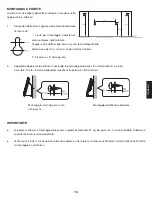
Страница 13: ... 3 Appendere apparecchio e diffusori inserendo la parte sporgente delle viti nei fori praticati sul retro Accertarsi che le viti siano saldamente inserite nella parte più stretta dei fori IMPORTANTE La parete scelta per il montaggio deve essere in grado di sostenere 15 kg per ogni vite In caso di dubbio chiedere la consulenza di un tecnico qualificato Verificare che tutte le viti siano ben salde n...

Страница 14: ...re la parte meccanica dell apparecchio Non forzare l apertura del vano dischi Quando l apparecchio non è in funzione verificare che il vano dischi sia chiuso per evitare che possano penetrarvi polvere e sporcizia Non inserire mai più di un CD alla volta USO DEL TELECOMANDO Per azionare l apparecchio direttamente dalla posizione d ascolto puntare il telecomando verso il sensore REMOTE NOTA Anche qu...

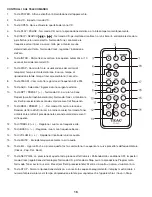
Страница 15: ...iretta Nel modo Tuner analizzano le frequenze verso il basso o verso l alto per sintonizzare una determinata emittente Nel modo Clock permettono di regolare l orologio 9 Tasto PLAY PAUSE Nel modo CD avvia la riproduzione del disco o la interrompe momentaneamente 10 Tasto STOP Ferma la riproduzione del disco o cancella la sequenza programmata il display mostra allora il numero totale dei brani ed i...

Страница 16: ...t ascolto ripetitivo del brani Nel modo Tuner sintonizza le emittenti preselezionate secondo valori crescenti di frequenza 11 Tasto RDM PRESET Nel modo CD avvia la funzione Random lettura di tutti i brani in ordine casuale Nel modo Tuner sintonizza le emittenti preselezionate secondo valori decrescenti di frequenza 12 Tasti TREBLE Regolano i suoni con frequenze alte 13 Tasti BASS Regolano i suoni ...

Страница 17: ...INSTALLAZIONE COLLEGAMENTI 17 ITALIANO ...

Страница 18: ... dell ora Premendo il tasto SET PGM le cifre delle ore cominciano a lampeggiare 2 Premere i tasti o per regolare l indicazione dell ora premere poi SET PGM per confermare le cifre delle ore smettono di lampeggiare 3 Cominciano a lampeggiate le cifre relative ai minuti Premere i tasti o per regolare l indicazione dei minuti premere poi SET PGM per confermare 4 L orologio è così regolato e le cifre ...

Страница 19: ...o quando si desidera riprendere la riproduzione 5 Quando tutti i brani del disco inserito sono stati riprodotti l operazione si ferma automaticamente Il display mostra di nuovo i numero complessivo dei brani ed il tempo totale di riproduzione 6 Per fermare la riproduzione del CD in qualsiasi momento premere il tasto STOP Nota Per vedere l indicazione dell ora mentre si ascolta il disco premere il ...

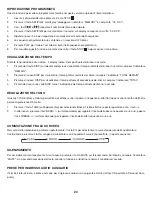
Страница 20: ...sualizzare il tempo attuale di riproduzione del disco compare l indicatore TOTAL 4 Premendo ancora una volta DISP torna l indicazione del tempo attuale del brano in ascolto REGOLAZIONE DEL TONO I due tasti TONE Bass e Treble permettono di ottenere una risposta in frequenza piatta flat oppure una tonalità adatta alle personali preferenze d ascolto 1 Premere il tasto TONE sull apparecchio per selezi...

Страница 21: ...20 nella quale si desidera inserire l emittente 4 Premere ancora il tasto SET PGM per memorizzare l emittente Se la locazione di memoria era già occupata la vecchia emittente verrà sostituita dalla nuova 5 Ripetere i passi 3 5 per memorizzare altre emittenti ASCOLTO DELLE EMITTENTI PRESELEZIONATE 1 Premere il tasto FM AM per scegliere la gamma FM oppure AM 2 Premere il tasto PRESET 1 20 sull appar...

Страница 22: ...nzionamento provare a staccare il cavo d alimentazione dalla presa di rete e poi inserirlo di nuovo Se il difetto permane rivolgersi al proprio rivenditore e chiedere l intervento del Servizio Assistenza Nota Non cercare di riparare l apparecchio personalmente perché verrebbe invalidata la garanzia ...

Страница 23: ... kHz Rapporto segnale rumore maggiore di 80 dB Generalità Alimentazione 230 V c a 50 Hz Potenza assorbita 60 watt Dimensioni LxAxP apparecchio 216 x 165 x 78 mm diffusore 193 x 156 x 65 mm subwoofer 161 x 218 x 355 mm Peso netto apparecchio 1 1 kg diffusore 0 65 kg subwoofer 4 8 kg Accessori in dotazione 1 telecomando completo di pila 1 cavo d alimentazione dal subwoofer all apparecchio 1 cavo di ...

Страница 24: ...ark Watford Hertfordshire WD18 8TE U K Phone 01923 819699 TEAC DEUTSCHLAND GmbH Bahnstrasse 12 65205 Wiesbaden Erbenheim Germany Phone 0611 71580 TEAC FRANCE S A 17 Rue Alexis de Tocqueville CE 005 92182 Antony Cedex France Phone 1 42 37 01 02 TEAC ITALIANA S p A Via C Cantù 11 20092 Cinisello Balsamo Milano Italy Phone 02 66010500 TEAC AUSTRALIA PTY LTD 106 Bay Street Port Melbourne Victoria 3207...

Отзывы: