background image

-  - 

26

TV Function                                                       


Time Setting 

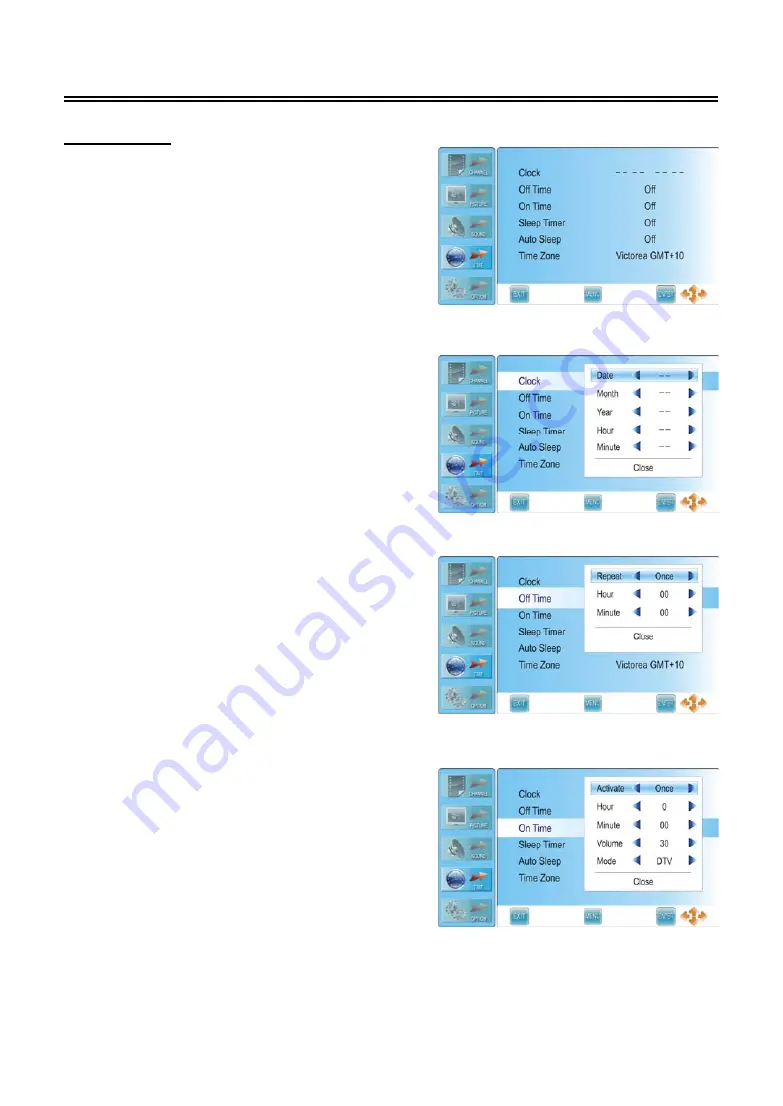
Press the MENU button once to enter 

CHANNEL


setup menu and press the 

▲▼

 button to select 

TIME

, the screen will display as shown.   

Press the ENTER or 

 button to enter the menu. 

In the 

TIME

 setup menu, press the 

▲▼

 button to 

select the desired item. Press the MENU button to 
return to the previous menu. 

Press the EXIT button 

to exit.


Clock  

Press the 

▲▼

 button to select 

Clock 

and press the 

 or ENTER button to prompt a information box, as 

shown: 
Press the 

▲▼

 button to select Date, Month, Year, 

Hour or Minute, press the 

◄►

 button to set.   

Press the ENTER button to confirm after selecting 
Close. 
 

Off Time 

Press the 

▲▼

 button to select 

Off Time 

and press 

the ENTER or 

 button to prompt a information 

box, as shown: 
Press the 

▲▼

 button to select Repeat, Hour or 

Minute, press the 

◄►

 button to set.   

Press the ENTER button to confirm after selecting 
Close. 
 

On Time 

Press the 

▲▼

 button to select 

On Time 

and press 

the ENTER or 

 button to prompt a information 

box, as shown: 
Press the 

▲▼

 button to select Activate, Hour, 

Minute, Volume or Mode, press the 

◄►

 button to 

set. Press the ENTER button to confirm after 
selecting Close. 


Содержание LCDV1955HD

Страница 1: ...USER MANUAL WARRANTY INFORMATION INSIDE PLEASE READ www teac com au IMPORTANT LCDV1955HD LCD TV...

Страница 2: ...ised Service Centre Where in home service is not available the purchaser is required to send the product to the nearest TEAC Authorised Service Centre for repair In this event a copy of this warranty...

Страница 3: ...e any obligation on it in connection with the sale of any equipment other than as stated in this warranty and outlined above 11 In no event will TEAC be responsible or liable for indirect or consequen...

Страница 4: ...Service Centre 3 Please have your purchase receipt as your proof of purchase and the following details completed for a valid Warranty Owner s Name Owner s Address Postcode Model Name No Serial No Dea...

Страница 5: ...AV Signal Source HDMI 14 Connecting to an External AV Signal Source AV Output 14 Connecting to Coaxial Digital Output 15 Connecting to a USB Device for Upgrading 15 Connecting to a PC 16 Connecting to...

Страница 6: ...out authorisation from the manufacturer s or authorised service agent WARNING The apparatus shall not be exposed to dripping or splashing and that no objects filled with liquids such as vases shall be...

Страница 7: ...ly operable 12 Protect the power cord from being walked on or pinched particularly at plugs power sockets and the point where they exit from the apparatus 13 Only use attachments accessories specified...

Страница 8: ...pause playback in DVD mode 5 Disc Tray Slot Insert disc into this slot 6 SD MS MMC Card Port Insert SD MS MMC card into this slot 7 USB Port Connect the USB device 8 INPUT button Press to select enter...

Страница 9: ...uttons Press to decrease or increase the volume On system setup menu the same function as direction buttons 12 POWER button Press to enter or exit standby mode 13 Speaker 14 Remote Sensor 15 Power Ind...

Страница 10: ...t Jack Connect the VGA signal source in VGA mode 6 COMPOSITE S VIDEO Input Jacks Connect Composite S Video signal source in Composite or S Video mode Composite and S Video share L R audio jacks 7 COAX...

Страница 11: ...l Refer to the illustration below and follow the procedures below to remove the DVD module from the unit 1 Loosen the screw on the DVD module 2 Carefully slide the DVD module along the rails and unplu...

Страница 12: ...or CD RW discs created on a computer requires proper formatting and finalization of the disc for audio playback Some computers and or software programs may not be capable of creating compatible discs...

Страница 13: ...STEREO button Press to select sound track in TV mode 9 VOL button Press to increase or decrease the volume 10 MUTE button Press to turn on or off the speaker output 11 INPUT button Press to select ent...

Страница 14: ...eletext mode press once to display the concealed information such as solution of riddles or puzzles press again to remove the riddles answers from the display 22 FAV LIST button Press to display the f...

Страница 15: ...ouble the size of teletext letters in the upper half of the screen second to double the size of teletext letters in the lower half of the screen and third to resume normal status 37 CARD button Press...

Страница 16: ...e is not in use for a long time Using of Remote control Point the remote control unit from no more than about 7 meters from the remote control sensor and within about 60 degrees of the front of the un...

Страница 17: ...ables Connecting to the Power Supply Connect the power supply cord to the wall AC outlet see the figure below Connecting to the Power Adapter Power is also supplied through the appropriate power adapt...

Страница 18: ...e external AV signal source Press INPUT then direction buttons to select COMPOSITE or S Video mode and then press the ENTER button to confirm The L R audio input jacks can be used in both AV and S VID...

Страница 19: ...hen press the ENTER button to confirm HDMI provides both audio and video signals and typically provides superior image quality to component S Video or composite Connecting to an External AV Signal Sou...

Страница 20: ...al digital audio input connectors For TVs with a built in DVD player optional and an amplifier with Dolby Digital decoding function set the digital audio signal output format in DVD setup menu to RAW...

Страница 21: ...output 2 Connect one end of the audio cables to the PC audio input jack on the jack panel of the television and the other end to the PC audio output jack 3 Set the PC video resolution to match that o...

Страница 22: ...press the ENTER button to confirm and conduct program selection Connecting to Earphones Connect earphones headphones to the earphone jack on the rear panel of the unit for listening to the audio outp...

Страница 23: ...s the ST direction button to select the desired video mode After several seconds you can enter the selected mode Or after you selected the desired mode press the ENTER button to enter the selected mod...

Страница 24: ...els The Installation Guide menu shown on the right will be displayed on the screen after you press the INPUT button to select TV mode The Language option is highlighted and the default is English You...

Страница 25: ...y as shown on the right Press the button to select desired country and press the button to highlight Start To cancel auto tuning press the ENTER button after highlight Cancel by pressing the button To...

Страница 26: ...o select desired item and press the button to set or activate Press the red button to save the settings Channel Edit Press the button to select Channel Edit and press the ENTER or button the screen wi...

Страница 27: ...set the channel skipped A symbol is appear on the skipped channel Press the blue button again to cancel press the MENU button to return Note A skipped channel is skipped when using the CH button to b...

Страница 28: ...tton to enter the adjusting bar Press the button to adjust the level Notes This item is only available under NTSC signal mode The items Contrast Brightness Color Sharpness and Tint are only available...

Страница 29: ...or Low Screen This item is only available in VGA mode Press the button to select Screen and press the or ENTER button to enter its sub menu as shown on the right Within this menu press the button to...

Страница 30: ...y available when Sound Mode is set to User Treble Press the button to select Treble and press the button to adjust the level Bass Press the button to select Bass and press the button to adjust the lev...

Страница 31: ...x as shown Press the button to select Date Month Year Hour or Minute press the button to set Press the ENTER button to confirm after selecting Close Off Time Press the button to select Off Time and pr...

Страница 32: ...lect OPTION the screen will display as shown Press the ENTER or button to enter the menu In the OPTION setup menu press the button to select the desired item Press the MENU button to return to the pre...

Страница 33: ...Close Hearing Impaired Press the button to select Hearing Impaired and press the button to select On or Off Country This item is used to shown the current country Restore Factory Default Press the but...

Страница 34: ...e green button to display the Schedule List as shown below Within the SCHEDULE LIST menu press the button to select desired item and press the red button to delete it Press the EXIT button to exit Pre...

Страница 35: ...ono audio signals press the STEREO button on the remote control repeatedly to shift the sound tracks between NICAM Mono and Mono and the screen will show the corresponding display as shown below Under...

Страница 36: ...the disc tray by pressing the EJECT button again You must push the disc until it is drawn into the disc tray automatically Warning Use of poor quality discs could result in damage to the television DV...

Страница 37: ...or chapter quickly by entering the relevant number Some discs do not support the function by inputting the number button but the direction buttons Language Audio There can be up to 8 audio languages...

Страница 38: ...rom the beginning of the next track Fast Playback Press the button on the remote control to activate fast backward or forward playback Repeat Press the Repeat button repeatedly to repeat a single trac...

Страница 39: ...y discs have other contents besides pictures Stop Press the STOP button to preview the pictures behind currently playing picture in the way of small pictures Press the PLAY button to resume normal pla...

Страница 40: ...ce to pause the playback and press it again or press the PLAY button to resume normal playback Previous and Next Press the button to go the previous file press the button to play the next file Fast Pl...

Страница 41: ...MS MMC playback The default state is disc playback Please see the figure below 2 Press the buttons to select the folder Press the ENTER button to enter 3 Press the buttons to select the desired track...

Страница 42: ...e menu use the direction buttons to select the desired item Press the ENTER button to enter the item Press the button to return 1 Press the direction buttons to select TV Display 2 Press the ENTER but...

Страница 43: ...button to enter the setup 3 Use the direction buttons to select On or Off 4 Press the ENTER button again to confirm selection and to return 1 Press the direction buttons to select Last Memory 2 Press...

Страница 44: ...c On the menu Use the direction buttons to select the desired item Press the ENTER button to enter the item Press the button to return 1 Press the direction buttons to select Dual Mono 2 Press the ENT...

Страница 45: ...enu Within this menu press the direction buttons to select desired item Sharpness 1 On the menu press the ENTER button to enter the setup 2 Use the direction buttons to select items 3 Press the ENTER...

Страница 46: ...s the ENTER button again to confirm setting and return 1 Press the direction buttons to select Contrast 2 Press the ENTER button to enter the setup 3 Use the direction buttons to adjust the level 4 Pr...

Страница 47: ...TER button to enter the setup 3 Press the direction buttons to select Subtitle language 4 Press the ENTER button again to confirm setting and return 1 Press the direction buttons to select Disc Menu 2...

Страница 48: ...play a section repeatedly Make sure it is not in repeat status Make sure the disc is not dirty or damaged There is no picture or picture jitters up and down Unsteady Check if the connections with the...

Страница 49: ...RCA Stereo audio input OTHERS DVD Player DVD RW DVD R CD CD R CD RW JPEG DivX 3 11 4 x 5 x 6 x Multi Media USB Card Reader MS SD MMC 3 in 1 Card reader and USB compatible Max Volume up to 2GB VGA 15 P...

Страница 50: ...83 02 47 59 1254 02 47 59 2312 Iwac Repairs Pty Ltd Shop 8 12 Statham Street BENNETTS GREEN 2290 02 49 48 1067 02 49 48 1069 Visual Audio Services 510 Chapple Street PO BOX 76 BROKEN HILL 2880 08 80 8...

Страница 51: ...E 2250 02 43 23 3623 02 43 23 1581 Quickfix Repairs 118 Stafford Street PENRITH 2750 02 47 22 8550 02 47 22 9949 BJRAE Electronics 2 199 Adelaide Street RAYMOND TERRACE 2324 02 49 87 7032 02 49 87 619...

Страница 52: ...City TV Video Shop 3 1 Mellefont Street GLADSTONE 4680 07 49 72 9495 07 49 72 9495 Lloyd Lawrence Electronics Shop 8 9 5 Torquay Road HERVEY BAY 4655 07 41 24 3787 07 41 24 3787 Professional VCR Sale...

Страница 53: ...85 82 4677 08 85 82 5294 E K Dunstan Co 255 Main Street CLARE 5453 08 88 42 2144 08 88 42 3942 Peter s Electronics 25 Lorna Street LOXTON 5333 08 85 84 6920 08 85 84 6920 Gambier Sound Vision Repairs...

Страница 54: ...ol Street GEELONG 3200 03 52 22 1418 03 52 22 1418 RTD Services Pty Ltd 25 29 Fairlie Street GEELONG NORTH 3215 03 52 78 9766 03 52 78 3545 Linke Electrical Repairs 82 Londsdale Street HAMILTON 3300 0...

Страница 55: ...UP 6027 08 93 00 1066 Printek Electronics 1 Lesueur Drive JURIEN BAY 6516 08 96 52 1664 08 96 52 1664 Kalgoorlie Electronics 395 Hannan Street KALGOORLIE 6430 08 90 21 1420 08 90 21 1420 J P Electroni...

Страница 56: ...TEAC CUSTOMER CARE CENTRE TCCC Free call 1800 656 700 Between Monday to Friday EST 9AM to 5PM...

Отзывы: