background image

 Automatic search     
                                                                        

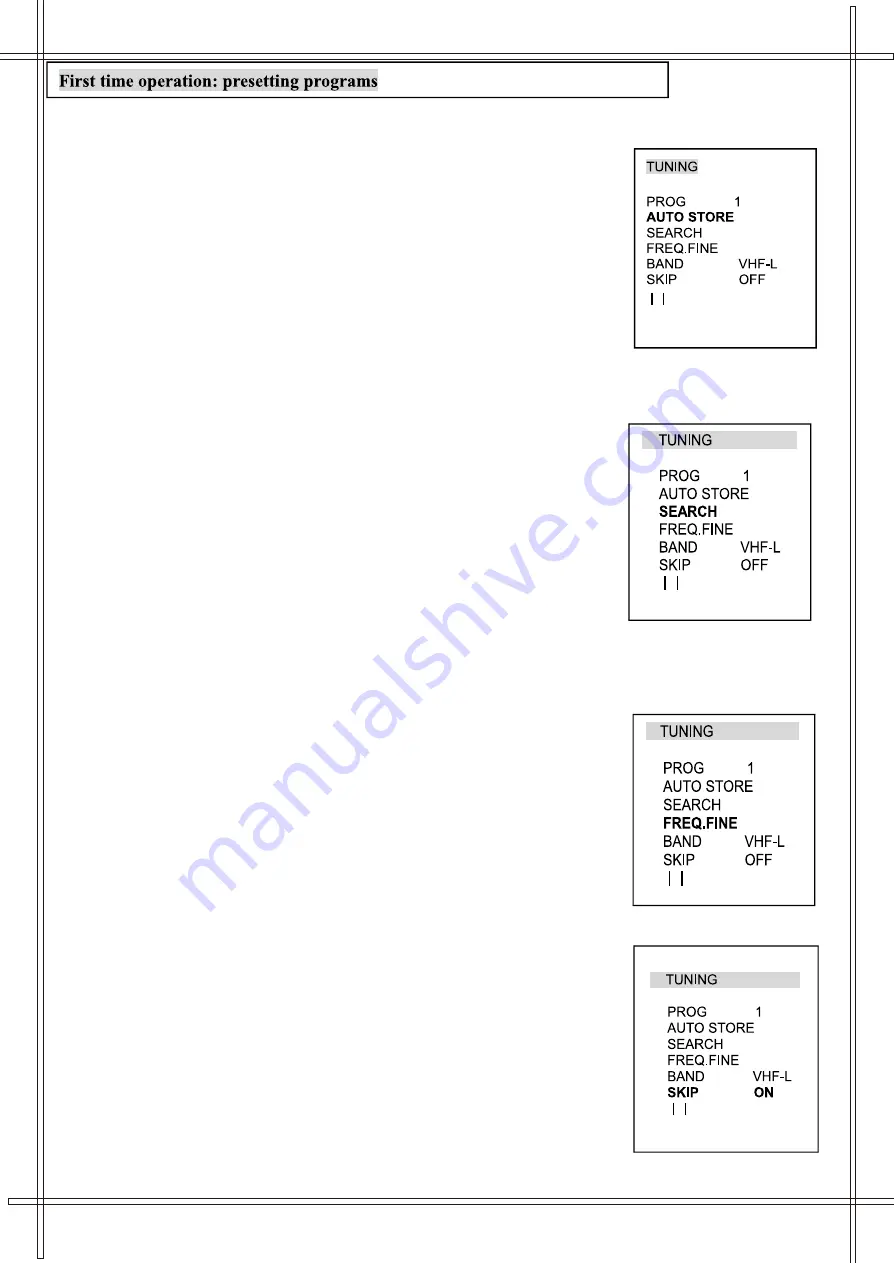
When you turn on the TV set for the first time, you must press the 

MENU


button repeatedly in  the front panel or in the remote controller, until the 
TUNING menu is displayed on the screen: 

Use 

P+

 or 

P-

 buttons to select the AUTO STORE option (it turns from 

white to green). Press 

V+

 button to start  the automatic search. The following 

menu is displayed on the screen and you can press any button to stop searching.

Auto search features:
        During automatic searching, all programs found will be automatically
 stored starting from the current Program Number. 

 If the number of programs found exceeds the maximum number of memory  locations 
the auto search will stop automatically. 
 All vacant program  locations (program numbers with no actual  TV channel stored) 
will be set as SKIP ON.

At the end of automatic search the first Program  found will be displayed.

7

 Manual search                                                                           

The use of manual search is recommended when:


The automatic search function cannot find the desired channel.

 To store TV Channels under particular Program numbers, one by  one.

                                         
Follow these steps to manually find and store television channels.

        1.  Press  

MENU.

  Alternatively press 

MENU

 5 times

2.  Select  the  option PROG using 

P+

 and 

P-

 keys and set the

     program number using 

V+

 and 

V-

.

3.  Highlight SEARCH and press 

V+

 for ascending frequency

     search, or 

V-

 to search for lower frequency TV channels. Repeat

      this step until the desired channel is found.
4.  The TV will store automatically the channel found under the
      selected  program number. 
5.   Press 

MENU

 or wait a few seconds to exit the tuning menu.

 Fine tuning                                                                               

Under poor reception conditions it is sometimes possible to improve the quality of the picture and sound using the fine tuning control. 

Enter the TUNING menu and highlight the FREQ. FINE option. Press 

V+

 or 

V-

 to

 produce small tuning frequency changes up or down from the central position. 
A fine tuning on-screen bar will be visible. Adjust for the best  possible picture 
and sound results. Finally press 

MENU

  to exit the menu and store your last settings

 for the fine tuning function.


 Skip over undesired Program numbers                                                      

After program presetting, you can use this function to skip over the undesired program numbers, 
leaving only those programs that you intend to use. When you change channels using P+ or P- all
 the skipped channels will be ignored.

        1.Press 

MENU.

 Alternatively press 

MENU

 5 times

2.Select the option PROG using 

P+

 and 

P-

 keys. Find the

   program number that you want to skip by using 

V+

 and 

V-

.

3.Highlight SKIP and press 

V+

 or 

V-

 to change the status to ON.

4.The TV will store automatically the new setting.
5.Repeat steps 2 to 4 for all the programs that you want to skip.
   Press  

MENU

 or wait a few seconds to exit the tuning menu.

Skipped programs can still be accessed by using the numeric 
buttons (0 to 227).
Following a similar procedure you can restore skipped program
s by changing the SKIP setting to OFF.


..............

..............

..............

..............

Содержание DV-TV5100

Страница 1: ...DV TV5100 DV TV5100 TV DVD COMBO ...

Страница 2: ...n home service will only be provided as part of this warranty if all the following conditions are met a The product is a Colour Television of 51cm screen size or over b The product is within the warranty period c The product is located within the normal service area of the local TEAC Service Provider In any other situation or circumstance where an in home service call is made a service fee will be...

Страница 3: ...n home service will only be provided as part of this warranty if all the following conditions are met a The product is a Colour Television of 51cm screen size or over b The product is within the warranty period c The product is located within the normal service area of the local TEAC Service Provider In any other situation or circumstance where an in home service call is made a service fee will be...

Страница 4: ...ty Precautions Installation Location of control Name and function of remote control Battery installation Operation of the whole machine Turn ON OFF power supply Watching TV programs Search Basic operations Picture and sound control Time operation Intelligent volume blue background Technical operation swap DVD Player Operation General Setup TV Display Angle Mark OSD Language Closed Captions Screen ...

Страница 5: ...ent fault with electronic elements the TV set should be placed at a ventilated location and dust foreign matter shall be prevented from entering the DVD disk tray Do not place the TV set at locations subject to direct sunshine or close to a heat source otherwise its normal operation may be affected There is high voltage inside the TV set Do not remove the back cover as it may be dangerous to human...

Страница 6: ...es to avoid interfering receiving TV program 7 Never use accessories not recommended by manufacturers as it may cause danger It is better to use original carton and packaging materials when handling the TV set 8 When the DVD function is not used for a long time the parts operation may not be ideal so please use the DVD function occasionally to prevent abnormality 9 To prevent picture quality deter...

Страница 7: ...Reflection on TV screen will cause eye fatigue To enjoy TV programs comfortably use soft indirect lighting The optimum watching distance is 5 7 times the screen height There shall be a clearance of 10cm or over between the TV set and wall for good ventilation The TV set cannot be placed at a location with excessive high temperature or humidity to avoid damage or invalidate components Automatic dem...

Страница 8: ...io digital Out Sockets For DVD only 17 Side AV interface description 1 Side AV AV1 mode signal input in TV mode 2 Rear AV interface AV2 mode signal input and AV signal output in TV mode 3 Optical fiber in DVD mode optical fiber signal digital and AUDIO output 4 Coaxial in DVD mode coaxial signal digital and audio output Note If you want to use the DVD mode and AV input mode of the TV set at the sa...

Страница 9: ...te Button 20 Call Button 21 PP Button 22 Title Button 23 Sub t Button 24 Display Button 25 Pbc Button 26 Vocal Assist Button 27 Go To Button 28 Step Button 29 Set Up Button 30 Menu Button 31 Direction Up Button Direction Down Button Direction Left Button Direction Right Button 32 Enter Play ENTER Button 33 Play Pause Button 34 Music Change Buttons 35 Fast Forward Button 36 TV Menu Button 37 Channe...

Страница 10: ...ce to enter three digit numbers between 100 and 227 The on screen indication will show that the TV is waiting for your input of a 3 digits program number Or use the program Up Down buttons P and P buttons Pressing P will select a program number in an increasing sequence Pressing P will select a program number in a decreasing sequence 2 Adjust the volume using the V and V buttons 3 Set correct colo...

Страница 11: ...equency TV channels Repeat this step until the desired channel is found 4 The TV will store automatically the channel found under the selected program number 5 Press MENU or wait a few seconds to exit the tuning menu Fine tuning Under poor reception conditions it is sometimes possible to improve the quality of the picture and sound using the fine tuning control Enter the TUNING menu and highlight ...

Страница 12: ... once or PICTURE to display the picture menu on the screen 2 Select the item that you want to adjust using P or P That is brightness contrast saturation sharpness or hue 3 Adjust the picture using V or V 4 Press MENU to exit this menu The HUE adjustment is only available for NTSC color system The adjusting range is from 50 to 50 Brightness contrast saturation and sharpness can be adjusted between ...

Страница 13: ...ically switched to Stand By Using the Automatic Volume Level function AVL Use this function to minimize volume differences between different programs 1 In TV mode press MENU button three times or press FEATURE once to enter the FEATURE menu 2 Select the AVL option and change its status to ON Use P P select options and V V Press MENU to store the new value and leave this menu Blue background screen...

Страница 14: ...c search for tuning in programs 1 Press PROG SWAPto display the swap menu on the screen 2 Select PROG1 and enter the number of the program that you want to move That program will be displayed on the screen Use P or P for selection and V or V to change values 3 Select PROG 2 and enter the destination for the program selected in step 2 4 Select SWAP and press V to make the change 5 Press PROG SWAP t...

Страница 15: ...enu until exit the Setup Menu 1 GENERAL SETUP ANGLE MARK This only works when there is an angle mark on the disc Select ON the screen shows the mark when playing DVD ON OFF OSD LANGUAGE ON SCREEN DISPLAY This is used to select the OSD language ENGLISH 11 TV DISPLAY 4 3 PANSCAN This is selected when the DVD player is connected to a normal 4 3 TV Wide screen images are shown on the screen but with s...

Страница 16: ... connectors PCM only This surround sound format is output to a DTS decoder through the optical and coaxial connectors SCREEN SAVER The screen saver image appears when the player stops or the image is frozen for a few minutes This saver can prevent the screen from being damaged ON Start the screen saver OFF Remove the screen saver 2 ANALOG AUDIO SETUP PAGE DOWNMIX LT RT STER 3 DOLBY DIGITAL SETUP D...

Страница 17: ...the image displayed It is ranged from 16 to 16 CONTRAST 4 DYNAMIC This option is used to set the compression ratio in order to control the sound volume contrast 13 DOLBY DIGITAL SETUP DOBLY DUAL MONO DYNAMIC 3 4 FULL 1 4 1 2 OFF SET DRC TO FULL B R I G H T N E S S 0 0 B R I G H T N E S S C O N T R A S T SHARPNESS DOBLY VIDEO SETUP PAGE C O N T R A S T C O N T R A S T 0 0 B R I G H T N E S S SHARPN...

Страница 18: ...n such language If not the original language recorded will be used ENGLISH FRENCH SPANISH CHINESE JAPANESE KOREAN RUSSIAN THAI SUBTITLE If a language listed below is recorded on the disc you can set the subtitle to be displayed in such language If not the original language recorded will be used ENGLISH FRENCH SPANISH CHINESE JAPANESE KOREAN RUSSIAN THAI OFF DISC MENU If a language listed be the di...

Страница 19: ... a disc with parental lock function you may select an age Control grade according to grade of disc and your own preference For example if PG is selected DVD Video disc rated higher than the PG grade cannot be played KID SAF G PG PG 13 P GR R NC 17 ADULT OLD PASSWORD NEW PASSWORD CONFIRM PWD OK DEFAULT User can load the original factory setti and press ENTER 4 ng by choosing RESET PASSWORD User can...

Страница 20: ...m index through the Number keys 0 9 to do the selection 3 Press ENTER 4to confirm the selection E button again to resume Select with Number Button 0 9 During a DVD movie playback by inputting through the Number Buttons you are able to select the Chapter in the current file When playing audio CD Number Key press will command the player to access the track indicated Audio Mode This function is appli...

Страница 21: ...H 01 012 0 02 18 DISPLAY OFF Press the GOTO button Press 0 as the hour input Press 1 and then 5 as the minute input TITLE 01 02 TIME Press 0 and then 8 as the second intput playback starts at 0 15 08 of Title 1 TITLE 01 02 TIME 0 TITLE 01 02 TIME 0 15 TITLE 01 02 TIME 0 15 08 In CD audio user can only access the location in the current track 1 Press the GOTO key to enter the Search Mode there is o...

Страница 22: ...Key The Program Sequence table will be shown on the screen 2 Enter the Title number with the Number keys 0 9 on the remote controller 3 Enter the Chapter number of the Title selected in the last step 4 Repeat step 2 and 3 to input the sequence 5 After assigning the playback sequence move the highlight cursor to the START option By using the Navigation Arrows Press ENTER 4on the remote controller t...

Страница 23: ...Play Mode by pressing the repeat There are five different play modes when playing mp3 disc LEFT RIGHT when playing MP3 disc 1 FOLDER All the files in the current folder will be played once in sequence 2 SINGLE The selected file will be played once in sequence 3 REPEAT The selected file will be repeated 4 REPEAT FOLDER All the files in the current folder will be repeated 5 SHUFFLE The selected file...

Страница 24: ...ave been recorded in the DVD disc Compatible to a sampling rate from 44 1KHz to 96Kz and digital encoding from 16 bits to 24 bits Built in Dolby decoder with 5 1 audio channel output With family head control function so that the played programs are suitable to all types of viewers Supporting various formats of other discs including CD MP3 CD R CD RW etc TIILE A DVD disc can contain a number of tit...

Отзывы: