Teac CD-W512S Скачать руководство пользователя страница 9


Specifications


TEAC CD-RW Installation Guide

9


Specifications


Model

CD-W512S


Interface

SCSI-2 (8 bit data bus)

Transfer Rate

Write: 12X (1.8MBps)
Rewrite: 10X (1.5MBps)
Read: 32X maximum (4.8MBps)

Digital Audio Extraction 
Rate

14X ~ 20X max.

Access Time

85 msec (1/3 Stroke)

Buffer Size

4MB

Write Methods

Track At Once; Disk At Once; Multi-Session; Incremental

Write Verification

Running Optimum Power Control to dynamically adjust 
laser write power

Logical Recording
Format

IS09660, UDF & CDR-FS Packet Write

CD Formats Supported

CD-DA; CD-ROM Mode-1, CD-ROM XA Mode-2 (Form-1 
and 2); Multi-session PhotoCD; CD-ROM XA; CD-R; CD-
RW; CD-I; Video CD; CD Extra/CD Plus, CD Text.

Disc Loading

Power Tray (caddy not required)
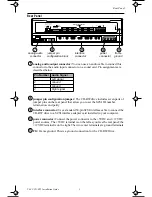
Front Panel

Built-in Headphone Jack, Dual Status LEDs, Volume Con-
trol Knob, and Power Eject Button

MTBF

100,000 POH

Dimensions

5.75”(W) x 1.63”(H) x 7.56”(D)

Weight

2.65 lbs.

Power Supplies

+5VDC, +12VDC

Analog Audio
   Headphone
   Line-Out

0.65 ± 0.3Vrms at 32


0.78 ± 0.3Vrms at 47K


Headphone Jack

3.5mm diameter stereo mini-headphone jack

Installation

Horizontal, plus or minus 10°

Operating Temperature 5° C to 40° C (41° F to 104° F)

Storage Temperature

-30° C to 60° C (-22° F to 140° F)

Operating Humidity

20% to 80% (non-condensing)

Storage Humidity

10% to 80% (non-condensing)

Safety Standards

UL, CSA, TUV


CD-W512Sshort.fm  Page 9  Thursday, December 14, 2000  10:30 AM

Содержание CD-W512S

Страница 1: ...ered tray for convenient disc loading Recommended System Requirements IBM PC compatible computer Pentium 300MHz or higher PCI SCSI host adapter card see Recommended Adapters on page 8 CD ROM drive with DAE support for disc to disc audio recording One available 5 25 inch drive bay 64MB of RAM A hard drive that meets or exceeds the following minimum specifications 1GB hard disk space or more 1 2MB se...

Страница 2: ...e features two LED indicator lights on the front panel Various operations are indicated as per the following table emergency eject mechanism If the eject button fails you can turn off the power to the CD RW drive and insert a small thin rod such as a straightened paper clip into the emergency eject mechanism opening and press firmly to eject the disc eject button Press this button to open or close...

Страница 3: ...a standard 50 pin SCSI interface cable to connect the CD RW drive to a SCSI interface adapter card installed in your computer power connector Connect the power connector to the 5VDC and 12VDC power sources The 5VDC terminal is on the left as you face the rear panel the 12VDC terminal is on the right The two center terminals are ground terminals FG Frame ground This is a ground connection for the C...

Страница 4: ...e rear panel of the unit You set the SCSI ID number for the CD RW drive by placing jumpers in various combinations on jumper pin pairs S0 S1 and S2 S indicates a jumper pin pair number The following table indicates the appropriate pin combinations Close indicates that you should place a jumper on the specified jumper pins Open indicates that you should not place a jumper on the specified pins leav...

Страница 5: ... TEAC factory use only The factory default setting is open Installing the CD RW Drive After you install a SCSI adapter card in your computer and configure the jumper pin block on the CD RW drive follow the steps below to install the TEAC CD RW drive into your computer Refer to your computer documentation for information specific to your system 1 Turn off the power to the computer system and any ex...

Страница 6: ...e so that the tab aligns with the notch in the interface connector Connect the opposite end of the interface ribbon cable to the interface connector on the rear panel of the CD RW drive 6 If desired connect an audio cable to the analog audio connector on the rear panel of the CD RW drive and connect the opposite end to your sound card Connect audio connector pin 1 on the CD RW drive to pin 1 on th...

Страница 7: ...Plug N Play device therefore it will be detected automatically by Windows 95 98 Me 2000 Professional There is no need to install any drivers Windows NT 4 0 does not support the Plug N Play feature Therefore confirm that the proper drivers are installed for your SCSI adapter card If not open the Control Panel double click SCSI Adapters click the Drivers tab then click the Add button At the Select a ...

Страница 8: ...irectCD Version 3 01e or higher A drag drop software application that allows you to read and write to your CD RW as if it were a standard floppy or removable hard drive It also provides the tools necessary to format the media For more information refer to the documentation that accompanies the software Recommended Media Use only 74 or 80 minute blank CD R and CD RW media from TEAC or the following...

Страница 9: ... 1 CD ROM XA Mode 2 Form 1 and 2 Multi session PhotoCD CD ROM XA CD R CD RW CD I Video CD CD Extra CD Plus CD Text Disc Loading Power Tray caddy not required Front Panel Built in Headphone Jack Dual Status LEDs Volume Con trol Knob and Power Eject Button MTBF 100 000 POH Dimensions 5 75 W x 1 63 H x 7 56 D Weight 2 65 lbs Power Supplies 5VDC 12VDC Analog Audio Headphone Line Out 0 65 0 3Vrms at 32...

Страница 10: ...EAC CD RW Installation Guide 10 Technical Support TEAC America Inc USA Technical Support Telephone 323 727 4860 Fax 323 869 8751 Monday Friday 8 00 a m 5 00 pm http www teac com dsp new dsp html E mail dspdtsg teac com ...

Отзывы: