background image

System 3 Installation Guide 


33 


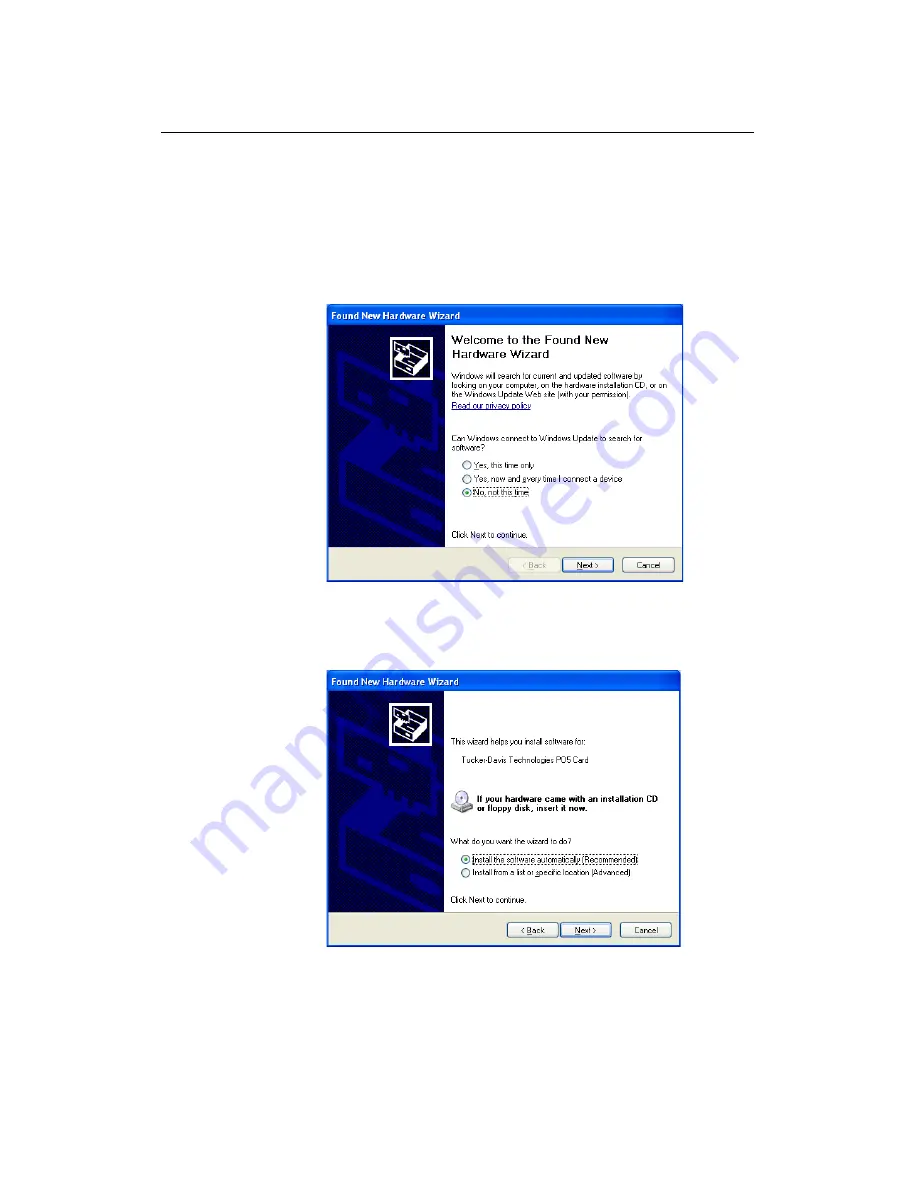
Otherwise, Windows® will prompt you to 

install the device.   


a.


On the first page of the 

Found New Hardware Wizard

select 

No, not at this time

 and click 

Next


b.


On the next page select 

Install the software 

automatically (Recommended)

 option and click 

Next


The wizard searches for the device drivers. 


Содержание System 3

Страница 1: ...System 3 Installation Guide Updated 10 19 2016...

Страница 2: ...TDT All rights reserved No part of this manual may be reproduced or transmitted in any form or by any means electronic or mechanical for any purpose without the express written permission of TDT Licen...

Страница 3: ...are and software Communicating with the TDT hardware and transferring data across a fiber optic interface Displaying and working with data during and after acquisition The System 3 platform includes s...

Страница 4: ...4 System 3 Installation Guide...

Страница 5: ...below illustrates the steps you ll take during set up Unpack Your System Processor s To Power Fiber Optic Connection Computer Workstation To Power To Monitor s To Keyboard To Mouse Test Your System 1...

Страница 6: ...s and other items such as stimulators preamplifiers and headstages The image above shows the most common elements found in a TDT system WS Computer Workstation with Keyboard and Mouse USB Extension an...

Страница 7: ...face card or communications loop with the computer Less commonly some other programmable devices like the PA5 Attenuator and RA8GA amplifier must also be mounted in a ZB1 chassis that houses an interf...

Страница 8: ...he high performance video card MUST be used for your monitor and the secondary DVI connection 4b below is recommended for an additional monitor Two DVI cables are provided Optionally one or two monito...

Страница 9: ...ptical Port Power on the WS The power supply is auto switching for 110 V or 220 V A soft on off button is provided on the front panel and a hard power cutoff switch is provided on the back panel 1 Use...

Страница 10: ...g system When Windows launches you can set up user accounts and customize your desktop as you would with any computer Your TDT software has already been installed and is available from the start menu...

Страница 11: ...tibit interface is located on the back panel The zBus chassis FO5 Optibit interface module is mounted in a rear bay Use the provided fiber optic cables to make the connections described in the step by...

Страница 12: ...d a Match the strand with a red collar to the Out port connector adjacent to the Red dot b Line up the raised key on the boot with the keyway notch on the interface port connector c Grasp the strand b...

Страница 13: ...processor s back panel Connecting Multiple Devices Multiple processors or other interface dependent devices mounted in a zBus chassis can be connected to the WS s Optibit interface The most common con...

Страница 14: ...t b Line up the raised key on the boot with the keyway notch on the interface connector c Grasp the strand by the boot and push the end firmly into the port You will hear a click when the strand is co...

Страница 15: ...fter you complete the installation guide Connection information for these devices may be found in two places the corresponding section of the System 3 Manual or the corresponding Fast Facts sheets pro...

Страница 16: ...System 3 devices do not need to be powered on in any particular order The RZ devices have a blue indicator light to show that the device is powered on The zBus chassis power switch has a green indica...

Страница 17: ...the RP2 1 RX6 RZ2 and PA5 connected to the PC The hardware diagram will not show most non programmable devices such as the HB7 or SM5 however non programmable devices that require a connection to the...

Страница 18: ...connected hardware Test A Transfer Test can be used to test data transfer both to and from the PC To perform a transfer test 1 Ensure the Show Statistics check box is selected 2 Click the Transfer Te...

Страница 19: ...elected The basic steps you ll take to set up your system 1 Unpack your equipment and identify your system interface components and connection cables 2 Install TDT Drivers on your computer 3 Install t...

Страница 20: ...Bus device chassis shown below with no modules installed The device chassis includes a bus system that distributes communication and power throughout the system One or two modular devices can be mount...

Страница 21: ...etting up your system we recommend starting with just the processors You can connect additional devices such as preamplifiers after the processors and interfaces are set up For more information about...

Страница 22: ...x1 but may be used in any PCIe slot size x1 x2 x4 x8 or x16 Back of Computer PCI express The LO5 ExpressCard interface requires a 34mm 26 pin ExpressCard slot in your laptop or computer ExpressCard N...

Страница 23: ...rive The TDT CD will start automatically 2 Click TDTDrivers in the software list then click the Install button to run the TDT Driver and RPvdsEx installation If you are prompted to answer a security q...

Страница 24: ...ollowing setup types System 3 with Optibit interface as default Choose this if your system uses an Optical interface PO5 PO5e or LO5 ExpressCard interface System 3 with USB interface Choose this optio...

Страница 25: ...System 3 Installation Guide 25 7 Click Install If you are asked would you like to install the device sotware click Install 8 Click OK...

Страница 26: ...e driver installation select the Yes option and click Finish After the TDT Drivers have been installed the system interface and hardware should be setup and tested After you have installed your hardwa...

Страница 27: ...nterface less common The steps to install connect power on and test your system will differ depending on how the system interfaces to your computer or laptop From here you can go directly to the secti...

Страница 28: ...28 System 3 Installation Guide...

Страница 29: ...sibly one or more 30 cm cables to connect multiple TDT chassis Before connecting the rest of your system you must install the interface card in your computer Install the PCI card in the computer PO5 P...

Страница 30: ...tandard cards maintain the same electrical protocols PC signals and software the low profile bracket is not compatible with standard cards 4 If you are upgrading from the Gigabit interface PI5 FI5 you...

Страница 31: ...PO5 PO5e card is not detected automatically you can scan for new hardware in the Device Manager or contact TDT support for assistance Now you can connect the Optibit interface to the ZBus connection o...

Страница 32: ...TDT chassis an LO5 ExpressCard adapter and a power cable 1 Connect the power cable to the LO5 2 Plug the power cable into a surge strip or battery backup 3 Power on the LO5 Important the LO5 interface...

Страница 33: ...you to install the device a On the first page of the Found New Hardware Wizard select No not at this time and click Next b On the next page select Install the software automatically Recommended optio...

Страница 34: ...Click Finish on the final page of the wizard The driver installation is complete Now you can connect the LO5 interface to the FO5 modules in the zBus device chassis See Assembling the zBus Chassis wi...

Страница 35: ...c protective plugs from the ends of the cables first The fiber optic cables have raised keys on one side of the connector There are also keyway notches on the inside of the connectors on the RZ or FO5...

Страница 36: ...O5e is marked with a red dot labeled OUT The LO5 has the text RED 2 Connect the other end of this cable blue to the input on the Optibit interface labeled IN 3 Connect the red end of the second 5 mete...

Страница 37: ...tibit interface labeled IN 3 Connect the red end of a 30 cm cable to the output of the first Optibit interface labeled OUT 4 Connect the other end of the first 30 cm cable blue to the input on the sec...

Страница 38: ...cular order The RZ devices have a blue indicator light to show that the device is powered on The RZ2 LCD screen will display interface connection information however other RZ devices do not display th...

Страница 39: ...interface When all devices are connected correctly open the zBUSmon program To run zBUSmon Click the Start button on the Windows taskbar point to Programs point to TDT Sys3 and click zBUSmon Alternat...

Страница 40: ...your devices were preprogrammed with the correct microcode The device name of any device programmed with outdated microcode will appear in red in the diagram The microcode running on each processor sh...

Страница 41: ...transfer test 1 Ensure the Show Statistics check box is selected 2 Click the Transfer Test button in zBUSmon If successful you should see a test passed message The amount of data transferred to and f...

Страница 42: ...pgrading to an Optibit interface if a system requires more than three chassis Note The UZ2 is designed for USB 2 0 ports Some systems might use the UZ1 and UB4 interfaces designed for USB 1 1 ports Co...

Страница 43: ...the Sync Out of the master clock to the Sync In of the slave with a short patch cable To connect several device chassis daisy chain the connections between the slave chassis When the Sync lines are co...

Страница 44: ...Windows to install the driver both times Once powered the green indicator light on the power switch of the zBus chassis will flash regularly 1 Hz until communication is initiated by TDT software such...

Страница 45: ...onsistent in software The number of the zBus chassis displayed to the right of the chassis in the diagram reflects the order in which the USB devices were powered on The microcode version of all real...

Страница 46: ...0 interfaces clicking the Hardware Reset button in zBUSmon will change the version numbers to 6543 and a transfer test will fail After using the Hardware Reset button wait 20 seconds then close and re...

Страница 47: ...System 3 Installation Guide 47...

Страница 48: ......

Страница 49: ...documents and PDF versions of all manuals are always available on the TDT website at http www tdt com user manuals html This page includes links to all application software such as OpenEx and BioSigRZ...

Страница 50: ...programmable devices that may have been purchased prior to your new system New versions of the files needed to update the microcode are always included in the TDT Drivers installation How is the micro...

Отзывы: