background image

1.

When the power cord or plug is damaged or frayed, unplug this television set from the wall outlet and refer servicing to
qualified service personnel.

2.

Do not overload wall outlets and extension cords as this can result in fire or electric shock.

3.

Do not allow anything to rest on or roll over the power cord, and do not place the TV where power cord is subject to
traffic or abuse. This may result in a shock or fire hazard.

4.

Do not attempt to service this television set yourself as opening or removing covers may expose you to dangerous
voltage or other hazards. Refer all servicing to qualified service personnel.

5.

Never push objects of any kind into this television set through cabinet slots as they may touch dangerous voltage
points or short out parts that could result in a fire or electric shock. Never spill liquid of any kind on the television set.

6.

If the television set has been dropped or the cabinet has been damaged, unplug this television set from the wall outlet
and refer servicing to qualified service personnel.

7.

If liquid has been spilled into the television set, unplug this television set from the wall outlet and refer servicing to
qualified service personnel.

8.

Do not subject your television set to impact of any kind. Be particularly careful not to damage the picture tube surface.

9.

Unplug this television set from the wall outlet before cleaning. Do not use liquid cleaners or aerosol cleaners. Use a
damp cloth for cleaning.

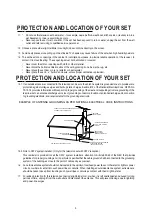
10.1. Do not place this television set on an unstable cart, stand, or table. The television set may fall, causing serious injury

to a child or an adult, and serious damage to the appliance. Use only with a cart or stand recommended by the
manufacturer, or sold with the television set. Wall or shelf mounting should follow the manufacturer s instructions, and
should use a mounting kit approved by the manufacturer.

10.2. An appliance and cart combination should be moved with care. Quick stops, excessive force, and uneven surfaces

may cause the appliance and cart combination to overturn.

CAUTION:

Read all of these instructions.

Sa ve these instructions

for later use . Follo w all W arnings and

Instructions

marked on the audio equipment.

1. Read Instructions-All the safety and operating instructionsshouldbe read before the productis operated.

2. Retain Instructions- The safety and operating instructions should be retained for future reference.

3. Heed Warnings- All warnings on the product and in the operating instructions should be adhered to.

4. Follow Instructions- All operating and use instructions should be followed.

3

SCHNEIDER ELECTRONICS GMBH-GERMANY

IMPORTANT SAFETY INSTRUCTIONS

FOR YOUR PERSONAL SAFETY

3

Содержание MS82B Series

Страница 1: ...ocedure 7 4 Block diagram 1 5 Scheme Diagram 5 Troubleshooting 26 6 PCB Layout 3 SORGH GUDZLQJ 2 8 BOM 33 This m anual i s t he l atest at t he t ime of pr inting and doe s not include the modification which may be made after the printing by the constant improvement of product ...

Страница 2: ...lectric shock to the person The exclamation point within an equilateral triangle is intended to alert the user to the presence of important operating and maintenance servicing instructions in the literature accompanying the appliance CAUTION Use of controls adjustments or procedures other than those specified herein may result in hazardous radiation exposure CA U T ION RISK RISK OF ELECTRI ELECTRI...

Страница 3: ...o impact of any kind Be particularly careful not to damage the picture tube surface 9 Unplug this television set from the wall outlet before cleaning Do not use liquid cleaners or aerosol cleaners Use a damp cloth for cleaning 10 1 Do not place this television set on an unstable cart stand or table The television set may fall causing serious injury to a child or an adult and serious damage to the ...

Страница 4: ...ing conductors location of antenna discharge unit connection to grounding electrode and requirements for the grounding electrode 15 2 Note to CATV system installer Only for the television set with CATV reception This reminder is provided to call the CATV system attention to Article 820 40 of the NEC that provides guidelines for proper grounding and in particular specifies that the cable ground sha...

Страница 5: ...edurein youroperatinginstructions do not attempt any further adjustment Unplug the set and call your dealer or service technician 22 Whenever the television set is damaged or fails or a distinct change in performance indicates a need for service unplug the set and have it checked by a professional service technician 23 It is normal for some TV sets to make occasional snapping or popping sounds par...

Страница 6: ...stem PAL NTSC Speakers Integrated speakers Bottom side Channels 199 Audio Power Output 5W 5W Chassis MS82D AP Sound Effect Stereo Music Movie News Personal Certification CB NICAM Power Supply AC 110V 240V 50 60Hz Power Consumption TV on 50W Power Consumption Standby 0 5W Default Color of Front Cabinet Black Keyboard Position Back Base Stand Detachable Yes Function Unpackaged Dimension for Main Bod...

Страница 7: ...第 1 页共 11 页 OEM 事业部 OEM 设计中心 Alignment Procedure MODEL MS82B C D E Series VERSION V1 0 PREPARED BY Xiongzp DATE 2012 06 12 APPROVED BY DATE 文件编号 CRT SJ FK02 2010 序号 ...

Страница 8: ...ce adjustments 2 Factory Menu 1 Methods of Entering Method 1 Using the remote enter the Picture submenu in the OSD choosing the contrast item and press the 9 7 3 and 5 in series Factory Menu will appear in the left top of screen Method 2 Press RETURN button when FACTORY HOTKEY is enabled ON 2 General introduction FACTORY MENU ITEMS Default Setting Description Status 1 FAC HOTKEY OFF Factory hotkey...

Страница 9: ...utton to select the factory and then press OK to confirm OK 8 POWER ON LAST ON Always turns on TV when AC power on STB Always goes to standby mode when AC power on LAST Restore the status before the last AC power off OK 9 USB UPDATE USB update refer as follow OK 10 ReloadEFBItem This item only factory used Note Below the factory menu some model information are showed including software version Pro...

Страница 10: ... GAIN OK B GAIN 128 B GAIN OK R OFFSET 128 R OFFSET OK G OFFSET 128 G OFFSET OK B OFFSET 128 B OFFSET OK WB INIT DO ONLY FOR TCL R D OK The first step is to adjust HDMI 3 Design Menu 1 Methods of Entering Method 1 Using the remote enter the Picture submenu in the OSD choosing the contrast item and press the 1 9 5 and 0 in series Design Menu will appear in the left top of screen Method 2 Press RETU...

Страница 11: ...Volume 30 0 100 adjustable OK PIC MODE STANDARD STANDARD BRIGHT SOFT PERSONAL OK SOUND MODE STEREO STEREO MUSIC MOVIE NEWS OK Channel 199 0 199 adjustable OK Language English Up to 7 languages optional OK COLOR SYS AUTO AUTO PAL NTSC SECAM OK SOUND SYS DK DK BG I M OK PRESET CH 1 0 199 adjustable OK COLOR TEMP NORMAL NORMAL WARM COOL OK Other ITEMS Default Setting Description Status VIF1 VIF adjus...

Страница 12: ...urve Hue curve Exclusively used by R D OK Sharpness Curve Sharpness curve Exclusively used by R D OK Volume Curve Volume curve Exclusively used by R D OK BackLight Curve BackLight curve Exclusively used by R D OK OverScan Exclusively used by R D 4 Service Menu 1 Methods of Entering Using the remote enter the Picture submenu in the OSD choosing the contrast item and press the 9 7 0 and 5 in series ...

Страница 13: ... music OK POWER LOGO OFF TCL Power on panel display logo OK SAANDBY LOGO ON OFF NO USE OK LOGO_LIGHT ON OFF LOGO BACKLIGHT Some model used OK TCL SHOW ON OFF default OK ERROR CODE OK Erase HDCP Key Do Only for R D OK Reset HDCP Key Do Only for R D OK UsbHdcpkey Update Do Only for R D OK USBPortNumset 1 default OK 5 Debugging 5 1 General Steps of debugging According to the requirement of the order ...

Страница 14: ...nder normal temperature calibrate ADC and adjust white balance 9 Choose Factory Menu SHOP and press the button of remote to initialize the set Note After step 9 Hotel Menu will be disabled by default Therefore if the order requires hotel function it is necessary to enable hotel function by set Design MENU Service Menu HOTEL ENABLE to ON 5 2 Equipments Color Analyzer CA 210 Video Pattern Generator ...

Страница 15: ...y 5 4 White Balance adjustments Manual Before adjustment you must make sure the ADC status only PC and YPbPr is success and Color Analyzer has been calibrated Only AV1 YPbPr PC HDMI1 need to be adjusted HDMI1 should be the first 5 4 1 Signal and generator The pattern of the signal should be used are White Chroma2329 pattern 113 and Grey pattern 114 The format of signal are respectively 720P for HD...

Страница 16: ...d YPbPr and repeat step 1 6 to do the WB adjustment Note For some small size LED panel the color coordination of specifications is not X 0 280 Y 0 290 and we recommend you adopt the values from panel specifications 5 5 ADC Calibration and White Balance Adjustment automatic The process of adjusting ADC and White Balance automatically is out of the range of this file Please refer to the relevant tec...

Страница 17: ...he Menu button of remote control then select Contrast item of Picture submenu press 1 9 5 0 consecutively there you go the Design Menu 2 Select the SERVICE MENU item press OK and RIGHT button of the remote to enter submenu 3 Select the PROJECT ID item press OK or RIGHT button of the remote to enter the submenu 4 Press the right or left button of the remote to select the ID you want 5 After ID sele...

Страница 18: ... Y Pb Pr VGA HDMI1 USBX2 可选 HDMI2 select U501 HDMI S W I T C H select USB SWITCH USBX1 IR KEY POWER ON BACKLIGHT ON BACKLIGHT DIM BACKLIGHT POWER BOARD TO PANEL LVDS SIGNAL U600 MSH9010 SPEAKER P702 MS182VG U102 P702 P701 P501 P502 P503 P200 P203 P800 P202 MS82D 信号流程图 ...

Страница 19: ...6 755 33312403 5TH FLOOR TCL BUILDING SOUTH NANHAI ROAD A DATE DATE DATE MODEL DESCRIPITION DRAWN CHECK APPR 7 7 6 6 D D C C B B THIS DRAWING CANNOT BE COMMUNICATED TO UNAUTHORIZED PERSONS COPIEDUNLESS PERMITTED IN WRITING FORMAT DIN A4 TCL NOTE PAGE OF 5 4 3 2 1 5 4 3 2 1 A MS82D POWE NO 24V 01 0MS82D MA1 ...

Страница 20: ...R713 R712 100R HS HD1_PR1 HD1_PB1 F713 VGA SCL VGA_RIN GND R769 75R C738 0 1U R771 68K R772 1K HD1_RIN HD1_LIN F712 HD1_Y R702 33R BIN C160 0 047U C704 10U C164 0 047U GIN VGA SDA 1 2 P703 HD1_RIN HD1_LIN GND11 VCOM VCOM AV1 AV1 VS SOGIN2 SOGIN0 SOGIN0 RIN GIN GIN BIN GIN GIN2P RIN2 BIN2 GIN2P SOGIN2 GIN2P HD R VGA VS HD L HD R 2U2 C183 HD L R701 33R R703 33R R704 33R RIN C167 0 047U GIN2P BIN2 RI...

Страница 21: ...60 15 22 54 14 26 19 31 32 33 34 35 36 42 41 53 3 2 5 4 8 7 12 11 10 9 61 62 16 28 25 27 18 56 29 59 63 30 U501 PS331 R510 47K 47K R511 SAR3 HDMI_3V3 RXC R528 33R 33R R527 H1_SDA RXC H1_RX0 _IN H1_RX1 _IN H1_RX1 _IN H1_RX2 _IN H1_RX2 _IN CEC H1_ARC H2_RXC _IN H2_RX0 _IN H2_RX1 _IN H2_RX1 _IN H2_RX2 _IN H2_RX2 _IN R530 2R2 C505 22P 2R2 R531 R537 0R H1_ARC_OUT C517 22P R545 2R2 22P C507 8 6 3 1 2 7 ...

Страница 22: ... M2 M1 L2 L1 K2 K1 K3 J1 J2 J3 H2 F4 F3 E2 E3 E4 D1 B1 C3 B3 B2 A3 D4 B4 B5 A5 C4 C5 A6 B6 C6 B7 C7 D5 R3 T4 P10 R10 P11 R11 T11 P12 T12 R12 P13 R13 P14 R14 T14 T15 R15 R16 L16 K14 K16 L15 F14 F16 L14 H15 E16 J14 H14 E15 T8 R8 R9 P8 N8 T9 P9 N9 C14 B14 G14 C9 B10 A10 A11 D12 C12 B12 A9 B9 D10 D11 A15 A14 A13 B13 C15 C16 B16 B15 B11 C11 C10 C13 D13 L4 D7 G1 T5 T7 H11 J10 J11 K9 K10 K11 A12 F13 G13 ...

Страница 23: ...07 2 2UH 2 2UH L208 1UH L206 C225 56P L205 1UH R210 100R 100R R211 TU_IF TU_IF C220 0 1U C215 0 1U 75R R207 6 7 8 1 3 2 4 5 9 10 TU1 TU1_SDA TU1_SCL 3V3 L202 100UH NC SCL 100P C203 C202 100P TUNER_VCC TAGC 3_3V SDA R206 75R R201 100R R203 10K 10K R202 TU_IF TU_IF ZAGC C204 4U7 0 1U C200 C205 0 1U IF2 IF1 1U C207 6V3 470U C208 C201 0 022U ZSDA TUNER_VCC TU1_SDA TU1_SCL ...

Страница 24: ...20U C842 10K R836 NC 5VAIN R865 18K 3_3VSTB R851 1K 22K R832 NC_P 3_3V R803 0R R879 120R 3_3VSTB 0 1U C843 NC_P R831 33K P_ON OFF 3_3V 12V 7 8 4 2 3 5 6 1 NC Q800 PMK50XP 3_3V R872 0R NC3 5V DDR R802 270R C858 0 1U R884 82K 12K R885 NC_P 0 1U C863 NC_P R892 82K R883 0R C862 1U R862 100K NC3 R840 0R 1U C873 NC3 NC3 18K R852 NC_P C874 0 1U 0 1U C867 R845 33K C837 0 1U R830 0R C872 1U 0 1U C836 100K ...

Страница 25: ...MP_MUTE R632 10K NC LL4148 D604 D600 LL4148 R658 10K AMP_AUOUTR0 ZR ZR R655 4K7 B C E BT3904 Q603 C607 2U2 R635 220R R642 100K R641 10K R640 56K D602 LL4148 R637 10K R636 56K B E C Q602 BT3906 R659 8K2 R657 47K R660 47R C605 0 1U C604 2U2 0 1U C608 47R R654 47K R652 8K2 R651 10K R650 2U2 C601 B C E Q604 BT3904 4K7 R653 ZL ZL 3_3VSTB OP_VCC OP_VCC AMP_R AMP_L 22UH L602A 80R L602 L603A 22UH L603 80R...

Страница 26: ... IIC bus Check the peripheral circuit of mail IC check solder of main IC check data fo NVM and reset it Check reset signal of main no switch on Check 3 3V 12V 24V of power supply Check PW Check DC DC part check Check signal P ON DIMBL ON of main IC link to PW Trouble shooting ...

Страница 27: ...n IC check LVDS cable Check crystal frequence Check the peripheral circuit of mail IC updating SW reset NVM replace main IC Abnormal picture All signal source bad Individual signal source bad Check the path with this signal source Check panel ID ...

Страница 28: ...te function Abnormal sound Check all sound source Individual sound signal source Check the sound signal link to main IC Check the peripheral circuit of main IC SW Check the power of sound IC Check sound IC Check wave filter and speaker Y ...

Страница 29: ......

Страница 30: ......

Страница 31: ......

Страница 32: ......

Страница 33: ...OT23 PMV65X Q813 T8 32AP7V MA8 13 AP2111 25B IC LDO AP2111 2 5 U801 T8 32AP7V MA8 13 AS1117 18B ICSOT 223 AS1117 18CX U803 T8 32AP7V MA8 13 DC1582 ENB33 IC DC DC STEP DOWN CONVERTER MP1582 U800 T8 32AP7V MA8 13 MP1494 DJB IC DC DC CONTROL MP1494DJ U806 T8 32AP7V MA8 13 MP1494 DJB IC DC DC CONTROL MP1494DJ U805 T8 32AP7V MA8 13 MP1494 DJB IC DC DC CONTROL MP1494DJ U807 T8 32AP7V MA8 13 MST6M1 82BVG...

Страница 34: ...OHM 5 1 10W 0603 R651 T8 32AP7V MA8 19 BC0680 JTX SMD RES 68 OHM 1 8W 5 R602 T8 32AP7V MA8 19 CD0000 JTX RES SMD 0 OHM 1206 R872 T8 32AP7V MA8 19 CD0000 JTX RES SMD 0 OHM 1206 R807 T8 32AP7V MA8 19 GA0000 JTX SMD RES 0 OHM 1 16W 5 R879 T8 32AP7V MA8 19 GA0000 JTX SMD RES 0 OHM 1 16W 5 R840 T8 32AP7V MA8 19 GA0000 JTX SMD RES 0 OHM 1 16W 5 R603 T8 32AP7V MA8 19 GA0000 JTX SMD RES 0 OHM 1 16W 5 R714...

Страница 35: ...1 T8 32AP7V MA8 19 GA0104 JTX SMD RES 100K OHM 1 16W 5 R143 T8 32AP7V MA8 19 GA0104 JTX SMD RES 100K OHM 1 16W 5 R819 T8 32AP7V MA8 19 GA0104 JTX SMD RES 100K OHM 1 16W 5 R142 T8 32AP7V MA8 19 GA0104 JTX SMD RES 100K OHM 1 16W 5 R140 T8 32AP7V MA8 19 GA0104 JTX SMD RES 100K OHM 1 16W 5 R890 T8 32AP7V MA8 19 GA0104 JTX SMD RES 100K OHM 1 16W 5 R662 T8 32AP7V MA8 19 GA0104 JTX SMD RES 100K OHM 1 16W...

Страница 36: ... OHM 1 16W 5 R181 T8 32AP7V MA8 19 GA0472 JTX SMD RES 4 7K OHM 1 16W 5 R524 T8 32AP7V MA8 19 GA0472 JTX SMD RES 4 7K OHM 1 16W 5 R138 T8 32AP7V MA8 19 GA0472 JTX SMD RES 4 7K OHM 1 16W 5 R136 T8 32AP7V MA8 19 GA0472 JTX SMD RES 4 7K OHM 1 16W 5 R503 T8 32AP7V MA8 19 GA0472 JTX SMD RES 4 7K OHM 1 16W 5 R108 T8 32AP7V MA8 19 GA0472 JTX SMD RES 4 7K OHM 1 16W 5 R134 T8 32AP7V MA8 19 GA0472 JTX SMD RE...

Страница 37: ...F 10V DCV 0603 C183 T8 32AP7V MA8 28 AA0225 KBX CAP CER SMD 2U2F 10V DCV 0603 C182 T8 32AP7V MA8 28 AA0475 KBX CAP CER SMD 4 7UF 10V 0603 CL10B475KP8NN C204 T8 32AP7V MA8 28 AB0102 KBX CAP CER SMD 1NF 50 0V 0603 10 R Y C803 T8 32AP7V MA8 28 AB0103 KBX CAP CER SMD 10NF 50 0V 0603 10 R Y C832 T8 32AP7V MA8 28 AB0103 KBX CAP CER SMD 10NF 50 0V 0603 10 R Y C838 T8 32AP7V MA8 28 AB0103 ZFX CAP CER SMD ...

Страница 38: ...1UF 16V 0805 C616 T8 32AP7V MA8 28 BC0105 KBX CAP CER SMD 1UF 16V 0805 C614 T8 32AP7V MA8 28 BC0105 KBX CAP CER SMD 1UF 16V 0805 C615 T8 32AP7V MA8 28 BC0225 ZFX CAP CER SMD 2U2F 16 0V 0805 C136 T8 32AP7V MA8 28 BC0225 ZFX CAP CER SMD 2U2F 16 0V 0805 C604 T8 32AP7V MA8 28 BF0106 ZFX SMD CAP 10uF C102 T8 32AP7V MA8 28 HA0105 KBX MLCC 1UF 10 10V B 1005 C551 T8 32AP7V MA8 28 HB0101 JCX CAP CER SMD 10...

Страница 39: ... 16V 0402 C116 T8 32AP7V MA8 28 HC0104 KBX CAP CER SMD 100NF 16V 0402 C138 T8 32AP7V MA8 28 HC0104 KBX CAP CER SMD 100NF 16V 0402 C871 T8 32AP7V MA8 28 HC0104 KBX CAP CER SMD 100NF 16V 0402 C110 T8 32AP7V MA8 28 HC0104 KBX CAP CER SMD 100NF 16V 0402 C127 T8 32AP7V MA8 28 HC0104 KBX CAP CER SMD 100NF 16V 0402 C107 T8 32AP7V MA8 28 HC0104 KBX CAP CER SMD 100NF 16V 0402 C109 T8 32AP7V MA8 28 HC0104 Z...

Страница 40: ...2 BVB IC THE COMPONENTS BE USED IN 32M BIT FLA U102 CPP T8 32AP7V MA8 33 GLN300 NTX CHIP BEAD 30 OHM 25 L801 T8 32AP7V MA8 33 GLN300 NTX CHIP BEAD 30 OHM 25 L802 T8 32AP7V MA8 47 USB002 XX0 USB SOCKET USB 1W B P501A T8 32AP7V MA8 46 40336W 05XG CONN PH 5 2 0MM FEMALE R P203A 1到5脚 T8 32AP7V MA8 71 BAR008 0A9 BARCODE LABEL T8 32AP7V MA8 71 AV0000 V00 SOFT LABEL PAPER WHITE T8 32AP7V MA8 19 AB0103 JT...

Страница 41: ...24D20 WHITE WORDS ON BLACK T8 32C727V RC1Z 56 464730 0KL6R RAW SUPPORT KEY CLUSTER 00 00 00 R N T8 32C727V RC1 46 CT055T 04J01G WIRE SPEAKER WIRE 350 550MM 4PIN TJC3 0 FOR P601 T8 32C727V RC1 63 B30100 AB5G SCREW ST 3MM 10MM JIS B 1122 12 0 0 R Y T8 32C727V RC1 63 B30100 AB5G SCREW ST 3MM 10MM JIS B 1122 12 0 0 R Y T8 32C727V RC1 63 S40150 AB3G S T SCREW S 4 X 15 AB T8 32C727V RC1 62 839350 0HG6R ...

Страница 42: ...BD P203A T8 32B3310 LPM1 T8 CS32TTL LC7 LVW320CSTT E3 32B3310 TOT背光 搭配华星 T8 CS32TTL LC7 T8 32F3380 MC1 ASS Y MIDDLE CABINET T8 32F3380 MC1 59 935430 000 RAW BUFFER 32E5300 0 0 R Y STICK ON GLUE FRAME UP DOWN T8 32F3380 MC1 59 935440 000 RAW BUFFER 32E5300 0 0 R Y STICK ON GLUE FRAME R L T8 32F3380 MC1 59 935450 000 RAW BUFFER 32E5300 0 0 R Y STICK ON GLUE FRAME CORNER T8 32F3380 MC1 67 M93409 0E0 ...

Страница 43: ...50 02A CLAPBOARD FOR OTHER PCB T8 SKDPCB SKY 76 402060 0AT CARTON BOX FOR OTHER PCB T8 SKDPCB SKY 76 402030 02A CLAPBOARD FOR OTHER PCB H7 HB331N7V EG0 T8 32F3380 SK3 ASS Y SKD PACKING T8 32F3380 SK3 74 080060 50G RAW BAG POLY BAG 80X60 01 00 00 R Y T8 32F3380 SK3 74 945316 5PG TV RAW SEPARATOR T B 01 00 R Y T8 32F3380 SK3 76 HF3380 0AA RAW CARTON 32F3380 A3A 01 00 00 R Y T8 32F3380 SK3 76 HF3380 ...

Отзывы: