background image

 6

Chapter 1 

Introduction

Remote Control Functions

Most of your television's functions are available via the menus that appear on the screen. The remote control supplied 

with your set can be used to navigate through the menus and to configure all the general settings.

Note: 

Figures and illustrations in this operation manual are provided for reference only and may differ from actual 

product appearance. 

The remote control type may be changed without notice.

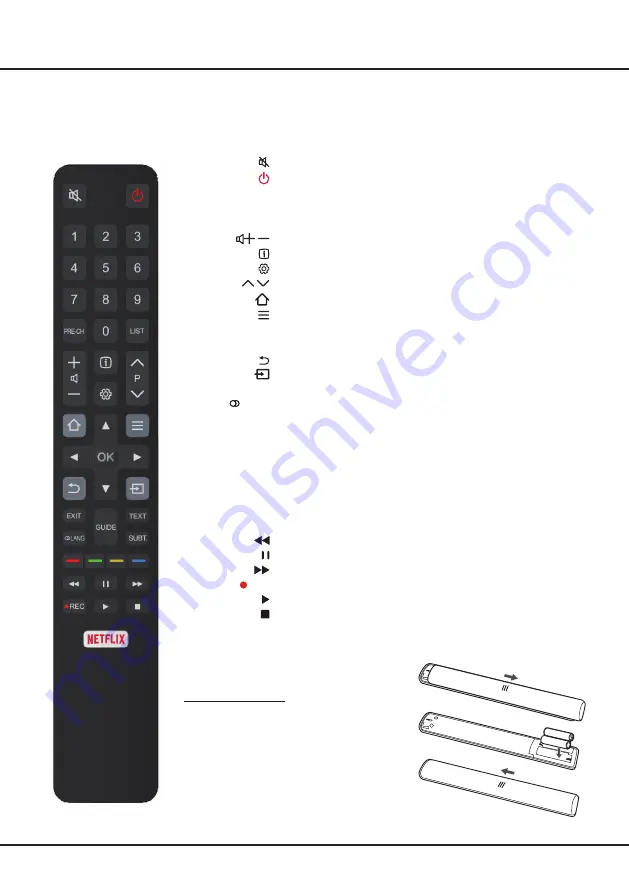
  To switch the sound off and back on.
  Standby / quit standby.

Numeric buttons

  To enter channel numbers or a digit.

PRE-CH

  To return to the previous channel in TV mode.

LIST

  To display the channel list.

/

  To control the volume.
  To display programme information, if available.
  To display the Settings menu.

P /

  To change channels.
  To access or exit the Smart TV homepage.
  To display the Option menu.

▲/▼/

/

  Navigation direction buttons.

OK

  To confirm an entry or selection.

  To return to the previous menu or quit an App.
  To select input source.

EXIT

  To exit the Settings menu.

LANG

  To select a sound type available for selected analogue TV 

   programme; to select an audio language available for selected 

  digital TV programme.

GUIDE

  To toggle the Electronic Programme Guide on or off (only 

  available for digital channels).

TEXT

  To toggle Teletext on or off.

SUBT.

  To select a subtitle language available for selected digital TV 

  programme.

Colour buttons

  To select tasks or Teletext pages; to be used for HbbTV 

  function.
  To start fast reverse.
  To pause playback.
  To start fast forward.

REC

     To record programs under DTV source.

  To start playback.
  To stop playback. 

NETFLIX

  To access the NETFLIX application. (Not available for some 

   models.)

C0

D5

CE

CD

CC

CB

CA

C9

C8

C7

C6

21

CF

9E

D0

C3

D2

D1

30

D3

F7

A6

13

A9

0B

A8

D8

A7

5C

F9

E5

E1

20

7F

FF

17

1B

27

E2

E6

E3

E8

E0

EA

10

3F

2A

31

32

33

34

35

36

37

38

39

DE

30

61

2F

2E

3C

CF

2D

2C

08

59

EC

56

F4

57

27

58

A3

06

1A

1E

80

DF

00

E8

E4

D8

1D

19

1C

17

15

1F

EF

Installing Batteries

1. 

Push to open the back cover as illustrated.

2. 

Insert two AAA batteries according to the 

polarities marked on the battery case.

3. 

Replace the back cover as illustrated.

Содержание 50P4US

Страница 1: ...ns in this User s Guide are provided for reference only and may differ from actual product appearance Product design and specifications may be changed without notice OPERATION MANUAL For use with mode...
Страница 2: ...12 Instant Power On 12 Automatic Channel Search 12 Chapter 4 Homepage Operation Using Homepage Home 13 Using Homepage Videos 14 Using Homepage TV 14 Using Homepage Apps 15 Chapter 5 Using More of Your...

Страница 3: ...those controls that are covered in these operating instructions as improper adjustment of other controls may result in damage If this happens unplug the set and refer to the service personnel If the...

Страница 4: ...r models with below buttons on the set For models with below buttons on the set or TV mode In menus P or P or Features Short press Long press Features Long press OK Short press Features Long press OK...

Страница 5: ...able AV RCA audio video sockets input The AV IN sockets can be used to connect a range of equipment including video recorders camcorders decoders satellite receivers DVD players or games consoles The...

Страница 6: ...select input source EXIT To exit the Settings menu LANG To select a sound type available for selected analogue TV programme to select an audio language available for selected digital TV programme GUID...

Страница 7: ...e to the mains socket Your TV set should only be connected to an AC supply It must not be connected to a DC supply If the plug is detached from the cable do not under any circumstances connect it to a...

Страница 8: ...ISP Internet Service Provider Modem Internet TV Set Router Ethernet Port on the back panel Chapter 2 Getting Started Connecting to a Wired Network To connect to a wired network 1 Ensure you have An Et...

Страница 9: ...press OK to connect Select All wireless if available to find more access points Note If you select a protected access point you will have to enter the corresponding password Press OK on the remote con...

Страница 10: ...es you through the initial setup process 1 Press to select your language then press OK to confirm and then press OK again to enter the next step 2 Press to select your location then press OK to confir...

Страница 11: ...emote control to proceed Note To prevent the channel installation process from being interrupted wait for the message indicating that the installation is complete You can also skip this step by select...

Страница 12: ...e following the instructions below 1 Press on the remote control select System Menu language and press OK to enter 2 Press to select your desired language to display the menus and press OK to confirm...

Страница 13: ...r According to circumstances of the contents provider an application s updates or the application itself may be discontinued Depending on your country s regulations some applications may have limited...

Страница 14: ...Some options may not be available for certain signal sources This section explores the input sources of your TV Press on the remote control to display homepage Press to enter TV page and select input...

Страница 15: ...omepage App Store Many useful and entertaining apps are available for downloading After entering the App Store you will see the recommendations Press to select press OK to enter Pre installed apps The...

Страница 16: ...just the delay time to synchronize the sound with the picture Audio Description Audio description refers to an additional narration track for blind and visually impaired viewers of visual media includ...

Страница 17: ...Insert the USB stick in which a new version software is stored into a USB socket of the set Select By USB and press OK to enter Follow the on screen instructions to complete the process By channel Ena...

Страница 18: ...Shift automatically Using EPG Electronic Programme Guide EPG is an on screen guide that displays scheduled digital TV programmes You can navigate select view and record programmes Note The DTV EPG do...

Страница 19: ...l for the product You can find instructions for the features of this TV set 1 Press on the remote control select Support E Manual and press OK to enter 2 Press to select the contents and press OK to e...

Страница 20: ...e what s available in your area More information about FreeviewPlus can be found on www freeview com au Share See application Select Media from the homepage and press OK to enter Then you can view pic...

Страница 21: ...nly one hard disk or a low power consumption mobile hard disk 4 The video from a mobile hard disk USB is playing with no sound The audio format of the video in your mobile hard disk is not supported b...

Страница 22: ...is weak the picture may be marred by dots When the signal is extremely weak it may be necessary to install a special antenna to improve the reception 1 Adjust the position and orientation of the indo...

Страница 23: ...ces will meet your requirements or that operation of the device or services will be uninterrupted or error free Under no circumstances including negligence shall TCL be liable whether in contract or t...

Страница 24: ...6LC EAUAA TCL Electronics Australia Pty Ltd ABN 83 111 032 896 Address 797 Springvale Road Mulgrave VIC 3170 Australia Telephone 1300 738 149 service au tcl com www tclelectronics com au Like us on Fa...

Отзывы: