background image

10

Connections and Setup

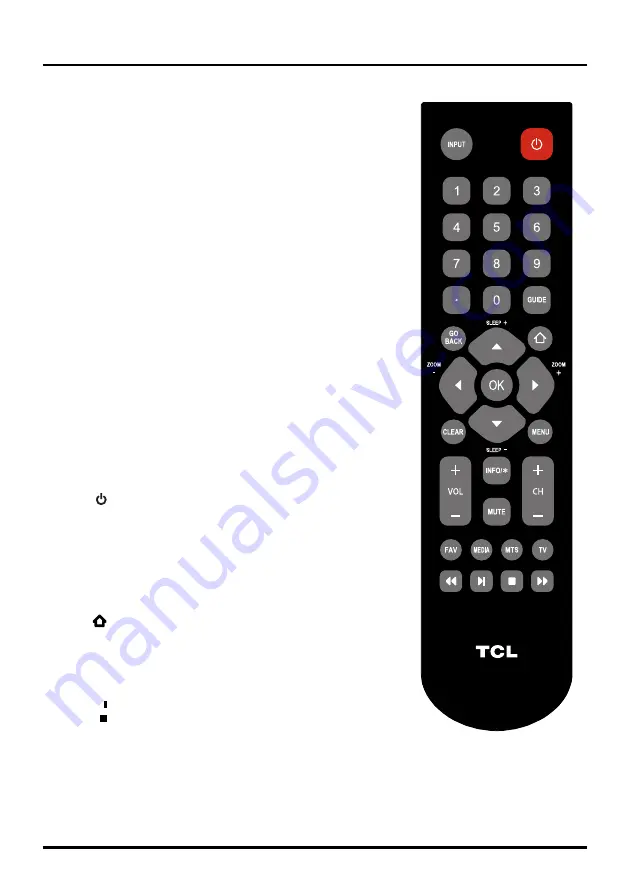
Remote Control Functions

INPUT

Press 

INPUT

 repeatedly to select the video input

0-9

(Alphanumeric buttons) Enters a channel number, then 

press 

OK

 (or let the entry timeout). 

(dot) To enter a digital channel with a sub-channel, 

enter the main channel; then, press the dot (•), the sub-

channel, and then the 

OK

 button.

MENU

Brings up the main menu or press to return to the 

previous menu.

▲/▼◄/►

(arrows) Highlights different items in the TV menu and 

adjusts the menu controls.

ZOOM+/-

(◄/►) Selects the desired screen format.

SLEEP+/-

(▲/▼) Sets the TV to turn off after a given amount of 

time.

PIC

Selects picture mode.

 INFO/* 

If no menus are currently active, press 

INFO/*

 to show 

information. 

 VOL+/-

Increases or decreases the TV volume.

MUTE

Turns the volume on and off.

FAV

Press the 

FAV

 button to browse the channels set in 

your favorite list. Use ▲/▼ to select one of the favorite 

channel to watch. Press 

CLEAR

 to exit the menu.

MEDIA

Goes to the 

USB

 menu.

(

POWER

 button) Turns the TV on or standby.

GUIDE

Toggles the Electronic Programme Guide between on 

and off. Only available for digital channels.

CLEAR

Removes any menu or display from the screen and 

return to normal viewing.

OK

Displays Channel List menu. When the TV is in the 

menu system, press to confirm your selection.


(HOME)

 Opens the MHL device's home menu when a 

MHL device is plugged in.

CH+/-

Selects channels and external input mode.

TV 

Press to access to the TV mode.

MTS

Press to select your desired sound mode.

◄◄/►►/►


/

These buttons can be used for playing music and 

photos in the USB menu.

Содержание 50FS4690

Страница 1: ...States or 1 877 800 1269 for AK HI and Puerto Rico User s Guide For use with models 48FS4690 50FS4690 Figures and illustrations in this User s Guide are provided for reference only and may differ from...

Страница 2: ...the disconnect device shall remain readily operable Therefore you should ensure that the TV is installed in a manner that allows you to disconnect the power cord when desired Product Registration Plea...

Страница 3: ...e personnel Service is required when the component is damaged in any way such as power supply cord or plug damage liquid spilled on or objects falling onto the component rain or moisture exposure abno...

Страница 4: ...u System 14 Input Menu 14 Picture Menu 14 Picture Mode 14 Brightness 14 Contrast 14 Saturation 14 Sharpness 14 Tint 14 Color Mode 14 Back Light 14 Dynamic Backlight 14 Dynamic Light Sensor 14 Advanced...

Страница 5: ...the top shelf so the heated air won t harm the TV Avoid Audio Interference Position cables properly insert each cable firmly into the designated jack Route all cables down one side of the back of the...

Страница 6: ...astic parts away from grease and organic solvents to avoid damage Especially during the assembly process Mounting Your TV to the Wall If you are mounting your TV to the wall don t attach the base stan...

Страница 7: ...tion when using the CMPT VIDEO input Red and white jacks for R AUDIO and L AUDIO connection Note AV IN and COMPONENT IN share the same L R AUDIO and Y Video input jacks AUDIO VIDEO IN AV IN Lets you c...

Страница 8: ...tion Link and allows you to link a MHL capable mobile device to the television HDMI 3 IN Lets you connect a component such as a digital cable or satellite box with an HDMI output for the best picture...

Страница 9: ...lugging the Roku Streaming Stick into the MHL port HDMI 2 is displayed as HDMI ROKU Roku Streaming Stick Sold Separately COMPONENT IN CMPT HDMI DVI IN 1 Menu operation for input source selection or se...

Страница 10: ...starts automatically When connecting MHL compatible device to HDMI 2 MHL port on the TV switch TV source to HDMI 2 Note Do not connect the MHL compatible device to any ports other than HDMI 2 MHL port...

Страница 11: ...how information VOL Increases or decreases the TV volume MUTE Turns the volume on and off FAV Press the FAV button to browse the channels set in your favorite list Use to select one of the favorite ch...

Страница 12: ...our location and the program will list local analog and digital stations available using your antenna Switching On Follow the instructions on this page on how to switch on your TV set and use the remo...

Страница 13: ...continue to the next screen Note if you select Retail Mode a screen menu will display to ask you go back to the previous menu to select Home Mode by pressing to select Go Back and press OK to confirm...

Страница 14: ...Sharpness Tint Color Mode Back Light Dynamic Backlight Geometry Advanced Vibrant 48 49 12 12 8 Cool 64 Off Picture Sound Settings Exit Return MENU CLEAR Exit Sound Equalizer Speaker SPDIF Type Smart...

Страница 15: ...Separately into the MHL port HDMI 2 is displayed as HDMI ROKU Picture Menu The menus for adjusting the picture are used to obtain the best picture settings according to your preference the type of pr...

Страница 16: ...Digital Audio Output jack SPDIF OUT Available options are Dolby Digital PCM Smart Volume Option On Off This option reduces the annoying blasts in volume that often occur during commercial breaks and...

Страница 17: ...to close the menu DTV Signal Show the condition of DTV signal Good or Bad Normal Bad for no DTV signal or very weak DTV signal Closed Caption Many programs are encoded with closed captioning informati...

Страница 18: ...Parental Control Change Password press OK to enter 2 Use the number buttons to enter the four digit number for your password 3 Re enter the same code to confirm the pass word Note The password must be...

Страница 19: ...etween View and Block View All unrated programs are available Block All unrated programs are not available Keyboard Lock This option allows you to block disable or unblock enable the TV panel buttons...

Страница 20: ...e with a USB port connect one end of the USB cable to the USB port and the other end to the USB jack on the side of the TV The USB feature on your TV allows you to play audio files format supported MP...

Страница 21: ...es sent in 4 3 which does not fill your screen It depends on how the station or device connected to your TV is formatting the video If there are bars on the screen press the ZOOM button to try a diffe...

Страница 22: ...back of your TV three video cables or bundled component video cables red blue and green connect to the corresponding COMPONENT INPUT jacks on the back of your TV Check the antenna connections Make su...

Страница 23: ...sistance If you have black bars on each side of your picture the component you connected might have a switch or a menu option allowing you to change the picture quality output that will fix this Choos...

Страница 24: ...may use a cloth dampened with warm water While cleaning do not spray liquid directly on the screen or allow liquid to run down the screen and inside the TV Also never place drinks or vases with water...

Страница 25: ...ce location will be at the sole discretion of TTE based upon the TTE Limited Warranty Statement At the sole discretion of TTE television screen sizes 32 and smaller will either be repaired at an Autho...

Страница 26: ...ODUCT OR ARISING OUT OF ANY BREACH OF ANY EXPRESS OR IMPLIED WARRANTY ON THIS PRODUCT THIS DISCLAIMER OF WARRANTIES AND LIMITED WARRANTY ARE GOVERNED BY THE LAWS OF THE STATE OF CALIFORNIA EXCEPT TO T...

Страница 27: ...ress or implied including but not limited to warranties of merchantability of satisfactory quality fitness for a particular purpose of accuracy of quiet enjoyment and non infringement of third party r...

Страница 28: ...an be determined by turning the equipment off and on the user is encouraged to try to correct the interference by one or more of the following measures Reorient or relocate the receiving antenna Incre...

Отзывы: