background image

7

8

1�2�2 

Power your phone on/off

To turn your phone on, press and hold the 

Power/Lock

 button until the screen turns on.

To turn your phone off, press both the 

Power/Lock

 button and 

Volume up

 button at the same time, 

then tap 

Power off

 on the screen when it appears.

1�2�3 

Set up your phone for the first time

The first time you power on the phone, you'll be prompted to choose your language, Vision settings, 
select a network, Date and time zone, log in to your Google Account and setup Google services. 
Finally, select a screen lock option such as fingerprint, face unlock, or Set a PIN, Pattern or Password. 
You may also skip this step and complete the setup at a later time.
Do not leave your PIN/password or pattern, with your phone. Store this information in a safe place 
when not in use.

1�3 

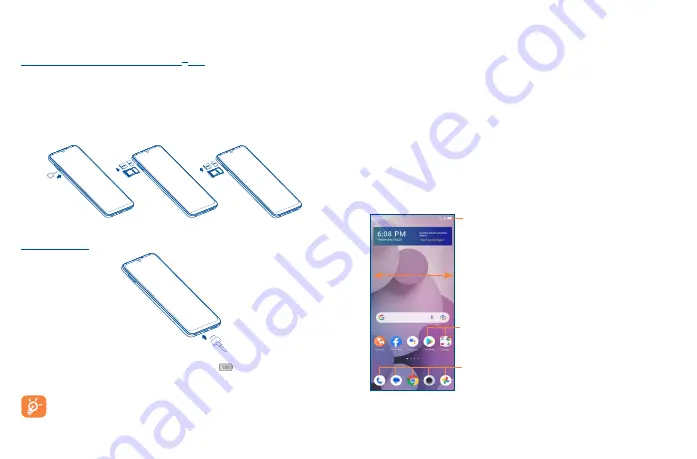
Home screen

You can bring all of the items (applications, shortcuts, folders and widgets) you use most frequently to 
your Home screen for quick access. Tap the 

Home 

 key to get instant access to the Home screen.

Status bar

• 

Status/notification indicators 

• 

Drag down to open the Notification panel.

Tap an icon to open an application, folder, etc.

Favorite Applications tray

• 

Tap to open the application.

• 

Touch and hold to move or change applications.

The Home screen is provided in an extended format to allow more space for adding applications, 
shortcuts, etc. Slide the Home screen horizontally to get a complete view. 

1�2 

Getting started

1�2�1 

Set up

Installing or removing the SIM card and microSD

TM

 card

Your phone already has a SIM card installed. If you need to change or remove your SIM card, follow 
the steps below.

  Use the provided SIM pin to open the SIM tray.

  To install SIM/microSD

TM

 card, place the SIM/microSD

TM

 card with the chip facing down into the 

SIM card tray and then slide it into its slot.

  To remove SIM/microSD

TM

 card, push up on the chip side of the cards inside the SIM tray.

Charging the battery

It is advised that you fully charge your battery before first use ( 

 ). Connect the charger to your 

phone and an outlet. Charging status is indicated by the percentage on screen while the phone is 
powered off. The percentage increases as the phone is charged.

To reduce power consumption and energy waste when the battery is fully charged, 
disconnect your charger from your phone; switch off Wi-Fi, GPS, Bluetooth or background-
running applications when not in use; reduce the backlight time, etc.

Содержание 40T

Страница 1: ...T608DL User Manual...

Страница 2: ...Safety and use 58 Table of contents 1 Your mobile 4 1 1 Keys and connectors 4 1 2 Getting started 7 1 3 Home screen 8 2 Text input 16 2 1 Using the Onscreen Keyboard 16 2 2 Text editing 17 3 Phone cal...

Страница 3: ...t or using it while worn on your body either use an approved accessory such as a holster or otherwise maintain a distance of 15 mm from the body to ensure compliance with RF exposure requirements Note...

Страница 4: ...ail from the list or tap CLEAR ALL to remove all thumbnails from the list Power key Press Lock the screen or light up the screen Press and hold Access Google Assistant Press and hold the Power key for...

Страница 5: ...to open an application folder etc Favorite Applications tray Tap to open the application Touch and hold to move or change applications The Home screen is provided in an extended format to allow more...

Страница 6: ...he device sideways to have a better view Auto rotate can be changed at any time in Settings 1 3 2 Status bar From the status bar you can view both phone status and notification information Status icon...

Страница 7: ...tion panel to open the Quick Settings panel where you can enable or disable functions or change modes by tapping the icons Tap to open the full Settings menu 1 3 3 Search bar The phone provides a Sear...

Страница 8: ...sunlight 1 3 5 Personalize your Home screen Add You can touch and hold a folder an application or a widget to activate the Move mode and drag the item to any Home screen as you prefer Reposition Touc...

Страница 9: ...touch then touch to activate the silent mode Using the Settings Menu Swipe up on the Home screen then touch Settings Sound vibration to set the volume for ring notification media alarm etc to your pr...

Страница 10: ...h the tab to show the Paste and Select all options which allows you to paste immediately 3 Phone call Call log and Contacts 3 1 Phone 3 1 1 Placing a call You can easily make a call using Phone Touch...

Страница 11: ...ring machine that you can consult at any time To access your voicemail touch and hold on the dial pad To set your voicemail number touch the Menu icon from the Phone screen then touch Settings Voicema...

Страница 12: ...ccessibility Touch Vibrate Reminder to enable vibrate when outgoing calls connect successfully Assisted dialing Touch to enable assisted dialing Note Assisted dialing predicts and adds a country code...

Страница 13: ...perations You can launch a new call send a message to the contact or number or view detailed information of the call To delete the call history of a selected contact or number touch and hold the conta...

Страница 14: ...number touch and hold the number you want to set as the default number from the contact s details screen then select Set default 1 Only phone and account contacts can be added to Favorites This choic...

Страница 15: ...n 4 1 Writing a new message On the message list screen touch the new message icon to write text multimedia messages Touch to create a new message Touch for more options Touch to view the whole message...

Страница 16: ...g message options are available for selection Pin the selected messages Archive the selected messages Delete the selected messages To block calls or texts from the contact The selected conversation wi...

Страница 17: ...h of field effect You can compose an image that highlights your subject while producing a gorgeously blurred background PRO Pro camera mode lets you fine tune parameters and gives you full control ove...

Страница 18: ...or vibration and will appear on Status bar Touch and drag down the Status bar to display the Notification panel touch the new email to view it Or you can also access the Gmail Inbox label and touch Al...

Страница 19: ...default reply action Auto fit messages Touch to mark the checkbox to shrink messages to fit the screen and allow zooming Auto advance Touch to select which screen to show after you delete or archive a...

Страница 20: ...eply Mark the checkbox to enable the suggested replies shown when available Vacation responder Touch to set the notification when on vacation Show the Meet tab for video calling Touch to mark the chec...

Страница 21: ...t from Day Week view screen touch an empty spot or an event to open the event details screen of the time you have previously selected 7 1 3 Event reminder If a reminder is set for an event the upcomin...

Страница 22: ...service Swipe up on the Home screen Touch Settings Mobile network Select Data roaming to set roaming mode When Data roaming is disabled you can still perform data exchange with a Wi Fi connection ref...

Страница 23: ...se to exchange data or connect to other Bluetooth devices for various uses To access this function swipe up on the Home screen then touch Settings Bluetooth Pair new device your device and other avail...

Страница 24: ...switch next to USB tethering to activate deactivate this function To share your phone s data connection as a portable Wi Fi hotspot Touch Settings Connections Hotspot tethering Touch Mobile hotspot t...

Страница 25: ...d download applications and games Applications are either free of charge or at a cost In the Play Store search for the app you need download it and then follow the installation guide to install the ap...

Страница 26: ...all data stored on the phone including both external SD card and internal storage such as applications media files downloaded from Google Play Store YouTube or other locations Videos pictures or audio...

Страница 27: ...a computer To connect your phone to the computer Use the USB cable that came with your phone to connect the phone to a USB port on your computer You will receive a notification that the USB is connec...

Страница 28: ...te some options manually for further optimization 10 13 Security biometrics Screen lock Select one method such as Swipe Pattern PIN Password to unlock the screen Fingerprint Use your Fingerprint to un...

Страница 29: ...browsing habits 10 21 Google Touch to configure your Google Account and services settings 10 22 Accessibility Use the Accessibility settings to configure any accessibility plug ins you have installed...

Страница 30: ...T PERMITTED BY APPLICABLE LAW TCL MOBILE AND ITS AFFILIATES expressly disclaim any and all representations and warranties arising by law or otherwise related to the Accessed Information including with...

Страница 31: ...so that their components can be reused Safety precautions for direct sunlight Keep this product away from excessive moisture and extreme temperatures Do not leave the product or its battery inside a v...

Страница 32: ...levant standards always use your device only in its normal use position Contact with the antenna area may impair call quality and cause your device to operate at a higher power level than needed Avoid...

Страница 33: ...r an air bag or in the air bag deployment area Store the phone safely before driving your vehicle Mounting accessories Do not use the product on an unstable table cart stand tripod or bracket Any moun...

Страница 34: ...tructions for satisfying RF exposure compliance To maintain compliance with FCC RF exposure compliance requirements please follow operation instruction as documented in this manual This transmitter mu...

Страница 35: ...t Telecommunications Internet Association TIA safety information Pacemakers The Health Industry Manufacturers Association recommends that a minimum separation of 15 cm 6 inches be maintained between a...

Отзывы: