


19
8 Algorithm Select buttons
Press to select one of the following three algorithms:
Hall: The Hall reverb simulates a rather large hall
while preserving the natural characteristics of the
source material. This is excellent for many studio
applications requiring medium to long decay times
and especially on vocal material.
Room: The Room algorithm simulates a relatively
small, well furnished room. In such a room, many
reflections are absorbed by soft materials, and the
sound is reflected and sustained only by the walls,
windows and maybe some furniture. The Room reverb
will work well on almost all instruments.
Plate: Prior to the digital era, either reverberating
springs or large metallic plates were used to create
reverb. Plate reverbs typically have a very diffuse and
bright sound. The Plate reverb algorithm can be used
with great effect on many percussive instruments.
9 Pre Delay
The Pre Delay parameter defines a short delay placed
between the direct signal and the reverb diffuse field.
By using a pre-delay, the source material is kept clear
and undisturbed by the more diffuse reverb diffuse
field arriving shortly after.
10 Decay Time
The decay parameter determines the length of the
reverb diffuse field. The length is defined as the time
it takes for the diffuse field to decay approximately by 60
dB.
11 Hi Color
The Hi Color parameter changes the “color” of the
reverb. From dark to crisp and bright, the Hi Color
parameter can really change the characteristics and
style of the reverb.
12 Mix
This is a dry/wet mix control for the reverb. You
should use the “mix” option when you are using the
M40 Studio Reverb as an insert effect on a track in
your DAW.
13 100%
Deactivates the mix control and sets a 100% wet mix.
This is the setting to use when you are using the M40
reverb as a send effect, and also when using it as a
cue reverb for recording. When using the M40 Studio
Reverb in the TC Near Control Panel, always enable
100%. In 100% mode the MIX knob is grayed out.
Notes on the M40 Studio Reverb
• The M40 Studio Reverb is available only when the TC
Near Control Panel is open.
• The M40 Studio Reverb does not consume any CPU
power when the reverb is inactive. The Reverb is
inactive when the REVERB LED on the Desktop
Konnekt is “off”.
• The display indicates “Power off” when the REVERB
button on the Desktop Konnekt 6 is turned fully
counter clockwise.
• The display indicates “Disabled” when the Reverb
Disabled function is activated on the Setup page.
• The M40 Studio Reverb is not available at quad speed
sample rates (176.4 kHz and 192 kHz.
M40 STUDIO REVERB
18
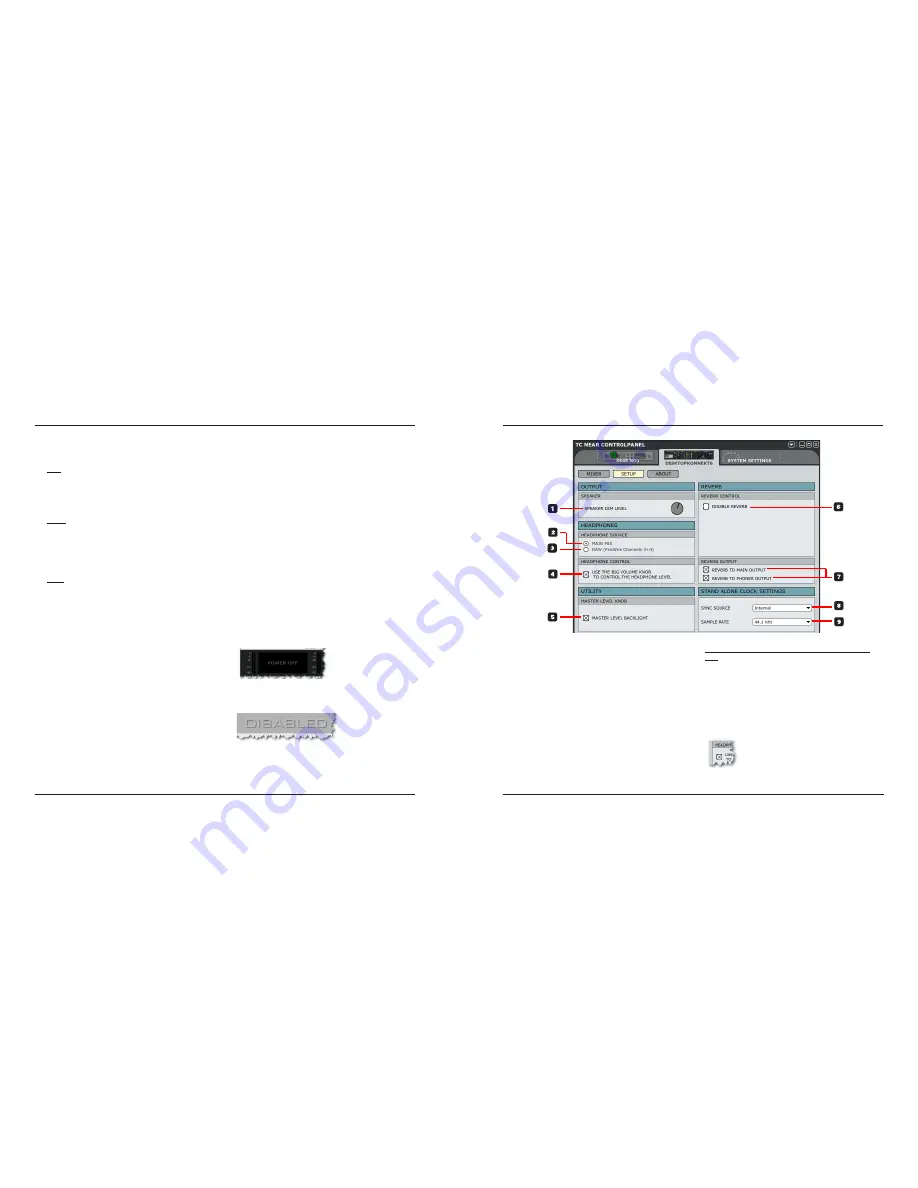
SETUP PAGE
OUTPUT
1 Speaker Dim Level
On the Desktop Konnekt 6’s front panel, you will find the
DIM button. The dim function allows you to instantly
switch to a lower level. Set the desired “dim level” using
this knob.
HEADPHONES
This is where you select which source you want to
monitor in the headphones.
2 Headphones Source – Main Mix
Select “Main Mix” to monitor the signal from your DAW
(FireWire channels 1+2) and the physical inputs on
Desktop Konnekt 6.
3 Headphones Source – DAW (Firewire Channels
3-4)
Select “DAW (Firewire Channels 3-4” to route an
individual signal from the computer to the headphones.
This is a function often used e.g. by DJ’s.
To set this up, select this option and assign FireWire
channels 3+4 (called “Phones”) from your host
application.
4 Headphone control
When the “Headphone control” option is not
checked, the big VOLUME knob on Desktop
Konnekt 6 controls the master volume on the
Monitor outputs and the PHONES knob
controls the headphones level.


