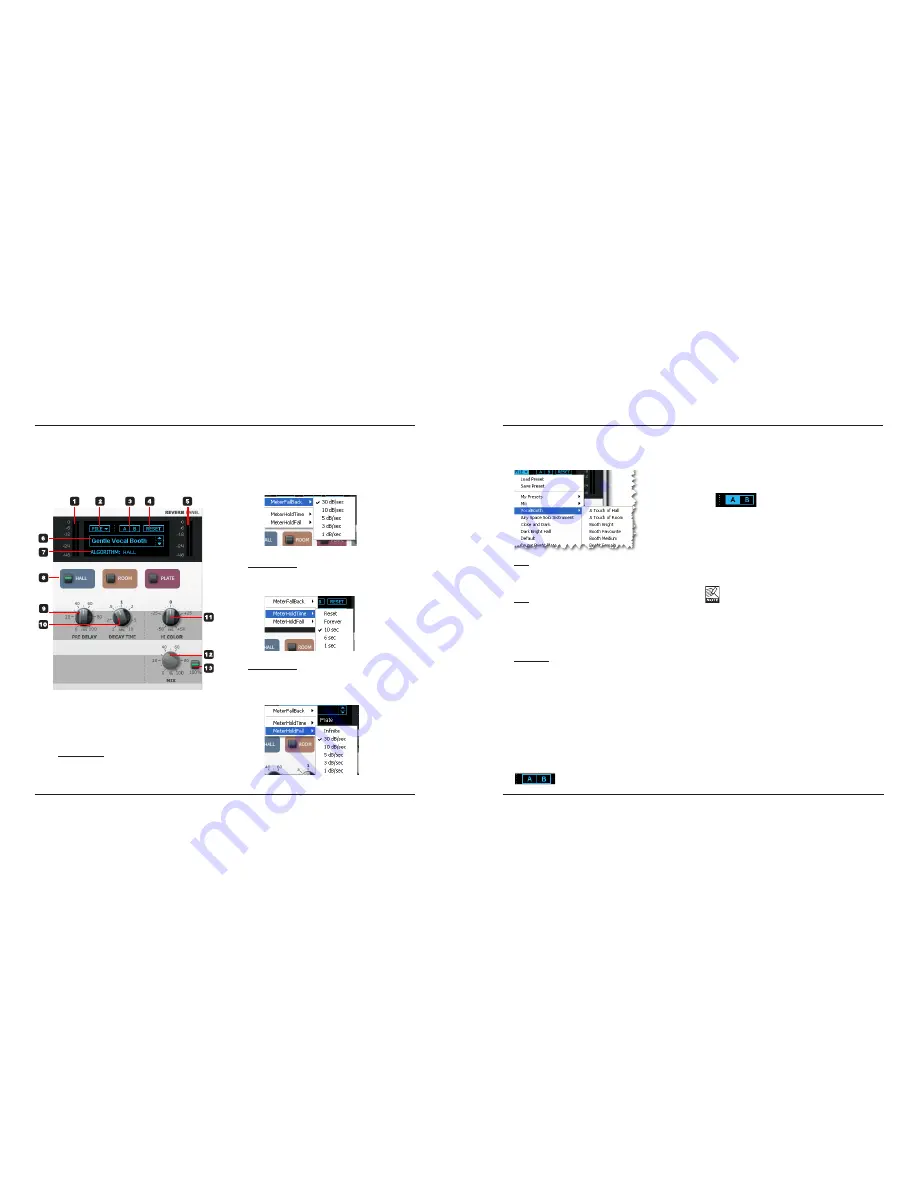
TC Electronic Desktop Konnekt 6 Скачать руководство пользователя страница 10


MeterHoldTime:
This parameter sets how long the OVERLOAD LED 
will be lit after an overload is detected.


vMeterHoldFall:
This parameter sets how fast the meter should fall 
back to normal metering after the OVERLOAD LED 
has been invoked.


2 File

Pressing the File button will open the File menu that 
allows you to load or save a preset.

Load

By selecting “Load”, you can navigate to any folder on 

the system, including shared folders. By default, you 

will be directed to the default file location. 

Save

By selecting “Save”, you can save your preset to any 

folder on the system that you have write access to, 

including any shared folder. By default, presets are 
saved to the default location for the TC Near Control 

Panel presets. 

My Presets
This menu item provides easy access to your own 

presets. Notice that only presets located in the default 
file locations for the TC Near Control Panel will be 

visible in the drop down menu.

3 A/B

With the A/B compare function you can easily 

compare different parameter settings when working 
with the plug-in.

When you start working on a preset, neither A or B is 

highlighted.


This state indicates that the settings in both memory 

locations A and B are identical – so there is actually 

nothing to compare.

As soon as you touch one of the parameters, the 

memory location “A” will be active – and highlighted.

All parameter changes will be applied to memory 

location “A”. If you switch to memory location “B”, 

you go back to the starting point, and all further 

changes will now be applied to memory location “B”.


Every time you press the A/B button, you will toggle 

between these two memory locations.

The A/B memory locations are temporary settings 

only! Saving a preset will save the currently 
selected memory location only. The setting of the 
other (hidden) memory location will not be saved!

4 Reset

Click the “Reset” button to clear the memory slots 

A/B and return to the originally recalled preset.

5  Output Meter

This is the output meter for the M40 Studio 
Reverb (see also descriptions of the parameters 

MeterFallBack, MeterHoldTime and MeterHoldFall in 
the “1 – Input meter” section).

6  Preset Name


This is the name of the currently recalled preset. 
Scroll through presets using the up/down arrows on 
the right side of the name display.

7 Algorithm


This is the currently selected reverb algorithm. The 
available options are Hall, Room and Plate.

M40 STUDIO REVERB

M40 STUDIO REVERB

17

16

1  Input Meter

This is the input meter for the M40 Studio 
Reverb.
Click on the meter using the left mouse button 
to select various meter options. 

MeterFallback:
This parameter sets how fast the meter 

should fall back after peaks. The more dBs 

per second, the faster the meter falls back.

The M40 Studio Reverb is an easy-to-use reverb for both monitoring and mixing. The reverb exist in two variations: 

A - as a standard VST/AU plug-in that can be used just as any other VST/AU plug-in from your DAW host application. Notice 

that the M40 Studio Reverb is copy protected by the Desktop Konnekt 6. If the Desktop Konnekt 6 is not attached to the 
computer, the plug-in will be disabled. 

B - as a part of the TC Near Control Panel where it can be used as an excellent cue reverb for the recording artist. In this 
situation it is worth noticing that the TC Near Control Panel MUST be open for the reverb to run.

Содержание Desktop Konnekt 6

Страница 1: ...User s Manual English Version Desktop Konnekt 6...

Страница 2: ...ipment should be installed near the socket outlet and disconnection of the device should be easily accessible To completely disconnect from AC mains disconnect the power supply cord from the AC recept...

Страница 3: ...an be determined by turning the equipment off and on the user is encouraged to try to correct the interference by one or more of the following measures Reorient or relocate the receiving antenna Incre...

Страница 4: ...r top notch sound quality Desktop Konnekt 6 s unique design not only makes it fit perfectly onto your desktop for easy operation it will also make you want to leave it right next to your laptop just f...

Страница 5: ...Control Panel On Mac computers Applications TC Near You may also start the application from System Preferences On Windows computers Press Start Programs TC Electronic TC Near The TC Near Control pane...

Страница 6: ...rols the phones level However via the Setup page it is possible to link the phones level to the big volume knob on the front panel Separate level control is ideal such as when you are in the control r...

Страница 7: ...ST 1 4 jack inputs When you work with a variety of recording sources you do not have to change the routing every time You can leave microphone and instruments connected to the three recording inputs a...

Страница 8: ...l the time Input selection is done using the SCENE buttons FRONT PANEL OVERVIEW REAR PANEL OVERVIEW 13 12 11 Phones level Individual levels can be set for the Phones and Monitor outputs This knob sets...

Страница 9: ...as you wish Simply click on the channel label and enter a name of your choice MIXER PAGE MIXER PAGE 15 14 CONTROL PANEL Press the Mixer tab to enter the Mixer page To change position of knobs and fade...

Страница 10: ...he A B button you will toggle between these two memory locations The A B memory locations are temporary settings only Saving a preset will save the currently selected memory location only The setting...

Страница 11: ...AW 13 100 Deactivates the mix control and sets a 100 wet mix This is the setting to use when you are using the M40 reverb as a send effect and also when using it as a cue reverb for recording When usi...

Страница 12: ...the Setup page Disabling the Reverb Control will of course have no influence on the VST AU version of the M40 Studio Reverb The reverb section on the mixer page will then show 7 Reverb Control Reverb...

Страница 13: ...48 units connected via FireWire a computer and an ADAT interface We assigned the nicknames SK48 No1 and SK48 No2 to the two Studio Konnekt 48 units Nicknames are set on the Setup page The intention is...

Страница 14: ...tudio Konnekt 48 will auto coast and immediately shift to the latest received valid clock rate AUTO INTERNAL NO REFERENCE This message appears when a valid external reference sync source has not been...

Страница 15: ...units will appear in this drop down menu Output Assuming that Desktop Konnekt 6 is the only Konnekt device connected to your computer you can select between the following output channels for each outp...

Страница 16: ...licking it Follow the instructions For detailed instructions on software installation please see the Installation guide included in the product box Updating Firmware Firmware is a computer program tha...

Страница 17: ...dB 20 Hz to 20 kHz 1 4 Phone Jack Ground Sensing Design 100 Ohm 100 dBu to 13 dBu 95 dB 0 002 1 kHz 1 dBFS 102 dB 20 Hz to 20 kHz 0 0 1 dB 20 Hz to 20 kHz 100 dB 20 Hz to 20 kHz DAC D to A Conversion...

Отзывы: