


17
CLARITY M/CLARITY M STEREO User Manual
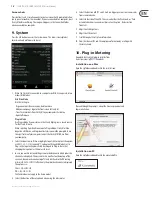
Plug-in Operation
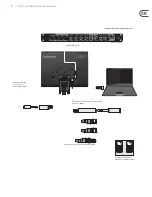
Connect the Clarity M to your computer with the included USB cable. On the
Clarity M unit, press the 5th button to access the System (SYS) menu, then make
sure that the USB Mode is set to Plug-in. When you switch from Disk Drive to
Plug-in Mode, a prompt will appear to advise that you eject the Clarity M from
your PC. The prompt on Clarity M will only occur the first time after Clarity M has
been switched on.
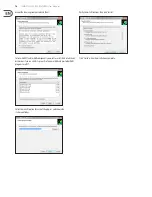
Open your DAW and insert the plug-in on the track or bus of your choice. Keep in
mind where it falls in relation to other plug-ins that might affect the metering.
The exact process varies depending on your software.
Once the plug-in is inserted in the signal chain in the desired location,
you can begin metering on the Clarity M hardware unit.
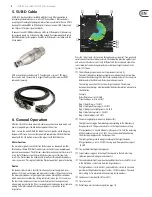
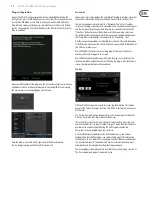
Connection
Connection status is indicated on the right side of the plug-in window. Successful
connection is indicated with a green circle and “Connected to Clarity M” text.
There are 2 conditions that will result in a “Not connected” status. If another
instance of the plug-in already exists on another track, a yellow circle will appear
and the text box will notify you where the plug-in is currently active. Click the
“Take Over” button to connect the hardware unit to the new plug-in location.
The yellow circle may also appear while the connection is being made between
the Clarity M unit and the plug-in, accompanied by “Connecting...” text.
All other connection problems are indicated by a red circle. This could be happen
if the USB cable is disconnected, the Clarity M unit is powered off, USB Mode is set
to Disk Drive, or other issues.
Most DAWs offer the ability to move or drag plug-ins from one track/bus to
another, and Clarity M supports this as well.
Most DAWs automatically offer an on/off switch for plug-ins, accessible inside
the plug-in window and/or the track itself. Muting the plug-in will stop the data
stream, but will not shut down the connection.
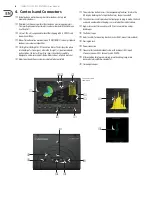
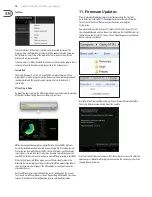
Controls
Click the Play/Pause icon to manually start and stop the metering. This button
overrules the 'Follow Transport' function. Click RESET to perform a manual reset
of the meter.
The “Follow Transport” option automatically starts the measurement when the
DAW is in Play mode, and stops it when the DAW stops.
“Reset on Play” automatically resets the meters when the Play icon is pressed,
or when the DAW starts to play in “Follow Transport” mode. Note that the Reset
parameter can also be automated using the DAW's automation feature.
This process will vary depending on your software.
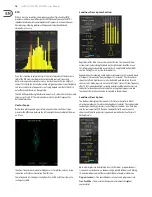
A track information section displays the track number, name, and channel
configuration. Some DAW programs can automatically supply this information
to the plug-in. In cases where this is not supported, the track name and number
can be entered manually. The number and name are stored within the project,
allowing them to be recalled when the project is opened again.
The track configuration mode will also be listed in this section (mono, stereo, 5.1).
The Stereo model only supports mono and stereo.
Содержание Clarity M
Страница 20: ......


