background image

TBK-DVR1200 & TBK-DVR1300 Digital Video Recorder User Manual  


www.tbkvision.com


144 


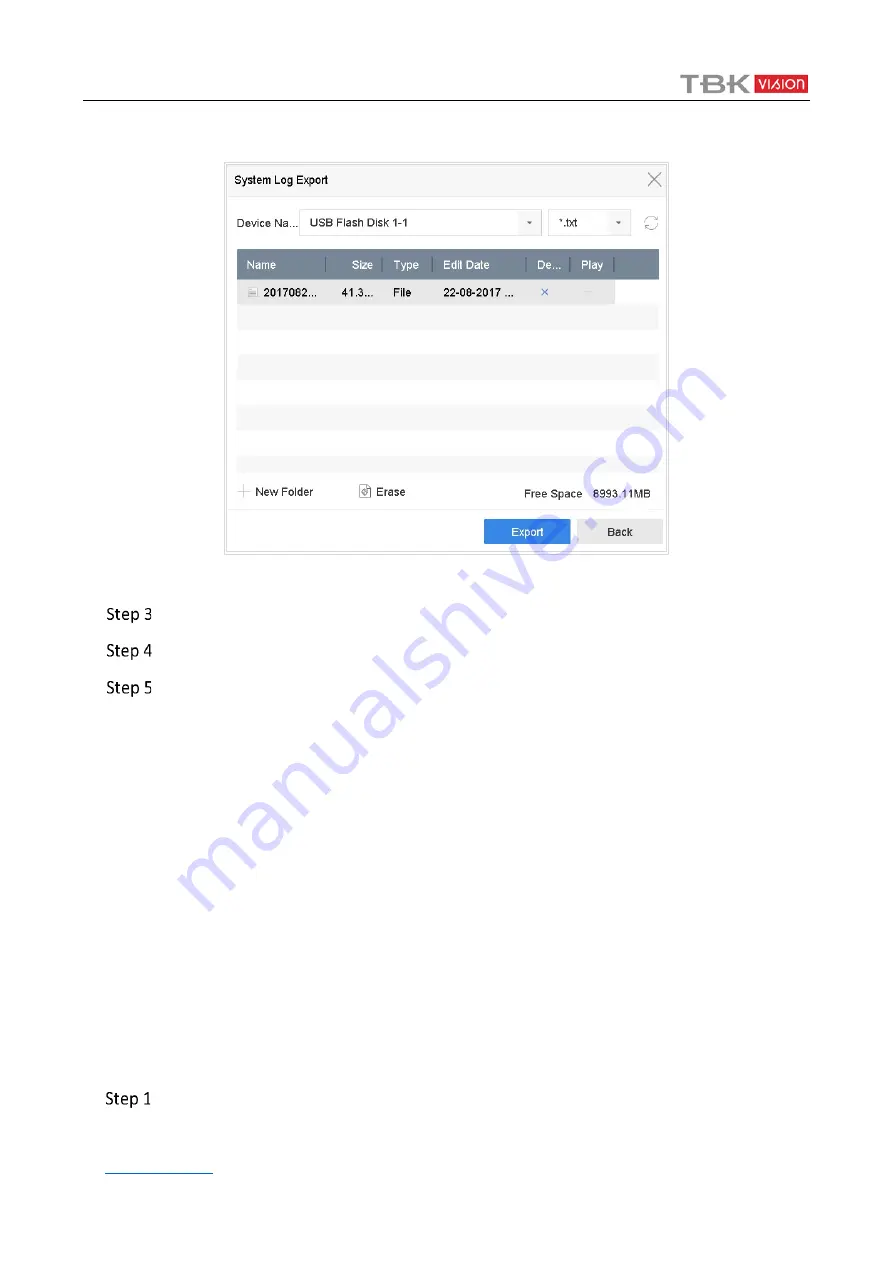
Select the storage device from the dropdown list of 

Device Name

.  


Select the format of the log files to be exported. Up to 15 formats are selectable.   


Click 

Export 

to export the log files to the selected storage device.  

Related Operation: 


Click 

New Folder

 to create new folder in the storage device.  


Click 

Format

 to format the storage device before log export.  

14.3 Import/Export IP Camera Configuration Files 


Purpose: 


The information of added IP camera can be generated into an excel file and exported to the local 

device for backup, including the IP address, manage port, password of admin, etc. And the 

exported file can be edited on your PC, like adding or deleting the content, and copy the setting to 

other devices by importing the excel file to it.   

Before You Start: 


Connect a storage device to your device. For importing the configuration file, the storage device 

must be with the file.   


Go to 

Camera

 > 

IP Camera Import/Export

.   


 Export Log Files   

Содержание TBK-DVR1200 Series

Страница 1: ...User Manual Digital Video Recorder TBK DVR1200 and TBK DVR1300 series...

Страница 2: ...fessionals Legal Disclaimer REGARDING TO THE PRODUCT WITH INTERNET ACCESS THE USE OF PRODUCT SHALL BE WHOLLY AT YOUR OWN RISKS OUR COMPANY SHALL NOT TAKE ANY RESPONSIBILITES FOR ABNORMAL OPERATION PRI...

Страница 3: ...use harmful interference 2 This device must accept any interference received including interference that may cause undesired operation EU Conformity Statement This product and if applicable the suppli...

Страница 4: ...308 TBK DVR1316 Symbol Conventions The symbols that may be found in this document are defined as follows Symbol Description Provides additional information to emphasize or supplement important points...

Страница 5: ...lug the power cable and then please contact the service center Preventive and Cautionary Tips Before connecting and operating your device please be advised of the following tips Ensure unit is install...

Страница 6: ...resolution frame rate bit rate image quality etc The minimum frame rate for main stream and sub stream is 1 fps Encoding for both video stream and video audio stream audio and video synchronization du...

Страница 7: ...n For TBK DVR1300 series DVR if enhanced VCA mode is enabled full channel line crossing detection and intrusion detection and 2 ch sudden scene change detection are supported but 2K 4K output and 4 MP...

Страница 8: ...ing types manual continuous alarm motion motion alarm motion alarm and event The device will note that the exported AVI video may have problems if the frame rates of the continuous and event recording...

Страница 9: ...video images and playback of captured pictures Backup Exports data by a USB and SATA device Exports video clips when playback Video and Log and Player are selectable to export for backup Management a...

Страница 10: ...ext password available GUID file can be exported for password resetting Security question can be configured for password resetting Multiple connected analog cameras supporting Turbo HD or AHD signal c...

Страница 11: ...ormation can be sent to the remote host Remotely start stop recording Remotely start stop alarm output Remote PTZ control Two way audio and voice broadcasting Output bandwidth limit configurable Embed...

Страница 12: ...2 6 Enter Main Menu 33 2 7 System Operation 34 Chapter 3 Camera Management 36 3 1 Add the IP Cameras 36 3 2 Enable the H 265 Stream Access 39 3 3 Upgrade the IP Camera 39 Chapter 4 Camera Settings 41...

Страница 13: ...re Holiday Recording and Capture 73 7 11 Configure Redundant Recording and Capture 74 7 12 Configure 1080p Lite 76 Chapter 8 File Management 77 8 1 Search and Export All Files 77 8 2 Search and Export...

Страница 14: ...Analysis 125 12 1 Face Search 125 12 2 Human Body Search 126 12 3 Vehicle Search 126 12 4 People Counting 127 12 5 Heat Map 128 Chapter 13 Network Settings 129 13 1 Configure TCP IP Settings 129 13 2...

Страница 15: ...tem Settings 152 15 1 Configure General Settings 152 15 2 Configure Date Time 153 15 3 Configure DST Settings 154 15 4 Configure Enhanced IP Mode 154 15 5 Manage User Accounts 154 15 6 Configure Passw...

Страница 16: ...ower switch on the rear panel is turned on STATUS Flickers red when data is being read from or written to HDD Tx Rx Flickers green when network connection is functioning properly 2 MENU Accesses the m...

Страница 17: ...t universal device identification number shared by the devices You may also pair an IR Remote to a specific device by changing the Device ID as follows Pairing Enabling the IR Remote to a Specific Dev...

Страница 18: ...ollows Press the DEV key on the IR Remote Any existing Device ID will be erased from the unit s memory and it will no longer function with the device Re enabling the IR Remote requires pairing to a de...

Страница 19: ...selection If User Is Not Logged On 1 Hold Power On Off button 1 down for five seconds to display the user name password prompt 2 Press the Enter button 12 to display the on screen keyboard 3 Input th...

Страница 20: ...DIT Delete characters before cursor Check the checkbox and select the ON OFF switch 5 A Adjust focus in the PTZ Control menu Switch on screen keyboards upper and lower case alphabet symbols and numera...

Страница 21: ...TZ control mode ENTER Confirm selection in any menu mode Checks checkbox Play or pause video in Playback mode Advance video a single frame in single frame Playback mode Stop start auto switch in auto...

Страница 22: ...s 255 This ID is valid for all the IR remote controls Press DEV on the remote control Enter the device ID you set in step 2 Press ENTER on the remote If the Status indicator on the front panel turns b...

Страница 23: ...evice list from your provider The operation of the mouse Description of the Mouse Control Name Action Description Left Click Single Click Live view Select channel and show the quick set menu Menu Sele...

Страница 24: ...ar Panel No Item Description 1 VIDEO IN BNC interface for Turbo HD and analog video input 2 AUDIO IN RCA connector 3 AUDIO OUT RCA connector 4 VGA DB15 connector for VGA output Display local video out...

Страница 25: ...Video Recorder User Manual www tbkvision com 25 10 Power Switch Switch for turning on off the device No Item Description 11 GND Ground 12 VIDEO OUT BNC connector for video output 13 Alarm In Out Conne...

Страница 26: ...y Connect the device power supply interface and electrical socket with delivered power cable It is HIGHLY recommended that an Uninterruptible Power Supply UPS be used in conjunction with the device Th...

Страница 27: ...rd monthly or weekly can better protect your product Enter the password to activate the IP camera s connected to the device Optionally check Export GUID Security Question Configuration or Reserved E m...

Страница 28: ...re connected with default protocol Configure Unlock Pattern for Login Purpose For the admin user you can configure the unlock pattern for device login After the device is activated you can enter the f...

Страница 29: ...et the pattern again Login to the Device Log in via Unlock Pattern Only the admin user has the permission to unlock the device Please configure the pattern first before unlocking Please refer to 2 2 A...

Страница 30: ...nu and other functions Select the User Name in the dropdown list Input password Click OK to log in When you forget the password of the admin you can click Forgot Password to reset the password In the...

Страница 31: ...e and time on the Date and Time Setup interface Click Next after you configured the network parameters which takes you to the HDD Management window Date and Time Settings After the time settings click...

Страница 32: ...rch to search the online IP Camera Before adding the camera make sure the IP camera to be added is in active status 2 Click the Add to add the camera If the camera is in inactive status you can select...

Страница 33: ...inimum of 8 characters including at least three of the following categories upper case letters lower case letters numbers and special characters in order to increase the security of your product And w...

Страница 34: ...nagement Smart Analysis Camera Management Storage Management System Management System Maintenance System Operation Log out Purpose After logging out the monitor turns to the live view mode and if you...

Страница 35: ...It is required to input a user name and password to unlock the system Shut Down the Device Click on the menu bar Click the Shutdown Click the Yes Do not conduct power off operation again when the sys...

Страница 36: ...device Before you start Ensure the network connection is valid and correct and the IP camera to add has already been activated Click on the main menu bar Click Camera IP Camera Custom Add on the title...

Страница 37: ...arched online devices If the IP camera to add has not been activated you can activate it from the IP camera list on the camera management interface For TBK DVR1200 0s series when IP camera is added th...

Страница 38: ...can be connected for the selected channel Click Apply to save the settings You can view the max accessible number of IP cameras in the Max IP Camera Number text field Refer to the specifications for t...

Страница 39: ...5 Stream Access Purpose The device can automatically switch to the H 265 stream of IP camera which supports H 265 video format for the initial access Click on the main menu bar Click Camera IP Camera...

Страница 40: ...firmware upgrade file to the device Click on the main menu bar On the camera management interface select a camera Click Camera IP Camera More Settings Upgrade at the top taskbar Select the firmware up...

Страница 41: ...creen Display settings for the camera including date time camera name etc Click on the main menu bar Click Display Select the camera from the drop down list Edit the name in the Camera Name text field...

Страница 42: ...on the main menu bar Click Privacy Mask Select the camera to set privacy mask Click the checkbox of Enable to enable this feature Use the mouse to draw a zone on the window The zones will be marked wi...

Страница 43: ...icons on the right side of the window or click Clear All to clear all zones Click Apply to save the settings Configure the Video Parameters Purpose You can customize the image parameters including th...

Страница 44: ...o 7 and the higher sensitivity results in the more easily to trigger the mode switch The switch time refers to the interval time between the day night switch You can set it from 5 sec to 120 sec Auto...

Страница 45: ...m 45 Backlight Set the wide dynamic range 0 to 100 of the camera When the surrounding illumination and the object have larger difference in brightness you should set the WDR value Image Enhancement Fo...

Страница 46: ...ture instant playback audio on off digital zoom live view strategy show information and start stop recording etc Digital Zoom Purpose Digital Zoom is for zooming in the live image You can zoom in the...

Страница 47: ...select different detection types motion detection vehicle detection face detection You can select the historical analysis or the real time analysis to obtain the results Result The smart analysis res...

Страница 48: ...nds to dwell between switching of cameras when enabling autoswitch in Live View Enable Audio Output Enable disable audio output for the selected video output Volume Adjust the volume of live view play...

Страница 49: ...can also click and drag the camera to the desired window on the live view interface to set the camera order Related Operation Click button to start live view for all the channels Click to stop all th...

Страница 50: ...ds to dwell between switching of cameras when enabling autoswitch The range is from 5s to 300s Go to View to set the view layout Click OK to save the settings Configure Channel zero Encoding Purpose Y...

Страница 51: ...tor These features include Single Screen Switch to a full screen display of the selected camera Camera can be selected from a dropdown list Multi screen Switch between different display layout options...

Страница 52: ...ew interface The PTZ control wizard will pop up as below Follow the wizard to adjust the PTZ view focus and zoom in out the camera Optional Check Do not show this prompt again Click OK to exit Configu...

Страница 53: ...re that the presets patrols and patterns should be supported by PTZ protocols Set a Preset Purpose Follow the steps to set the preset location which you want the PTZ camera to point to when an event t...

Страница 54: ...view the configured presets Call a Preset Purpose This feature enables the camera to point to a specified position such as a window when an event takes place Click on the quick settings toolbar in the...

Страница 55: ...re for a set duration before moving on to the next key point The key points are corresponding to the presets Click on the quick settings toolbar in the live view interface Click Patrol to configure pa...

Страница 56: ...pan to stay at the corresponding key point 2 Click Apply to save the key points to the patrol Optional Click to adjust the key point order Click Apply to save the settings of the patrol Repeat steps 3...

Страница 57: ...e pattern to make the PTZ movement according to the predefined path Click on the quick settings toolbar in the live view interface The PTZ control panel displays on the right of the interface Click Pa...

Страница 58: ...is properly connected Purpose The linear scan can be enabled to trigger the scan in the horizontal direction in the predefined range This function is supported by some certain models Click on the quic...

Страница 59: ...specified protocol Purpose For some certain model of the speed dome it can be configured to start a predefined park action scan preset patrol and etc automatically after a period of inactivity park t...

Страница 60: ...onnected Purpose You can operate the auxiliary functions including light wiper and center on the PTZ control panel Click on the quick settings toolbar in the live view interface Click Aux Function Cli...

Страница 61: ...he Quick Start Guide for the installation instructions Add the Network Disk You can add the allocated NAS or disk of IP SAN to device and use it as network HDD Up to 8 network disks can be added Addin...

Страница 62: ...cessfully added the NAS disk return to the HDD Information menu The added NetHDD will be displayed in the list Adding IP SAN Go to Storage Storage Device Click Add to enter the Custom Add interface Se...

Страница 63: ...t and click Init for initialization Configure eSATA for Data Storage Purpose When there is an external eSATA device connected to device you can configure eSATA for the data storage and you can manage...

Страница 64: ...onto a Click to enter the Local HDD Settings interface Set eSATA Mode When Usage type is selected to Record Capture enter the storage device interface Edit the property of the selected eSATA or initi...

Страница 65: ...ect the Group number for the current HDD Click OK Regroup the cameras for HDD if the HDD group number is changed Go to Storage Storage Mode Select Mode to Group Select the group No from Record on HDD...

Страница 66: ...ttings Configure HDD Quota Purpose Each camera can be configured with allocated quota for the storage of recorded files or captured pictures Go to Storage Storage Mode Select Mode to Quota Select a ca...

Страница 67: ...ge mode settings When the quota capacity is set to 0 all cameras will use the total capacity of HDD for record and picture capture Recording Parameters Main Stream The Main Stream refers to the primar...

Страница 68: ...need of bandwidth and HDD storage space A higher resolution frame rate and bitrate setting will provide you the better video quality but it will also require more internet bandwidth and use more stor...

Страница 69: ...ile will not be deleted The actual keeping time for the file should be determined by the capacity of the HDD Redundant Record Capture By enabling redundant record or capture you save the record and ca...

Страница 70: ...urable Continuous scheduled recording Event recording triggered by all event triggered alarm Motion recording triggered by motion detection Alarm recording triggered by alarm M A recording triggered b...

Страница 71: ...pter 7 4 Configure Recording Schedule for details Configure Motion Detection Triggered Recording You can configure the recording triggered by the motion detection event Go to System Event Normal Event...

Страница 72: ...You can configure the recording triggered by the motion detection face detection vehicle detection line crossing detection etc Go to System Event Normal Event Alarm Input Configure the alarm input and...

Страница 73: ...low the steps to configure the record or capture schedule on holiday for that year You may want to have different plan for recording and capture on holiday Go to System Holiday Select a holiday item f...

Страница 74: ...recording and capture which means saving the record files and captured pictures not only in the R W HDD but also in the redundant HDD will effectively enhance the data safety and reliability You must...

Страница 75: ...al www tbkvision com 75 Go to Storage Schedule Settings Record Schedule Capture Schedule Click Advanced to set the camera recording parameters Check the checkbox of Redundant Record Capture Click OK t...

Страница 76: ...p 2 Check the checkbox of 1080P Lite Mode and click Apply to pop up the attention box After enabling 1080p lite mode the 3 MP signal is not accessible to analog channel Step 3 Click Yes in popup messa...

Страница 77: ...le Management All Files Click Search to display results The matched files will be displayed 8 1 2 Export Files Purpose Export files for backup purposes using USB device USB flash drive USB HDD USB opt...

Страница 78: ...ay results The matched files are displayed in thumbnail or list Target Picture Display the search results of people close up Source Picture Display the search results of original picture captured by c...

Страница 79: ...Picture or Source Picture in menu bar to display related pictures only Select Video or Picture to specify the file type Target Picture Display the search results of vehicle close up Source Picture Dis...

Страница 80: ...quick search Go to File Management All Files People Appearance File Vehicle File Set the search conditions Click Save Enter a name in text field and click Finished The saved search conditions will be...

Страница 81: ...ing during the last five minutes On the live view window of the selected camera move the cursor to the window bottom to access the toolbar 9 1 2 Play Normal Video Go to Playback Select one or more cam...

Страница 82: ...mart playback mode the device can analyze the video containing the motion line or intrusion detection information mark it in red color and play the smart searched video The smart playback must be in t...

Страница 83: ...7 Click the icon 8 Specify 4 points to set a quadrilateral region for intrusion detection Only one region can be set Motion Detection 9 Click the icon 10 Hold the mouse on the image to draw the detect...

Страница 84: ...urpose Video tag allows you to record related information like people and location of a certain time point during playback You can use video tag s to search for video files and position time point Bef...

Страница 85: ...dit Tag Files Go to Playback Click Tag The available tags are white marked and displayed in the time bar Point the white marked tag in the time bar to access the tag information Click to edit the tag...

Страница 86: ...one or several channels searched by event type e g alarm input motion detection line crossing detection face detection vehicle detection etc Go to Playback Click Custom Search on the left bottom to en...

Страница 87: ...urpose The video files can be played in multiple sub periods simultaneously on the screens Go to Playback Select icon at the left bottom corner to enter the sub period playing mode Select a camera Set...

Страница 88: ...files for 1 hour on each screen simultaneously 9 1 8 Play Log Files Purpose Play back record file s associated with channels after searching system logs Go to Maintenance Log Information 9 1 9 Play E...

Страница 89: ...deo In the Smart Custom video playback mode click to set the play strategy When Do not Play Normal Videos is checked the device will skip the normal video and play the smart motion line crossing intru...

Страница 90: ...the playback interface you can conveniently locate the required video files on the time bar In the video playback mode move the mouse to the time bar to get the preview thumbnails of the video files...

Страница 91: ...ual www tbkvision com 91 9 2 6 Digital Zoom In the video playback mode click from the toolbar to enter the digital zoom interface You can move the sliding bar or scroll the mouse wheel to zoom in out...

Страница 92: ...n an alarm or exception occurs including Event Hint Display Full Screen Monitoring Audible Warning buzzer Notify Surveillance Center Trigger Alarm Output and Send Email 10 2 1 Configure Auto switch Fu...

Страница 93: ...ng Auto switch will terminate once the alarm stops and back to the live view interface 10 2 2 Configure Audio Warning Purpose The audio warning enables the system to trigger an audible beep when an al...

Страница 94: ...tion face detection line crossing detection and all other events Go to the Linkage Action interface of the alarm input or event detection e g motion detection face detection line crossing detection in...

Страница 95: ...et patrol pattern No to call when the alarm events occur You can set one PTZ type only for the linkage action each time 10 3 Configure Motion Detection Alarm Purpose The motion detection enables the d...

Страница 96: ...e preview screen to draw the customized motion detection area s You can click Clear to clear the current motion detection area settings and draw again Set sensitivity 0 100 The sensitivity allows you...

Страница 97: ...detect video loss of a channel and take alarm response action s Go to System Event Normal Event Video Loss Set Video LossDetection Select the camera to configure the video loss detection Check Enable...

Страница 98: ...2 3 levels are available The sensitivity allows you to calibrate how readily movement triggers the alarm The higher value results in the more readily to trigger the video tampering detection Set the a...

Страница 99: ...0 6 Sensor Alarms Purpose Set the handling action of an external sensor alarm 10 6 1 Configure Alarm Input Edit Alarm Name Select Input Go to System Event Normal Event Alarm Input Select an alarm inpu...

Страница 100: ...evice to take effect the settings 10 6 2 Configure One Key Disarming Purpose The one key disarming enables the device to disarm the alarm input 1 by one key operation Go to System Event Normal Event A...

Страница 101: ...10 6 3 Configure Alarm Output Purpose Trigger an alarm output when an alarm is triggered Go to System Event Normal Event Alarm Output Select an alarm output item from the list and click Edit Alarm Na...

Страница 102: ...tal Video Recorder User Manual www tbkvision com 102 Set the arming schedule Refer to Chapter 10 1 Configure Arming Schedule Alarm Output Optional You can click Copy to copy the same settings to other...

Страница 103: ...in the live view window trigger alarm output and linkage actions Go to System Event Normal Event Exception Optional Enable the event hint if you want to display the event hint in the live view window...

Страница 104: ...or Clear Alarm Output Manually Purpose Sensor alarm can be triggered or cleared manually When Manually Clear is selected for the dwell time of an alarm output the alarm can be cleared only by clickin...

Страница 105: ...TBK DVR1200 TBK DVR1300 Digital Video Recorder User Manual V2 www tbkvision com 105 Alarm Output...

Страница 106: ...ring scene and capture the human body pictures This feature is available only when the connected camera supports the human body detection Go to System Event Smart Event Click Human Body Select the cam...

Страница 107: ...ine and re draw it Set the arming schedule Refer to Chapter 10 1 Configure Arming Schedule Set the linkage actions Refer to Chapter 10 2 Configure Alarm Linkage Actions Click Apply to activate the set...

Страница 108: ...the arming schedule Refer to Chapter 10 1 Configure Arming Schedule Set the linkage actions Refer to Chapter 10 2 Configure Alarm Linkage Actions Click Apply 11 3 Vehicle Detection Purpose Vehicle De...

Страница 109: ...ra to configure Check Enable Vehicle Detection Optionally check Save VCA Picture to save the captured pictures of vehicle detection Set the arming schedule Refer to Chapter 10 1 Configure Arming Sched...

Страница 110: ...k Save VCA Picture to save the captured pictures of line crossing detection Follow the steps to set the line crossing detection rules and detection areas 1 Select an Arming Region to configure Up to 4...

Страница 111: ...ty Sensitivity range sensitivity The higher the value is the more easily the detection alarm can be triggered 4 Click Draw Region and set two points in the preview window to draw a virtual line Set th...

Страница 112: ...nally check Save VCA Picture to save the captured pictures of intrusion detection Follow the steps to set the detection rules and detection areas 1 Select a Virtual Panel to configure Up to 4 virtual...

Страница 113: ...trigger an alarm Its range is 1 100 3 Click Draw Region and draw a quadrilateral in the preview window by specifying four vertexes of the detection region Set the arming schedule Refer to Chapter 10...

Страница 114: ...1 Select an Arming Region to configure Up to 4 regions are selectable 2 Drag the sliders to set Sensitivity Sensitivity The higher the value is the more easily the detection alarm can be triggered It...

Страница 115: ...4 regions are selectable 2 Drag the sliders to set Sensitivity Sensitivity The higher the value is the more easily the detection alarm can be triggered Its range is 0 100 3 Click Draw Region and draw...

Страница 116: ...etection function detects the objects left over in the pre defined region such as the baggage purse dangerous materials etc and a series of actions can be taken when the alarm is triggered Check Enabl...

Страница 117: ...triggered after the object is left and stayed in the region for 10s Its range is 5s 20s Sensitivity Similarity degree of the background image The higher the value is the more easily the detection ala...

Страница 118: ...emoved from the pre defined region such as the exhibits on display and a series of actions can be taken when the alarm is triggered Go to System Event Smart Event Click Object Removable Object Removal...

Страница 119: ...value is 10 alarm is triggered after the object disappeared from the region for 10s Its range is 5s20s Sensitivity The similarity degree of the background image Usually when the sensitivity is high a...

Страница 120: ...d Intensity Detection Audio Loss Exception Detects the sound steep rise in the surveillance scene You can set the detection sensitivity and threshold for sound steep rise You need to configure its Sen...

Страница 121: ...ly 11 11 Sudden Scene Change Detection Purpose Scene change detection detects the change of surveillance environment affected by the external factors such as the intentional rotation of the camera Go...

Страница 122: ...arming schedule Refer to Chapter 10 1 Configure Arming Schedule Set the linkage actions Refer to Chapter 10 2 Configure Alarm Linkage Actions Click Apply 11 12 Defocus Detection Purpose The image blu...

Страница 123: ...Alarm Linkage Actions Click Apply 11 13 PIR Alarm Purpose A PIR Passive Infrared alarm is triggered when an intruder moves within the detector vision field The heat energy dissipated by a person or a...

Страница 124: ...TBK DVR1200 TBK DVR1300 Digital Video Recorder User Manual www tbkvision com 124 FIR Alarm Select a camera to configure...

Страница 125: ...re related video file according to the specified conditions Before you start Please refer to Chapter 11 2 Face Detection for configuring the face detection Go to Smart Analysis Smart Search Face Searc...

Страница 126: ...series Purpose You can search and view the matched captured vehicle pictures Go to Smart Analysis Smart Search Vehicle Search Select the IP camera for the vehicle search Set search conditions Purpose...

Страница 127: ...and form in daily weekly monthly annual reports for analysis Optional Click Export to export the report in excel format Plate Search Click Start Search Go to Smart Analysis Smart Search Counting Selec...

Страница 128: ...esponding configuration must be set Click Counting Then there will generate the result graphic in different colors As shown in the figure above red color block 255 0 0 indicates the most welcome area...

Страница 129: ...evice will automatically enable the other standby NIC card so as to ensure the normal running of the whole system Load Balance By using the same IP address and two NIC cards share the load of the tota...

Страница 130: ...Set up devices 1 Go to Menu Configuration Network Platform Access 2 Check Enable to activate the function Then the service terms will pop up Enter the verification code in Verification Code a Scan the...

Страница 131: ...on app or TBK cloud website 13 3 Configure DDNS Purpose You can set Dynamic DNS service for network access Different DDNS modes are available DynDNS PeanutHull and NO IP Before You Start You must regi...

Страница 132: ...o available under DDNS Type and required information should be entered accordingly Enter Server Address for DynDNS i e members dyndns org Under Device Domain Name enter the domain name obtained from t...

Страница 133: ...ternet service provider for details about PPPoE service 13 5 Configure NTP Purpose Connection to a network time protocol NTP server can be configured on your device to ensure the accuracy of system da...

Страница 134: ...to receive device information via SNMP port By setting the trap address and port the device is allowed to send alarm event and exception message to the surveillance center Check Enable A message box...

Страница 135: ...er The network must be connected to either an intranet or the Internet depending on the location of the e mail accounts to send notification Enable Server Authentication Check to enable the function i...

Страница 136: ...o the IP address of the remote PC on which the CMS software is installed and the Alarm Host Port 7200 by default must be the same as the alarm monitoring port configured in the software Server Port Se...

Страница 137: ...00 TBK DVR1300 Digital Video Recorder User Manual www tbkvision com 137 The output bandwidth limit is used for the remote live view and playback The default output bandwidth is the maximum limit Port...

Страница 138: ...ce 14 1 1 Configure Disk Clone Purpose Select the HDDs to clone to eSATA HDD Before you start Connect an eSATA disk to the device Go to Maintenance HDD Operation HDD Clone HDD Clone Check the HDD to c...

Страница 139: ...nology is a monitoring system for HDD to detect and report on various indicators of reliability in the hopes of anticipating failures Go to Maintenance HDD Operation S M A R T Select the HDD to view i...

Страница 140: ...ed you can check Continue to use the disk when self evaluation is failed 14 1 3 Bad Sector Detection Go to Maintenance HDD Operation Bad Sector Detection Select the HDD No in the dropdown list you wan...

Страница 141: ...ed damage information 14 1 4 HDD Health Detection Purpose You can view the health status of Seagate HDD that generated after October 1th 2017 and provides capacity ranges from 4 TB to 8 TB The functio...

Страница 142: ...The operation alarm exception and information of the device can be stored in log files which can be viewed and exported at any time 14 2 1 Search the Log Files Go to Maintenance Log Information Set t...

Страница 143: ...iled information Click to view the related video file 14 2 2 Export the Log Files Before You Start Connect a storage device to your device Search the log files Refer to Chapter 14 2 1 Search the Log F...

Страница 144: ...age device before log export 14 3 Import Export IP Camera Configuration Files Purpose The information of added IP camera can be generated into an excel file and exported to the local device for backup...

Страница 145: ...s 14 4 Import Export Device Configuration Files Purpose The configuration files of the device can be exported to local device for backup and the configuration files of one device can be imported to mu...

Страница 146: ...ect your device with a local storage device with update firmware file Go to Maintenance Upgrade Local Upgrade to enter the local upgrade interface Click Upgrade to start upgrading After the upgrading...

Страница 147: ...e latest firmware Before You Start Ensure the device has successfully connected to Cloud and it requires to install at least one read write HDD for firmware downloading Go to Maintenance Upgrade Onlin...

Страница 148: ...rom the backup device Step 4 Click Upgrade to start upgrading Select the restoring type from the following three options Restore Defaults Restore all parameters except the network including IP address...

Страница 149: ...to disable the service HTTP You can choose to disable the HTTP or set the HTTP authentication when it is enabled as demand to enhance the access security By default the HTTP service is enabled Set HTT...

Страница 150: ...o to System System Service System Service Uncheck the Enable HTTP to disable the HTTP service RTSP Authentication Purpose You can specifically secure the stream data of live view by setting the RTSP a...

Страница 151: ...er accounts Go to System System Service ONVIF Check Enable ONVIF to enable the ONVIF access management Click Add to enter the Add User interface Edit the user name and enter the strong password Select...

Страница 152: ...he password to enhance the security Go to System System Service IP Camera Activation In the text filed of the IP Camera Activation Password enter the new strong password for the cameras Click Apply to...

Страница 153: ...ault language used is English Output Standard Select the output standard to NTSC or PAL which must be the same with the video input standard Resolution Configure the resolution of the video output Dev...

Страница 154: ...15 2 Configure Date Time Go to System General Configure the date and time Time Zone Select the time zone Date Format Select the date format System Date Select the system date System Time Set the syste...

Страница 155: ...at 2 00 a m on the first Sunday of November with 60 minutes ahead Click the Apply button to save the settings 15 4 Configure Enhanced IP Mode Check Enhanced IP Mode Enabling Enhanced IP Mode will all...

Страница 156: ...luding User Name Password Confirm password User Level Operator Guest and User s MAC Address Strong Password recommended We highly recommend you create a strong password of your own choosing Using a mi...

Страница 157: ...e Guest user has no permission of Two way Audio in Remote Configuration and only has the local remote playback in the Camera Configuration by default User s MAC Address The MAC address of the remote P...

Страница 158: ...deleting and editing of IP cameras Local Advanced Operation Operating HDD management initializing HDD setting HDD property upgrading system firmware clearing I O alarm output Local Shutdown Reboot Shu...

Страница 159: ...lly starting stopping manual recording and alarm output of the selected camera s Remote Manual Operation Remotely starting stopping manual recording and alarm output of the selected camera s Local Pla...

Страница 160: ...era Configuration interface Select Camera Permission as Local Live View Select cameras to live view Click OK 15 5 4 Edit the Admin User Purpose For the admin user account you can modify your password...

Страница 161: ...le Unlock Pattern to enable the use of unlock pattern when logging in to the device 2 Use the mouse to draw a pattern among the 9 dots on the screen and release the mouse when the pattern is done Chec...

Страница 162: ...heck the checkbox of Change Password if you want to change the password and input the new password in the text field of Password and Confirm A strong password is recommended Go to System User Edit the...

Страница 163: ...forget your password Check Export GUID when you are activating the device or check Export when you are editing the admin user account Insert a USB flash drive to your device and export the GUID file...

Страница 164: ...ng the admin user account Set three security questions and answers Click OK 15 6 3 Configure Reserved Email Purpose The reserved email will help you to reset password when you forget your password Che...

Страница 165: ...min user account Refer to 18 6 1 Export GUID File On the user login interface click Forgot Password Select the password resetting type to Verify by GUID Insert the USB flash drive that contains GUID f...

Страница 166: ...ve configured the reserved email when you are activating the device or editing the admin user account Refer to 18 6 3 Configure Reserved Email On the user login interface click Forgot Password Select...

Страница 167: ...1500IC12 0 18P US 12 V 1 5 A 0000201935 MOSO Technology Co Ltd TS A018 120015AD 100 to 240 VAC 12 V 1 5 A 18 W 5 5 2 1 10 0000200878 Shenzhen Transin Technologies Co Ltd MSA C2000IC12 0 24P DE 12 V 2...

Страница 168: ...R1200 TBK DVR1300 Digital Video Recorder User Manual www tbkvision com 168 MSP Z1360IC48 0 65W 48 V 1 36 A 0000201935 MOSO Technology Co Ltd KPL 050S II 48 V 1 04 A 0000203078 Channel Well Technology...

Страница 169: ...169 www tbkvision com...

Отзывы: