


Section 8
8-1
Model SB25
Troubleshooting Guide
8
Troubleshooting Guide
Table 8-1
PROBLEM
PROBABLE CAUSE
REMEDY
1.
No power and no lights.
a. The power switch is off.
a. Place power switch in the ON
position.
b. The power cord is not plugged in.
b. Check the connection at the outlet to
ensure the outlet is functioning.
c. Main board problem or blown fuse.
c. Contact a Taylor service technician.
2.
Water is not dispensing.
a. Water line is kinked.
a. Straighten the water line.
b. Water line at back of machine is not
connected.
b. Connect the water line, using the
quick connect fitting.
c. Water pressure is low in the store.
c. Contact a Taylor service technician.
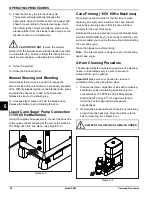
3.
Water is leaking from the machine.
a. Poor fitting/hose connection.
a. Contact a Taylor service technician.
b. Cracked hose.
b. Contact a Taylor service technician.
c. Broken fitting.
c. Contact a Taylor service technician.
4.
Cane sugar is leaking from the
machine. (115V 60 Hz machines
only)
a. Poor fitting/hose connection.
a. Contact a Taylor service technician.
b. Cracked hose.
b. Contact a Taylor service technician.
c. Broken fitting.
c. Contact a Taylor service technician.
5.
Cane sugar is not dispensing or is
dispensing an incorrect amount.
(115V 60 Hz machines only)
a. Sugar cane bottle is missing or has
an inadequate supply.
a. Replace the cane sugar supply.
b. Poor fitting/hose connection.
b. Check connection at rear of machine.
c. Cracked hose.
c. Contact a Taylor service technician.
d. Broken fitting.
d. Contact a Taylor service technician.
e. Pump is not working.
e. Contact a Taylor service technician.
6.
Recipe key #1 - fast blink (hopper/
lid sensor fault).
a. Hopper cover is not seated properly.
a. Correct hopper cover installation.
Replace the cover if it's broken.
b. Hopper is not seated properly.
b. Correct hopper installation. Replace
the hopper if it's broken.
c. Safety switch issue.
c. Contact a Taylor service technician.
7.
Recipe key #2 - fast blink (shaver is
jammed).
a. Large piece of ice has jammed the
shaver.
a. Remove ice, fill with new ice cubes,
and reset the machine.
b. Foreign object is causing jam.
b. Remove the object and reset the
c. machine.
c. Motor failure.
d. Contact a Taylor service technician.
8.
Recipe key #2 - slow blink (shaver
over temperature).
a. Shaver motor is over temperature.
a. Reset machine. If problem persists,
contact a Taylor service technician.
b. Motor failure.
b. Contact a Taylor service technician.
9.
Recipe key #3 fast blink (blender
over temperature or jam).
a. Blender motor is jammed.
a. Reset machine and press the BLEND
key. Repeated jams indicate a failed
blender motor. Contact a Taylor
service technician.
10. Recipe key #3 - slow blink (blender
over temperature).
a. The blender motor is over
temperature.
a. Reset the machine. If the problem
persists, call an authorized service
technician.
11. Recipe key #3 - continuous
illumination (thermistor open fault).
a. Motor failure.
a. Contact a Taylor service technician.
12. Recipe key #4 - fast blink (over
temp fault).
a. Motor control board is over
temperature.
a. Reset the machine. If the problem
persists, call an authorized service
technician.
Содержание SB25
Страница 8: ...1 4 TO THE INSTALLER Model SB25 To the Installer 1 Notes...
Страница 10: ...2 2 TO THE OPERATOR Model SB25 To the Operator 2 Notes...
Страница 16: ...4 4 OPERATOR PARTS IDENTIFICATION Model SB25 Operator Parts Identification 4 Notes...
Страница 28: ...6 8 OPERATING PROCEDURES Model SB25 Operating Procedures 6 Notes...
Страница 30: ...7 2 OPERATOR S CHECKLIST Model SB25 Operator s Checklist 7 Notes...
Страница 34: ...9 2 PARTS REPLACEMENT SCHEDULE Model SB25 Parts Replacement Schedule 9 Notes...
Страница 40: ...11 4 LIMITED WARRANTY ON PARTS Model SB25 Limited Warranty on Parts 11 Notes...


