background image

C713 Operator Training

C713 Operator Training

C713 Operator Training

C713 Operator Training

13

Freezing Cylinder Assembly

Step 10 

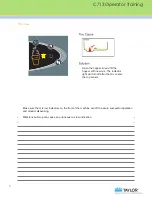
To assemble the freezer door, place the door gaskets into the grooves on the back of the freezer 

door. Slide the front bearings over the baffle rods. The flanged edges should be against the door. DO 

NOT lubricate the gaskets or bearings.

Step 11 

Slide the two o-rings into the grooves on each prime plug. Apply an even coat of Taylor Lube to the 

o-rings and shafts.

Step 12 

Insert the prime plugs into the holes in the top of the freezer door and push down.

Step 13 

To install the freezer door, insert the baffle rods through the beaters in the freezing cylinders.

With the door seated on the freezer studs, install the handscrews. Use the long handscrews on the 

top and the short handscrews on the bottom. Tighten them equally in a criss-cross pattern to insure 

the door is snug.

Step 14 

Slide the three o-rings into the grooves of each standard draw valve. Slide the H-ring and o-ring into 

the grooves of the center draw valve. Lubricate the H-ring and o-rings.

Step 15 

Lubricate the inside of the freezer door spouts, top and bottom.

Step 16 

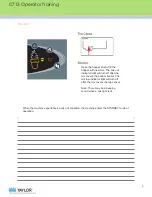
Insert the draw valves from the bottom until the slot in the draw valves come into view.

Step 17 

Slide the fork of the draw handles in the slot of the draw valves, starting from the right. Slide the 

pivot pin through each draw handle as they are inserted into the draw valves.

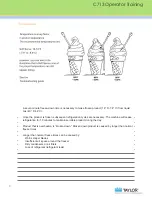
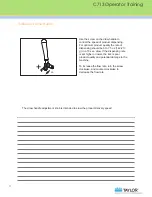
Note:  This freezer features three adjustable draw handles to provide portion control, giving a better 

consistent quality to your product and controlling costs. The draw handle should be adjusted to pro-

vide a flow rate of 5 to 7-1/2 oz. (142 g. to 213 g.) of product by weight per 10 seconds.

To INCREASE the flow rate, turn the adjustment screw CLOCKWISE. Turn the adjustment screw 

COUNTER-CLOCKWISE to DECREASE the flow rate.

Содержание c713

Страница 1: ......

Страница 2: ......

Страница 3: ...C713 Operator Training 1 Introduction...

Страница 4: ...tical The rate must be 5 7 5 oz 150 225 g per 10 seconds The way we measure capacity is by how many servings can be drawn before the machine needs time to recover the mix to the proper viscosity The C...

Страница 5: ...s are necessary The machine will cease refrigeration for 10 minutes to maintain servable product during the day Product that is overbeaten is broken down Broken down product is caused by longer than n...

Страница 6: ...ervice technician Cause Freeze up in mix inlet hole Remedy Call an authorized service technician Cause Mix feed tube is installed incorrectly or the air orifice is not installed Remedy Brush clean the...

Страница 7: ...on the front of the machine are off to assure successful operation and product dispensing Milkstone build up can cause an erroneous mix low indication Open the hopper lid and fill the hopper with new...

Страница 8: ...ers the STANDBY mode of operation Open the hopper lid and fill the hopper with new mix The mix out indicator light will turn off after the mix covers the bottom sensor The mix low indicator light will...

Страница 9: ...or Training 7 After hour 99 the brush clean counter will change to a letter and a number example A0 A1 B0 B1 etc Brush Clean Counter The Brush Clean Counter will display the number of hours since the...

Страница 10: ...ailure BRL 41F 5C AFTER PF The mix temperature in the freezing cylinder was above 41 F 5 C more than four hours following a power failure HPR 45F 7C AFTER 1 HR The mix temperature in the hopper was ab...

Страница 11: ...C713 Operator Training C713 Operator Training 9 INTERACTIVE MODULE Move your mouse across the panel to learn what each part does Accessing Data...

Страница 12: ...C713 Operator Training 10 C713 Operator Training Menu Simulator Click the switch to turn the power ON...

Страница 13: ...the speed of product dispensing For optimum product quality the rate of dispensing should be 5 to 7 5 oz 142 213 g in a 10 sec draw If the dispensing rate is set higher or lower the risk is poor prod...

Страница 14: ...stalling the beater assembly check the scraper blades If they are in good condition take one of the scraper blades and slip it under the hook at the front of the beater Wrap the blade around the beate...

Страница 15: ...in a criss cross pattern to insure the door is snug Step 14 Slide the three o rings into the grooves of each standard draw valve Slide the H ring and o ring into the grooves of the center draw valve L...

Страница 16: ...the small o ring into the groove of the air orifice Do not lubricate the o ring Note Make sure the hole in the air orifice is clean and is not clogged If the hole in the air orifice should become clo...

Страница 17: ...If the mix gets too cold the reset button will trip to protect the beater motor This could be caused by insufficient mix in the freezing cylinder If this occurs inspect the feed tube to verify that i...

Страница 18: ...osits 4 Dispose of o rings and seals if they are worn torn or fit too loosely and replace with new ones 5 Follow all lubricating procedures as outlined in Assembly 6 Check the condenser and filters fo...

Страница 19: ...the ON position Step 6 Touch the WASH symbol This will cause the sanitizing solution in the freezing cylinder to be agitated Step 7 With an empty pail beneath the door spouts raise the prime plug Step...

Страница 20: ...remove all sanitizing solution When only fresh mix is flowing close the draw valve Step 2 Once a steady stream of mix starts to flow from the prime plug opening in the bottom of the freezer door push...

Страница 21: ...un container beneath the door spout Press the WASH key and open the draw valve Drain the remaining product from the freezing cylinder and mix hopper When the flow of product stops press the WASH key a...

Страница 22: ...e the machine is in the WASH mode Step 2 With a mix pail beneath the door spout raise the prime plug and touch the WASH symbol Step 3 When a steady stream of rinse water is flowing from the prime plug...

Страница 23: ...probes Using the double ended brush clean the mix inlet hole Note Do not brush clean the mix inlet hole while the machine is in the WASH mode Step 4 Touch the WASH symbol This will cause the cleaning...

Страница 24: ...drive shaft seal from the drive shaft Step 5 Remove the freezer door gasket front bearing pivot pin draw handle draw valve prime plugs and design caps Remove the three o rings from the draw valve Rep...

Страница 25: ...isassembled parts in the cleaning solution making sure all lubricant and mix film is removed Be sure to brush all surfaces and holes especially the holes in the freezer door Step 3 Rinse all parts wit...

Страница 26: ...thorized service technician The mix in the hopper is too warm Cause Hopper cover is not in position Remedy Clean and sanitize hopper cover and place in position Cause The hopper temperature is out of...

Страница 27: ...Training 25 Troubleshooting LCD No control panel functions with power switch ON Cause Machine is unplugged Remedy Plug into wall receptacle Cause Circuit breaker is OFF or blown fuse Remedy Turn the c...

Страница 28: ...er door Cause Beater assembly is bent Remedy Replace beater assembly Cause Gear box is out of alignment Remedy Call an authorized service technician The drive shaft is stuck in the drive coupling Caus...

Страница 29: ...e machine in AUTO Cause Machine not in AUTO mode Remedy Select AUTO and allow machine to cycle off before drawing product Cause The feed tube is not properly installed Remedy Make sure the feed tube i...

Страница 30: ...ated or worn Remedy Lubricate properly or replace the seal Cause The drive shaft seal is installed inside out Remedy Install correctly Cause Inadequate lubrication of the drive shaft Remedy Lubricate...

Страница 31: ...edy Call an authorized service technician Cause Freeze up in mix inlet hole Remedy Call an authorized service technician Cause Mix feed tube is installed incorrectly or the air orifice is not installe...

Страница 32: ...he Taylor Operator Manual or local Taylor Distributor for part numbers Note For air cooled units condensers should be cleaned monthly with a soft brush Design Cap Every 3 months replace the following...

Страница 33: ...aining C713 Operator Training 31 Six Months Parts Replacement Every 6 months inspect replace if necessary the following Black Bristle Brush 1 x 2 Double Ended Brush White Bristle Brush 1 x 2 White Bri...

Страница 34: ...C713 Operator Training 32 C713 Operator Training Quiz Shakes Start Exit Game C713 the Game...

Страница 35: ...C713 Operator Training C713 Operator Training 33 EXIT GAME...

Страница 36: ...ng 34 C713 Operator Training Sc o r e EXIT GAME 1What will worn scraper blades cause Long running refrigeration times The freezer to be unable to keep up with customer needs The mix to become broken d...

Страница 37: ...perator Training 35 Sc o r e EXIT GAME 2What will happen if the air orifice is not installed on the mix tube Product will have incorrect air to mix ratio No product will dispense The product will free...

Страница 38: ...Operator Training Sc o r e EXIT GAME 3What is the cause when a rear drip pan fills with an excessive amount of mix Worn rear shell bearing Worn damaged or incorrect drive shaft seal Incorrect lubricat...

Страница 39: ...C713 Operator Training C713 Operator Training 37 Sc o r e EXIT GAME 4How often should scraper blades be replaced Every 4 months Never Every 3 months or as needed None of the above...

Страница 40: ...C713 Operator Training 38 C713 Operator Training Sc o r e EXIT GAME 5If the mix out light on the control is lit what mode will the freezer be in Auto Heat Wash Standby...

Страница 41: ...erator Training C713 Operator Training 39 Sc o r e EXIT GAME 6What is the serving temperature of soft serve ice cream 16 to 18 F 8 8 to 7 7 C 14 to 20 F 10 to 6 6 C 20 to 24 F 6 6 to 4 4 C None of the...

Страница 42: ...or Training 40 C713 Operator Training Sc o r e EXIT GAME 7What is the draw rate set for 5 7 oz 142 213 g in 10 seconds 8 15 oz 227 425 g in 10 seconds 7 10 oz 198 283 g in 10 seconds 5 7 oz 142 213 g...

Страница 43: ...3 Operator Training C713 Operator Training 41 Sc o r e EXIT GAME 8What is the term broken down product used to describe Un servable product Wet appearing soft product Over beaten product All of the ab...

Страница 44: ...C713 Operator Training 42 C713 Operator Training Sc o r e EXIT GAME 9How often should tune up kits be installed Monthly Yearly Every 3 months None of the above...

Страница 45: ...C713 Operator Training C713 Operator Training 43 Sc o r e EXIT GAME 10 What is the access code for entering the operator s menu 7348 1234 8309 None of the above...

Страница 46: ...C713 Operator Training 44 Sc o r e Congratulations You now have a great understanding of your Taylor C713 Freezer With this knowledge you ll be able to keep it running at its optimum level EXIT GAME...
Отзывы: