


Drive Motor
Page 68
R-380 DC System
MR-380-03
INSPECTION
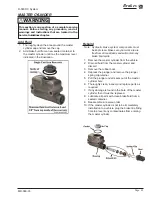
Brushes
Note: There are four brushes in the motor. The
brushes will not wear at the same rate. It
is recommended that all four brushes are
inspected at the same time.
Note: If the motor is not ventilated, then the
motor must be disassembled to inspect the
brushes. Refer to Transmission Service
section for information on removing the
motor.
Note: In some vehicle configurations it may not be
possible to inspect all four brushes while the
motor is in the vehicle. Refer to Transmission
Service section for information on removing
the motor.
1: Look through the brush cover and compare the
top of the brush to the top of the brush holder.
If it is even with or below the top of the brush
holder then the brushes should be removed
and measured. Refer to Replacing the Brushes
section for information regarding removing the
motor brushes.
2: If any one brush is less than or equal to the
service limit specified in Service Limits, then all
four brushes should be replaced.
3: Reconnect the main positive and negative cables
at the batteries.
4: Remove the blocks from behind the wheels,
release the park brake and test drive.
This section is one section of a complete service
manual. Before starting any procedure, read all
warnings and instructions that are located in the
Service Guidelines chapter.
WARNING
Armature
1: Visually inspect the armature windings for burnt
insulation. Burnt insulation is a direct result of
motor overheating and could lead to a shorted
armature.
•
If the insulation is cracked or burnt, then it is
recommend that the armature or motor be
replaced.
Note: If the armature has been burnt then there
is a good possibility that the field windings
may also be burnt. Symptoms indicating a
shorted field include high motor current, lack
of power and possibly excessive speed.
2: Test the armature for shorts with a growler.
•
If the armature is shorted, then the armature or
motor must be replaced.
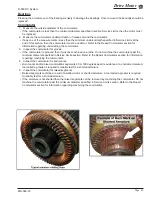
3: Using the continuity function of digital multi-
meter, check the continuity around the entire
commutator by placing one test lead against
one of the commutator segments and the other
test lead against all of the other segments one
at a time (see illustration below). There should
be continuity around the entire commutator. If
any segment indicates an open circuit, then the
armature or motor must be replaced.
4: Using the continuity function of digital multi-
meter, check the continuity from any one of the
commutator segments and the armature frame.
If it is not an open circuit, then the armature is
shorted and the motor must be replaced.
5:
Measure the armature and field resistance (refer
to Service Limits table at end of this section).
If the armature of field resistance is not within
specification then the motor must be repaired or
replaced.
6: Visually inspect the armature windings where
they loop around at the shaft end of the armature.
The armature windings are coated with a thick
insulating enamel. The enamel should be a deep
red color. If the enamel is brown, black or cracked
then the armature has been overheated and may
be shorted. If the loops of wires expanded and
contacted the field, then the maximum RPM of
the motor has been exceeded.
Содержание R0-380-36
Страница 6: ......
Страница 12: ...Page 12 MR 380 03 Introduction R 380 DC System Notes...
Страница 21: ...Table of Contents Special Tool List Special Tool List Troubleshooting Guide 23...
Страница 24: ...Tool List Page 24 R 380 DC System MR 380 03 Notes...
Страница 27: ...Lubrication Page 27 MR 380 03 R 380 DC System LUBRICATION DIAGRAM...
Страница 28: ...Lubrication Page 28 R 380 DC System MR 380 03 Notes...
Страница 44: ...Drive Axle Page 44 R 380 DC System MR 380 03 Notes...
Страница 53: ...Steering Page 53 MR 380 03 R 380 DC System Exploded View of Steering Gear...
Страница 72: ...Drive Motor Page 72 R 380 DC System MR 380 03 Notes...
Страница 90: ...Tires Wheels Page 90 R 380 DC System MR 380 03 Notes...
Страница 102: ...Replacement Parts Page 102 MR 380 03 R 380 DC System AXLE ASSEMBLY FRONT...
Страница 104: ...Replacement Parts Page 104 MR 380 03 R 380 DC System AXLE REAR...
Страница 106: ...Replacement Parts Page 106 MR 380 03 R 380 DC System BATTERY...
Страница 108: ...Replacement Parts Page 108 MR 380 03 R 380 DC System BRAKES BRAKE LINES...
Страница 114: ...Replacement Parts Page 114 MR 380 03 R 380 DC System BRAKES PARK BRAKE LINKAGE...
Страница 118: ...Replacement Parts Page 118 MR 380 03 R 380 DC System CAB DOORS...
Страница 136: ...Replacement Parts Page 136 MR 380 03 R 380 DC System STEERING LINKAGE...
Страница 142: ...Replacement Parts Page 142 MR 380 03 R 380 DC System Notes...
Страница 143: ......


