USE:
- Unroll the cable completely before plugging it in.
- Connect the appliance to the mains.
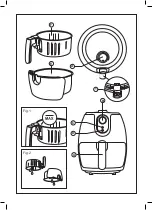
- Take the bowl (E) out of the fryer carefully.
Note: Do not use the bowl without the basket in it.
Note: manipulate the bowl using the basket and
its basket handle. Don’t touch the bowl when
it’s hot.
- Put the ingredients you want to fry inside the
basket (F)
- Introduce the bowl inside the fryer.
- Choose the needed temperature using the
thermostat (A).
- Once you’ve done it, choose the right cooking
time with the Timer (B) and the appliance will
start to work.
- The green power pilot light (C) and the red
heating pilot light (D) will switch on.
- During the process of frying, the red heating pi-
lot light (D) will switch on intermittently, showing
when the appliance is heating.
Note: have in mind that if the appliance is cool
you should add 3 minutes to the cooking time.
Note: if you want to shake the ingredients, pull
the bowl out of the appliance by the handle and
shake it.
- Once the cooking time reaches its end, pull out
the bowl outside the appliance. The appliance
will switch off automatically.
CAUTION: Bowl, basket and food will be very
HOT.
- Place the bowl over a plain surface able to work
with high temperatures.
- Split the basket from the bowl using the basket
release button (H) and turn the basket to take
off the fries, avoiding the risk of burns.
ONCE YOU HAVE FINISHED USING THE
APPLIANCE:
- When the timer reaches its min position (0 min)
the fryer will stop automatically.
To stop the fryer, you just have to turn the timer
into its min position.
- Unplug the appliance from the mains.
- Clean the appliance as it is explained on the
cleaning section.
PRACTICAL RECOMMENDATIONS:
SAFETY THERMAL PROTECTOR:
- The appliance has a safety device, which pro-
tects the appliance from overheating.
CLEANING
- Disconnect the appliance from the mains and
allow it to cool before undertaking any cleaning
task.
- Clean the electrical equipment and the mains
connection with a damp cloth and dry. DO NOT
IMMERSE IN WATER OR ANY OTHER LIQUID.
- Clean the equipment with a damp cloth with a
few drops of washing-up liquid and then dry.
- Do not use solvents, or products with an acid or
base pH such as bleach, or abrasive products,
for cleaning the appliance.
- It is advisable to clean the appliance regularly
and remove any food remains.
- If the appliance is not in good condition of clean-
liness, its surface may degrade and inexorably
affect the duration of the appliance’s useful life
and could become unsafe to use.
- The following pieces may be washed in a dis-
hwasher (using a soft cleaning program):
- Non-stick Bowl
- Basket
- The draining/drying position of the articles
washable in the dishwasher or in the sink must
allow the water to drain away easily. (Fig. 2)
- Then dry all parts before its assembly and
storage.
SUPPLIES
- Supplies can be acquired from distributors and
authorised establishments (such as filters, etc.)
for your appliance model.
- Always use original supplies, designed specifi-
cally for your appliance model.
ANOMALIES AND REPAIR
- Take the appliance to an authorised technical
support service if product is damaged or other
problems arise. Do not attempt to disassemble
or repair the appliance yourself as this may be
dangerous.
FOR EU PRODUCT VERSIONS AND/OR IN
CASE THAT IT IS REQUESTED IN YOUR
COUNTRY:
ECOLOGY AND RECYCLABILITY OF THE
PRODUCT
- The materials of which the packaging of this
appliance consists are included in a collection,
classification and recycling system. Should you
wish to dispose of them, use the appropriate
Содержание PROFESSIONAL AIR
Страница 2: ......
Страница 3: ...Fig 1 A C B D E F G Fig 2...
Страница 20: ......
Страница 37: ...Professional Air Taurus 8 8...
Страница 38: ...10 N MAX...
Страница 39: ...1 MIN A B C D E F G H E F B C D D 3 0...
Страница 40: ...0 min 0 min pH 2 2014 35 2014 30 2011 65 2009 125...
Страница 41: ...200 min 180 8 2 min 180 min 200 min 180 min 200 13 15 min Professional Air...
Страница 42: ...Professional Air Taurus 8 8 8...
Страница 43: ...10 C H H H H 1...
Страница 44: ...min A B C D E F G H e f a b c d d 3 h 0...
Страница 45: ...ph 2 WEEE 2014 35 EU 2014 30 eu 2011 65 EU 2009 125 EC...
Страница 46: ...200 180 8 180 200 180 200 13 15...
Страница 51: ...Professional Air Taurus 8 8 8...
Страница 52: ...10 c c MAX 1...
Страница 53: ...MIN A B D F G H D D...
Страница 54: ...0 min 0 min pH 2 U 2014 35 UE 2014 30 UE 2011 65 U 2009 125 CE...
Страница 55: ...200 180 8 2 180 2 200 1 180 200 13 15 Professional Air...
Страница 57: ...3 0 B H 0 0 2 giF EEEW UE 56 1102 UE 03 4102 UE 53 4102 CE 521 9002...
Страница 58: ...1 GIF XAM NIM A B C D E F G H E F A B D C D...
Страница 59: ...Professional Air 8 8 8 01...
Страница 60: ...Avda Barcelona s n E 25790 Oliana Spain...


