background image


TATUNG Wireless Thin Client (TX-3000) User Guide                                                                                                                             


4. TX-3000 Features .............................................................  

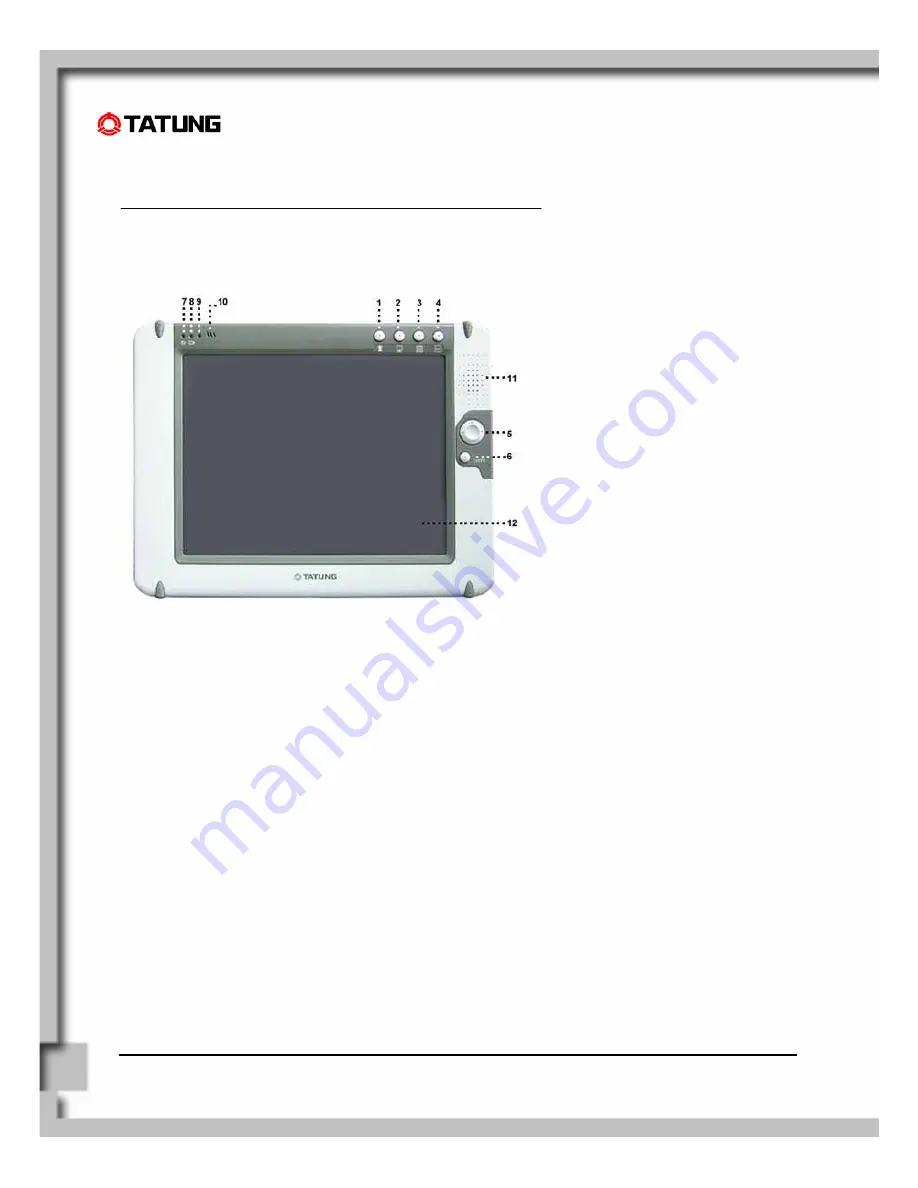
4.1 Front View of TX-3000 


1.  Push function key 1, and you can execute “On Screen Keyboard”. 

2.  Push function key 2, and you can execute “Internet Explorer”. 

3.  Push function key 3, and you can execute “File Manager”. 

4.  Push function key 4, and you can execute “Device setting” utility, which is developed by 

Tatung. It includes four functions: brightness adduction, double-tap setting, button setting, 

and touch panel calibration. 

5. Direction 

Key 

6. Enter 

Key 

7.  Power LED  

8.  Battery Charge LED 

9. RF 

Strength 

LED 

10. Built-In Microphone 

11. Built-In Speaker 

12.  TFT Touch-Screen Panel (Perform operations and input data by tapping and writing directly on 

the screen) 


Содержание TX-3000

Страница 1: ...2006 8 23 page1 TATUNG Wireless Thin Client TX 3000 ...

Страница 2: ...ent may be photocopied reproduced adapted or translated to another language without the prior written consent of TATUNG Co except as allowed under the copyright laws The programs that control this product are copyrighted and all rights are reserved Reproduction adaptation or translation of those programs without prior written permission of TATUNG Co is also prohibited Tatung is the registered trad...

Страница 3: ...n order to avoid property damage or body injury CAUTION Always use standard battery packs supplied with the TX 3000 Other battery packs may have different specifications and cause damages to TX 3000 Do not expose the battery pack to other metal objects Do not use or place TX 3000 near sources of heat or expose it to direct sunlight for an extended period of time Store it in a cool and dry place Do...

Страница 4: ...3000 10 4 4 Right View of TX 3000 11 4 5 Back View of TX 3000 12 5 Quick Start Procedure 13 5 1 Starting TATUNG TX 3000 13 5 2 Booting Logo 15 5 3 Device Settings 16 5 4 LCD Panel Setting 17 5 7 Recalibrating the Touch Screen 20 5 8 Using the Input Method 22 5 9 Resetting TX 3000 23 6 Software Applications 24 7 Restrictions 25 8 Troubleshooting 26 9 Support and Service 28 10 Warranty 29 11 Regulat...

Страница 5: ...oose TATUNG Wireless Thin ClientTM This wireless device is designed to support customers in building a customizable product for different vertical markets Both first time and experienced users can quickly learn how to operate the TATUNG Wireless Thin Client from this guide ...

Страница 6: ...m the box Check to make sure that the following accessories are included in the box If you find any accessory missing or damaged please contact TATUNG representatives immediately TX 3000 Stylus AC Adapter AC Power Cord Battery Pack Embedded Accessories Backup Battery RTC Battery CompactFlash Storage Card 802 11g WLAN Card ...

Страница 7: ...x 1 USB USB2 0 x 2 Card slot PCMCIA Type II Card Bus type x 1 I O connector RJ 45 RS232C VGA Out 3 in 1 connector I O Audio Headphone terminal x 1 Microphone terminal x 1 Power Li ion Battery pack AC adapter Main battery Type Rechargeable Li ion battery 2200mAh 11 1V Operation time About 2hrs Charging time About 2 5hrs Type Rechargeable Ni MH battery 40mAh 7 2V Backup time About 30min system in su...

Страница 8: ...ecute File Manager 4 Push function key 4 and you can execute Device setting utility which is developed by Tatung It includes four functions brightness adduction double tap setting button setting and touch panel calibration 5 Direction Key 6 Enter Key 7 Power LED 8 Battery Charge LED 9 RF Strength LED 10 Built In Microphone 11 Built In Speaker 12 TFT Touch Screen Panel Perform operations and input ...

Страница 9: ...icator LED Color Power LED Battery Charge LED Wireless Signal LED Off Power Off or Suspend Mode Not Charging Signal Strength 0 No signal Green Power On Fully Charged Signal Strength 4 5 Excellent Amber Low Battery 8 Charging Signal Strength 2 3 Good Red Extremely Low Battery Auto Suspend 4 Charge Error Or No Battery Installed Signal Strength 1 Very Low ...

Страница 10: ...TUNG Wireless Thin Client TX 3000 User Guide 4 2 Top View of TX 3000 1 I O Connector 2 Reset Button 3 USB 2 0 Port 4 3 Left View of TX 3000 1 PC Card Slot PCMCIA Type II 2 Headphone Jack 3 Microphone Jack ...

Страница 11: ...Power Button 1 Pressing and holding the power button for more than 4 seconds will power off the system 2 Quickly tapping and releasing the power button will put the system into suspend mode Re tap the power button again to resume operation 2 Stylus 3 USB 2 0 Port 4 DC In Jack ...

Страница 12: ...ient TX 3000 User Guide 4 5 Back View of TX 3000 1 Battery Connector Cover 2 Battery Pack 3 Battery Latch 4 Battery Release Switch 5 IDE Compact Flash Card Slot Cover 1 Backup Battery and RTC Battery Cover 2 Back Stand Handle ...

Страница 13: ...C using the AC DC converter To operate the device with AC power perform the following steps In order to prevent accidental data lost we strongly suggest you to insert the battery pack 1 Insert the battery pack into the Battery Slot 2 Lock the battery latch NOTE The system would not power on if the battery latch was not in the locked position ...

Страница 14: ...uide 3 Plug one end of the AC adapter into the DC In jack and plug the other end into an electrical outlet The power source can range from 100 to 240 Volts at 50 or 60 Hz 4 Turn on TX 3000 by pressing the power button 5 The system is turned on ...

Страница 15: ...TATUNG Wireless Thin Client TX 3000 User Guide 5 2 Booting Logo When the user turns on TX 3000 the Microsoft Windows XP embedded logo is displayed on the screen while the system is booting up ...

Страница 16: ...TATUNG Wireless Thin Client TX 3000 User Guide 5 3 Device Settings TX 3000 uses the standard Microsoft Windows XP user interface But we create a new program which will help you to set the TX 3000 easier ...

Страница 17: ... the brightness of the LCD panel by the Device Setting utility program brightness tab 1 Press the function key 4 and you will see the Device Setting window As in the figure 2 Please kick the Brightness button 3 You can adjust the brightness level according to your personal preference ...

Страница 18: ...ange the double tap speed in Device Setting utility program 1 Press the function key 1 and you will see the Device Setting window As in the figure 2 Please kick the Double Tap Setting tab 3 You can adjust the speed and the distance of the double tap according to your personal preference ...

Страница 19: ...our requirements 1 Press the function key 1 and you will see the Device Setting window 2 Please kick the Botton Setting button As in the figure 3 You can change the button setting for your own needs NOTE The default settings of these four function keys were shown as follows Button 1 On Screen Keyboard Button 2 Internet Explorer Button 3 Windows Explorer Button 4 Device Setting ...

Страница 20: ...ecalibrating the Touch Screen If the user finds that TX 3000 is responding bluntly to stylus taps the user will need to recalibrate his screen Follow the instructions below 1 Launch the Device Setting Utility program 2 Please click the Calibration button ...

Страница 21: ...TATUNG Wireless Thin Client TX 3000 User Guide 3 Screens 1 through 7 of device calibration ...

Страница 22: ...UNG Wireless Thin Client TX 3000 User Guide 5 8 Using the Input Method TX 3000 provides an integrated Soft Keyboard to ease the data input You can bring up the Soft Keyboard by pressing the function key 1 ...

Страница 23: ...setting TX 3000 There are two ways of resetting TX 3000 Hardware Reset and Software Reset Hardware Reset The reset button is located on the top left of TX 3000 Software Reset You can choose to perform a system cold reset by Start Turn off Computer Restart ...

Страница 24: ... on TX 3000 You can download some programs by your needs For details on commercially available software applications contact your local retailer or visit the Microsoft s Web site at http www microsoft com NOTE TX 3000 might not support applications written for MS DOS or 16 bits application programs You should check for compatibility before using the applications ...

Страница 25: ...nect to the Internet make sure that the name of the NIC does not contain more than 10 characters 6 When you plug and remove the PCMCIA card please press the Safely Remove Hardware icon 7 Suspending the system while your PCMCIA card or hard drive is in operation may cause system crash and your device may not be bootable again If your device is no longer bootable you need to send back your CF card f...

Страница 26: ...nd of its service life Purchase a new battery TX 3000 powers off automatically Use the stylus to tap on the screen to check whether the display activates by your awakening Check to see if the system is in suspend mode Check to see if the battery power is too low or completely drained Replace a charged battery or plug in the AC DC adapter to charge the battery TX 3000 cannot be turned on when not c...

Страница 27: ... management by doing a cold boot memory initialization To turn off the sound in TX 3000 Disable the volume and notifications functions Network Connection Problem Action Network connection problems Make sure that the access point is firmly seated and connected to the proper network jack while it is functioning in the network infrastructure mode Make sure that you have provided the required server i...

Страница 28: ...ireless Thin Client TX 3000 User Guide 9 Support and Service Web site You may obtain the Tatung Wireless Thin Clients product information from http www tatung com This online service is provided free of charge ...

Страница 29: ...ed for one 1 year from the date of the first consumer purchase What the warranty does not cover Misuses unauthorized modification opening for any reason except to perform an official upgrade using an proper tools kit Operation or storage outside the environmental specifications for the product The battery or damage caused by this battery In transit damage and improper maintenance Physical damage t...

Страница 30: ... Agreement The Tatung Software Product License Agreement shall govern the use of all software that is provided to you the customer as part of this Tatung product with the exception of Microsoft s software and products which are licensed to you under the Microsoft End User License Agreement EULA contained in the Microsoft documentation Any third party software supplier s warranty terms that may be ...

Страница 31: ...he transfer of all your rights and only if you obtain the prior agreement of the third party to be bound by the terms of this License Agreement Upon such a transfer you agree that your rights to the software are terminated and that you will either destroy all your copies and adaptations or deliver them to the third party Transfer to a U S government department or agency or to a prime or lower tier...

Страница 32: ... or other materials contained in the product packaging shall supersede the Tatung Software Product Limited Warranty with regard to that third party software Ninety Day Limited Software Warranty Tatung warrants for a period of 90 days from the date of purchase that the software product will execute its programming instructions when all files are properly installed Tatung does not warrant that the s...

Страница 33: ...ith respect to this product Any implied warranty of merchantability of fitness for a particular purpose is limited to the 90 day duration of this written warranty Limitation of Liability and Remedies The Remedies provided above are your sole and exclusive remedies In no event shall Tatung be liable for any direct indirect special incidental or consequential damages including lost profit whether ba...

Страница 34: ...aration of Conformity Model Number TATUNG Wireless Thin Client Trade Name TATUNG CO Responsible Party TATUNG CO Address 22 Chung Shan N Rd Sec 3 Taipei Taiwan 104 R O C Telephone number 886 2 2586 7714 This device complies with the following Certifications UL 60950 FCC Part 15 TUV GSCE ...

Страница 35: ...one of the following measures Reorient or relocate the receiving antenna Increase the separation between the equipment and receiver Connect the equipment into an outlet on a circuit different from that to which the receiver is connected Consult the dealer or an experienced radio TV technician for help FCC Caution Any changes or modifications not expressly approved by the party responsible for comp...

Отзывы: