Tascam TM-D1000 Скачать руководство пользователя страница 35

13 - Options

35

  TASCAM TM-D1000 Operations Manual

channels 1 + 2 and 5 + 6, they will also be routed to 
the TDIF-1 B channels with the same numbers.

If input channels are routed using the DIRECT OUT 
function, and the IF-TD1000 Digital I/O board is fit-
ted, the input channels will be output to the TDIF-1 

B

 connector. It may also be selected to be output in 

parallel to both TDIF-1 connectors (

A

 and 

B

) by 

selecting input channels 1–8 as the source for TDIF-

A

.

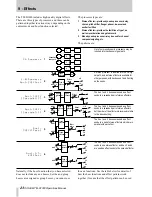
13.3FX-D1000 Effect Board

The FX-D1000 Effect Board provides an additional 
set of effect processors, doubling the capacity of the 
TM-D1000’s internal processor capability.

Effect patterns are still subject to the same restric-
tions as regards groups and aux busses (i.e. if there 
are no aux busses, no aux sends are possible).

However, the FX-D1000 Effect Board provides you 
with much more power and flexibility in the way that 
you use the internal effect system of the TM-D1000.

WARNING

This board requires internal connections to 
the TM-D1000. For this reason, you should 
not install the board yourself, but should refer 
installation to a qualified TASCAM distributor.

Содержание TM-D1000

Страница 1: ...d length 13 5 3 Connecting a 2 track recorder 14 5 4 Connecting a digital audio source 14 5 5 Using digital effect returns 15 6 Word synchronization 16 6 1 Setting up the TM D1000 as a word clock mast...

Страница 2: ...applications 1 3 Setting up your TM D1000 Before you start to set up your TM D1000 make sure that you have a clear working area and sufficient space to set out and connect all your equipment WARNING T...

Страница 3: ...the ring unconnected This will prevent any short cir cuits to the internal amplifiers 1 3 6GROUP OUTPUTS AUX SENDS These connectors serve a dual function depending on the console mode currently selec...

Страница 4: ...L INPUTS Digital audio may be received through either the XLR or RCA coaxial input of this digital audio input 1 3 13TDIF 1 A This 25 pin D sub connector is used to connect eight input and eight outpu...

Страница 5: ...efer to it as the OPTION key its SHIFTed function WARNING Changes to the Master Clock selection 6 Word synchronization or to the MODE selection 4 3 Choosing REC or MIX mode from the appropriate Option...

Страница 6: ...d on the screen at any one time Turning the knob immedi ately below a parameter will change that parameter Notice that there is no beginning or end when you turn the knobs these are continuously varia...

Страница 7: ...EFGHIJKLMNOPQRSTUVWXYZ 0123456789 abcdefghijklmnopqrstuvwxyz _ 2 8 Viewing parameters without changing them The Option Monitor allows you to look quickly through the settings made in the TM D1000 with...

Страница 8: ...ualization on page 18 Making stereo linked pairs of channels Press and hold down the CH SEL key of an odd num bered channel and press the CH SEL key of the next even numbered channel you can also pres...

Страница 9: ...Option MIDI MMC Device ID See Setting up the device IDs on page 29 Controlling an external device though MMC Press and hold down the SHIFT key while pressing the MMC control keys MMC blue labels below...

Страница 10: ...ng the snapshot memories effect set tings etc will be restored to the factory settings This action cannot be undone If you have second thoughts about re initializing all the data press the ESCAPE key...

Страница 11: ...he chan nel panpot controls the balance between the left and right channels of the stereo buss Aux sends may be assigned to be pre or post fader using the menu system See Setting aux send lev els on p...

Страница 12: ...ts depends on the number of group outputs which are being used in the currently selected buss function Groups are always routed through to the TDIF 1 out put connector the exact routing pattern is des...

Страница 13: ...rd clock connection to the WORD SYNC IN of the TM D1000 NOTE Remember to set the DTRS recorder s DIGI TAL IN when recording using the TM D1000 Operating Tip Choose your sampling frequency for the proj...

Страница 14: ...bottom line of the display shows Digital Out A B Format 6 Press the ENTER key 7 Push the DATA ENTRY knob to change between the A and B digital outputs and turn it to select between SPDIF and AES EBU...

Страница 15: ...buss and press ENTER The default setting for the AUX return is Digital Input A If this is already shown on the bottom line of the display there is no need to press ENTER 4 Turn the DATA ENTRY knob un...

Страница 16: ...ecorders CD players digital multitrack and hard disk recorders and digital mixers such as the TM D1000 can usually be con figured to act as either a word clock master or slave 6 1 Setting up the TM D1...

Страница 17: ...for the word clock master and must be connected so that the word clock is transmitted to them NOTE When using the TM D1000 with a DTRS or other recorder in varispeed mode the TM D1000 must be configur...

Страница 18: ...e frequency range from 41 Hz to 16 0 kHz and the same cut and boost 15 dB in 0 5dB steps However the LOW and HI bands are shelving filters which work in a slightly different way to the peak dip filter...

Страница 19: ...the DATA ENTRY knob until the bottom line of the display shows Effect 3 Press ENTER and turn the DATA ENTRY knob until the bottom line shows Ch Dynamics Insert 4 Press ENTER Each number on the displa...

Страница 20: ...linked with channel 4 but not with channel 2 or with channel 5 Channels may be linked if either of them is assigned to use an in line dynamic effects processor see Assigning channel dynamics on page...

Страница 21: ...check the mono mix of any of these stereo pairs However you should note that the meters will still continue to meter the two stereo signals individually rather than the summed stereo pair WARNING As m...

Страница 22: ...olo mode 1 Press and hold down the SHIFT key and press the OPTION key 2 Turn the DATA ENTRY knob until the bottom line of the display shows Setup 3 Press ENTER and turn the DATA ENTRY knob until the b...

Страница 23: ...2 Effect 2 A stereo processor is inserted into the L R sig nal path and a stereo effector is available for other purposes with Aux busses 1 and 2 acting as the sends Aux1 2 Eff Cascade1 2 3 The Aux 1...

Страница 24: ...5 9 3 Setting aux send levels Follow the procedure below to send channel signals to the AUX busses 1 Press the PARAM SEL key until the AUX indi cator above it lights in green 2 Select the channel to b...

Страница 25: ...Y knob to view and set more parameters 3 To select the second effect press the DATA ENTRY knob when the top right of the screen shows the down arrow symbol Pressing the DATA ENTRY knob once more will...

Страница 26: ...the TM D1000 always tries to use the first available unused area you can use the DATA ENTRY knob to change the memory area to one which has previously used overwrit ing the data already there or to an...

Страница 27: ...s printed around the display white on black show which controls and channels cor respond to the on screen symbols The top line of the display shows the positions of the panpots of the sixteen input ch...

Страница 28: ...available 10 5 1Direct recall defeat To avoid accidental recall of snapshots the TM D1000 provides a safety defeat mode 1 Press and hold down the SHIFT key and press the OPTION key to enter the Optio...

Страница 29: ...nob until the bottom line shows MMC Communication and press ENTER 4 Turn the DATA ENTRY knob to choose between Closed loop and Open loop and press ENTER to confirm your choice If you select the closed...

Страница 30: ...g the MTC type MTC can be received in a variety of types Select the type used by the TM D1000 in the following way 1 Press and hold down the SHIFT key and press the OPTION key 2 Turn the DATA ENTRY kn...

Страница 31: ...age If MIDI Timecode is not being received you only need to press the MEMO key once 2 Press the CH SEL key of the memory location you want to edit A memory location which has not been used no value ha...

Страница 32: ...MIX user mode is selected 1 Press and hold down the ENTER key and press the OPTION key 2 Turn the DATA ENTRY knob until the bottom line of the display shows MIDI and press ENTER 3 Turn the DATA ENTRY...

Страница 33: ...ouse 23 Effector 1 2 Parameter 1 Continuouse 24 Effector 1 2 Parameter 2 Continuouse 25 Effector 1 2 Parameter 3 Continuouse 26 Effector 1 2 Parameter 4 Continuouse 70 EQ switch On off 71 Channel assi...

Страница 34: ...yourself but should refer instal lation to a qualified TASCAM distributor The digital inputs are labeled B and C Digital input B is available as an extra option in the following menus where input A is...

Страница 35: ...FX D1000 Effect Board The FX D1000 Effect Board provides an additional set of effect processors doubling the capacity of the TM D1000 s internal processor capability Effect patterns are still subject...

Страница 36: ...nob to choose between 30 ms 60 ms and 90 ms 2 Push the DATA ENTRY knob to enter the Peak Hold Time screen 3 Turn the DATA ENTRY knob to adjust the peak hold time between 0 0 seconds and 1 0 seconds in...

Страница 37: ...You can also check the current battery level using the following procedure Option Monitor System Battery Check If the displayed value falls below 2 7 volts it is time to consider replacing the batter...

Отзывы: