background image

50 

TASCAM  MX-8A

Panoramica dell’applicazione

Utilizzando l’applicazione di controllo remoto TASCAM MX 

CONNECT, è possibile utilizzare l’unità a distanza.
Per i dettagli sull’applicazione, vedere il relativo manuale di 

istruzioni.
È possibile scaricare il manuale dell’applicazione dal sito TEAC 

Global (

http://teac-global.com/

).

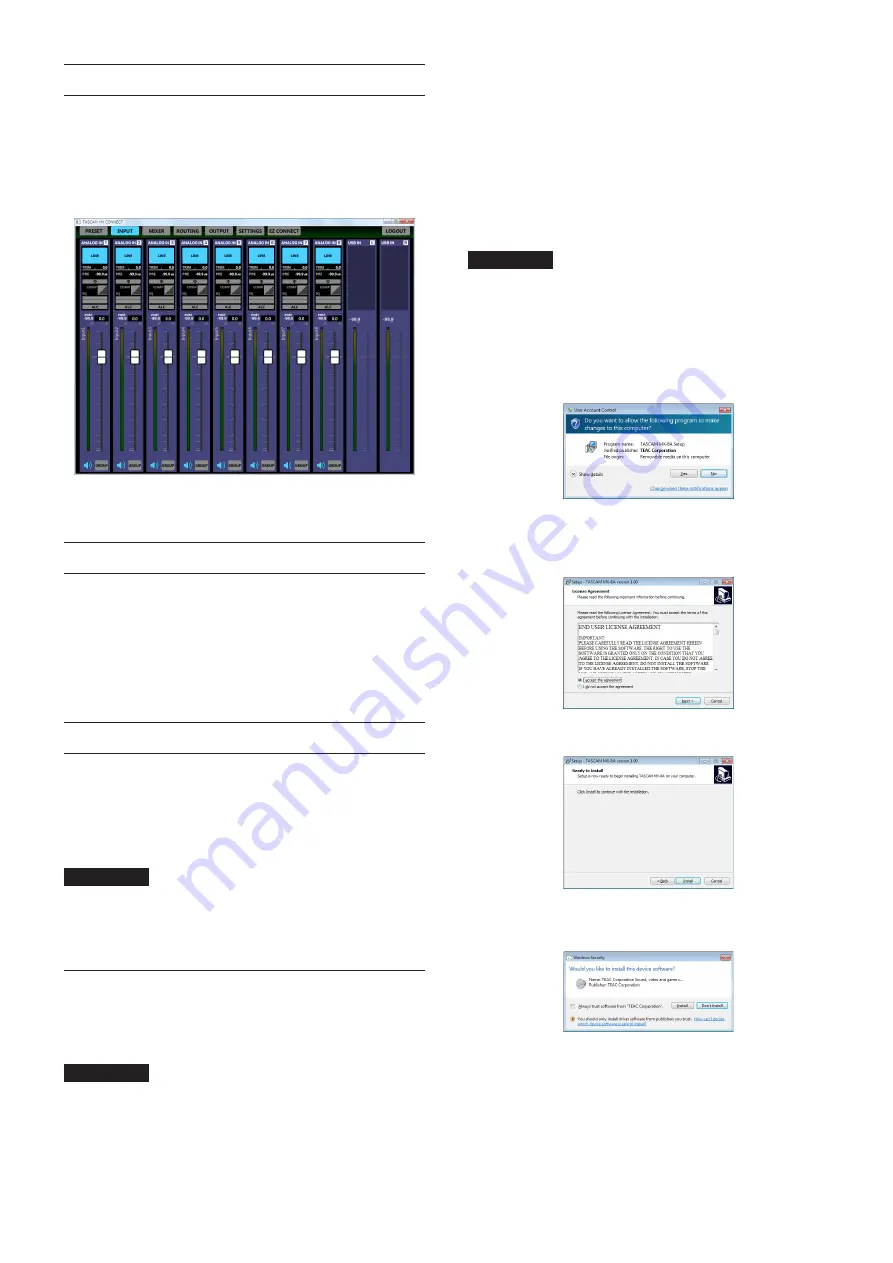
Schermata INPUT

Connessione con Ethernet

Collegare un cavo LAN al connettore 

ETHERNET

 su questa 

unità.

Requisiti per i cavi LAN utilizzati per le con-

nessioni con i connettori su questa unità

Utilizzare cavi STP di categoria 5e almeno.
Possono essere usati sia cavi incrociati che cavi normali.

Funzioni dell’interfaccia audio USB

Per utilizzare questa unità come interfaccia audio USB con un 

computer Windows, è necessario installare un software dedicato 

nel computer.
Scaricare il software più recente dal sito TEAC Global (

http://te-

ac-global.com

/).

L’installazione del software dedicato installerà un driver.

ATTENZIONE


i

Prima di iniziare a installare il software, uscire da altre appli-

cazioni.


i

Con un Mac, iOS o Android, verrà utilizzato il driver OS stan-

dard, quindi non è necessario installare alcun software.

Installazione del software dedicato 

Windows

Seguire le procedure seguenti per installare il software dedicato 

Windows.

ATTENZIONE


i

Completare l’installazione del software Windows dedicato nel 

computer prima di collegare l’unità ad esso con il cavo USB.


i

Se si è collegata l’unità al computer utilizzando il cavo USB 

prima di installare il software dedicato Windows e “

Installa-

zione guidata nuovo hardware

” viene avviato, chiudere la 

procedura guidata e scollegare il cavo USB.

Procedure di installazione del software 

dedicato a Windows

1. 

Scaricare l’ultimo software Windows dedicato dal sito TEAC 

Global (

http://teac-global.com/

) e salvarlo nel computer 

da utilizzare con l’unità.

2. 

Decomprimere il software salvato (file zip) nel desktop del 

computer o in un’altra posizione.

3. 

Fare doppio clic su “

TASCAM_MX-8A_Installer_x.xx.exe

” nel-

la cartella che appare dopo la decompressione per avviare il 

software di installazione.

ATTENZIONE

Se si apre un file zip senza decomprimerlo e si fa doppio clic 

su “

TASCAM_MX-8A_Installer_x.xx.exe

” nella cartella che si 

apre, l’installazione non verrà avviata. Fare clic con il pulsante 

destro nella schermata file zip e seleziona “

Estrai tutto

”, ad 

esempio, per decomprimerlo e quindi riprovare.

4. 

Quando un 

Avviso di sicurezza

 o 

Controllo dell’account 

utente

 appare, fare clic su 

.

5. 

Leggere i contenuti del Contratto di licenza dell’utente e 

selezionare “

I accept the agreement

” se si accettano i termi-

ni. Quindi, fare clic su 

Next>

.

6. 

Quindi, fare clic su 

Install

.

7. 

Quindi, fare clic su 

Install

 per avviare l’installazione (solo per 

Windows 7)

Содержание MX-8A

Страница 1: ...ENGLISH FRAN AIS ESPA OL DEUTSCH ITALIANO OWNER S MANUAL MODE D EMPLOI MANUAL DEL USUARIO BEDIENUNGSANLEITUNG MANUALE DI ISTRUZIONI D01348400A MX 8A MATRIX MIXER...

Страница 2: ...r company names product names and logos in this document are the trademarks or registered trademarks of their respective owners TEAC CORPORATION https tascam jp jp Phone 81 42 356 9143 1 47 Ochiai Tam...

Страница 3: ...nterference to radio or television reception which can be determined by turning the equipment off and on the user is encouraged to try to correct the interference by one or more of the following measu...

Страница 4: ...tteries there is danger of explosion if a battery is replaced with an incorrect type of battery Replace only with the same or equivalent type WARNING Products with Class construction are equipped with...

Страница 5: ...ms This product includes the following items Take care when opening the package to avoid damaging the items Keep the box and packing materials for transportation in the future Please contact the store...

Страница 6: ...han one that is AC100V 240V 50 60Hz 0 0Hold the power cord by its plug when connecting or discon necting it Beware of condensation Condensation could occur if the unit is moved from a cold place to a...

Страница 7: ...ing and turning off See Explanation of STATUS indicator status lit blinking un lit on page 7 Explanation of STATUS indicator status lit blinking unlit STATUS indicator Note Starting up Blinking mode 1...

Страница 8: ...malfunction i i Always turn the unit power off before connecting or discon necting a cable Connecting and disconnecting while the power is on could cause malfunction NOTE A cover is attached to the R...

Страница 9: ...gh the input level will be increased or decreased automatically to an appropriate level Input channel fader Adjust the level sent to the matrix and USB buses Input mute Mute the input channel signal M...

Страница 10: ...N i i Complete installation of the Windows dedicated software on the computer before connecting the unit to it with the USB cable i i If you connected the unit to the computer using the USB ca ble bef...

Страница 11: ...the Program item If View by is set to Large icons or Small icons click Programs and Features 3 Select TASCAM MX 8A version x xx from the list and double click it 4 Then follow the instructions that ap...

Страница 12: ...andard 100BASE TX Cables category 5e or faster STP cables 0 00 dBu 0 775 Vrms Audio performance Mic amp EIN equivalent input noise 126 dBu or less MIC IN w LINE OUT Input impedance 150 22 kHz LPF A we...

Страница 13: ...ique applicable E1 E2 E3 E4 1 Lisez ces instructions 2 Conservez ces instructions 3 Tenez compte de tous les avertissements 4 Suivez toutes les instructions 5 N utilisez pas cet appareil avec de l eau...

Страница 14: ...AVERTISSEMENT Les produits ayant une construction de Classe sont quip s d un cordon d alimentation avec une fiche de terre Le cordon d un tel produit doit tre branch dans une prise secteur avec terre...

Страница 15: ...st livr avec les l ments suivants Ouvrez l emballage avec soin pour ne pas les endommager Conservez la bo te et les mat riaux d emballage pour de futurs transports Si un l ment quelconque est manquant...

Страница 16: ...e connecteur IN i i Ne le branchez pas une prise secteur fournissant un courant d un autre type que du CA 100 V 240 V 50 60 Hz i i Tenez le cordon d alimentation par sa fiche quand vous le branchez ou...

Страница 17: ...ment ou extinction Voir Explication des tats du voyant STATUS allum clignotant teint en page 17 Explication des tats du voyant STATUS allum clignotant teint Voyant STATUS Note D marrage Mode clignotan...

Страница 18: ...nect au c ble i i teignez toujours l unit avant de brancher ou de d brancher un c ble Brancher ou d brancher quand l unit est sous tension peut entra ner des dysfonctionnements NOTE Un cache est ins r...

Страница 19: ...u jusqu un niveau appropri Fader de canal d entr e Sert r gler le niveau envoy aux bus USB et de matrice Coupure d entr e Mute Pour couper le signal du canal d entr e M langeur M langeur matriciel Cet...

Страница 20: ...sur l ordinateur avant de brancher l unit celui ci l aide du c ble USB i i Si vous avez branch l unit l ordinateur l aide du c ble USB avant d avoir install les logiciels d di s pour Windows et si l A...

Страница 21: ...e sous la rubrique Programme Si Afficher par est r gl sur Grandes ic nes ou Petites ic nes cliquez sur Programmes et fonctionnalit s 3 S lectionnez TASCAM MX 8A version x xx dans la liste et double cl...

Страница 22: ...CP IP Norme Ethernet 100BASE TX C bles STP cat gorie 5e ou plus rapides i i 0 dBu 0 775 Vrms Performances audio Bruit rapport l entr e d ampli micro EIN 126 dBu ou moins MIC IN w LINE OUT imp dance d...

Страница 23: ...a 6 Limpie este aparato solo con un trapo seco 7 No bloquee ninguna de las aberturas de ventilaci n Instale este aparato de acuerdo con las instrucciones del fabricante 8 No instale este aparato cerca...

Страница 24: ...ECAUCI N Los productos de Clase est n equipados con una cable de alimentaci n con un enchufe con toma de tierra Por este motivo debe conectar el cable de alimentaci n de este aparato a una salida de c...

Страница 25: ...lementos Tenga cuidado de no da ar estos objetos al abrir el embalaje Conserve la caja y las protecciones por si alguna vez necesita transportar el aparato P ngase en contacto con su distribuidor si e...

Страница 26: ...te en la toma AC IN i i No conecte este aparato a una salida de corriente que est fuera del rango 100 240 V 50 60 Hz i i A la hora de conectar o desconectar el cable de alimentaci n tire del enchufe y...

Страница 27: ...o apag ndose Vea Explicaci n del estado del indicador STATUS iluminado parpadeando apagado en p g 27 Explicaci n del estado del indicador STATUS iluminado parpadeando apagado Indicador STATUS Nota Arr...

Страница 28: ...Apague siempre esta unidad antes de conectar o desconectar ning n cable La conexi n o desconexi n de un cable con esta unidad encendida puede producir errores NOTA El conector RS 485 incluye una tapa...

Страница 29: ...o o reducido de forma autom tica para adaptarlo a un nivel m s adecuado Fader de canal de entrada Ajuste el nivel enviado a la matriz y a los buses USB Mute o anulaci n de entrada Esto anula la se al...

Страница 30: ...n del software espec fico de Windows en el ordenador antes de conectar esta unidad con el cable USB i i Si ha conectado esta unidad al ordenador con el cable USB antes de instalar el software espec fi...

Страница 31: ...do a Iconos grandes o Iconos peque os haga clic en Programas y funciones 3 Elija TASCAM MX 8A versi n x xx en el listado y haga doble clic en l 4 Siga despu s las instrucciones que aparecer n en panta...

Страница 32: ...egor a 5e o superiores i i 0dBu 0 775Vrms Rendimiento audio EIN ruido de entrada equivalente de amplificador de micro 126dBu o inferior MIC IN w LINE OUT Impedancia de entrada 150 22 kHz LPF medici n...

Страница 33: ...Geh use i i Stellen Sie das Ger t in der N he einer gut erreich baren Steckdose auf Es muss jederzeit m glich sein den Netzstecker zu ziehen um das Ger t vom Stromnetz zu trennen i i Verbinden Sie das...

Страница 34: ...nnen Die Entsorgung ist f r Sie kostenlos Weitere Informationen zur Wertstoffsammlung und Wieder verwertung von Alt ger ten erhalten Sie bei Ihrer Stadt verwaltung dem f r Sie zust ndigen Abfall ent s...

Страница 35: ...geh ren die unten aufge f hrten Bestandteile Achten Sie beim ffnen der Verpackung darauf dass Sie nichts besch digen Bewahren Sie das Verpackungsmaterial f r einen eventuellen zuk nftigen Transport au...

Страница 36: ...tigungssatz k nnen Sie das Ger t wie hier gezeigt in einem blichen 19 Zoll Rack befestigen Lassen Sie ausreichend Raum mindestens 1 HE 45 mm ber dem Ger t frei f r die Bel ftung Kondensation vermeiden...

Страница 37: ...wenden Sie keinen USB Hub sondern verbinden Sie den Mischer direkt mit einer USB Schnittstelle des Computers Andernfalls kann es sein dass die Daten bertragung nicht richtig funktioniert Anmerkung Um...

Страница 38: ...trennen k nnen Funktionsst rungen auftreten Anmerkung Der RS 485 Anschluss ist mit einer Abdeckung versehen um das versehentliche Einstecken eines Ethernet LAN Kabels zu verhindern Entfernen Sie diese...

Страница 39: ...requenzanteile d mpfen 8 8 Automatische Aussteuerung Der Aufnahmepegel wird entsprechend dem Eingangssignal automatisch abgesenkt beziehungsweise angehoben 8 8 Fader der Eingangskan le Hiermit passen...

Страница 40: ...ndows Ger tesoftware installieren Um die Ger tesoftware f r einen Windows Computer zu instal lieren f hren Sie die weiter unten aufgef hrten Schritte aus Wichtig Schlie en Sie in jedem Fall zuerst die...

Страница 41: ...e aus und doppelklicken Sie darauf 3 Folgen Sie dann den Anweisungen auf Ihrem Bildschirm Die Mikroschalter nutzen Mit Hilfe der Mikroschalter auf der Ger ter ckseite k nnen Sie den Mischer auf seine...

Страница 42: ...stungsdaten Audio 8 8 quivalentes Eingangsrauschen der Mikrofonvorverst rker 126 dBu oder weniger Mikrofoneingang bis Line Ausgang Eingangsimpedanz 150 22 kHz Tiefpassfilter A bewertet JEITA 8 8 Frequ...

Страница 43: ...struzioni 5 Non usare l apparecchio vicino all acqua 6 Pulire solo con un panno asciutto 7 Non bloccare le aperture per la ventilazione Installare secondo le istruzioni del costruttore 8 Non installar...

Страница 44: ...solo con tipo uguale o equivalente ATTENZIONE I prodotti costruiti in Classe sono dotati di un cavo di alimentazione con un polo di terra Il cavo di un tale prodotto deve essere inserito in una presa...

Страница 45: ...re attenzione quando si apre la confezione per evitare di danneggiare gli articoli Conservare la scatola e il materiale di imballaggio per il trasporto in futuro Si prega di contattare il negozio in c...

Страница 46: ...ore AC IN i i Non collegare un alimentatore diverso da quello che AC100V 240V 50 60Hz i i Tenere il cavo di alimentazione per la spina quando lo si colle ga o lo scollega Attenzione alla condensa La c...

Страница 47: ...catore STATUS acceso lampeggiante spento a pagina 47 Spiegazione dello stato dell indicatore STATUS acceso lampeggiante spento Indicatore STATUS Nota Avvio Modalit lampeggiante 1 Lampeggio lento a int...

Страница 48: ...egare o scollegare il cavo Il collegamento e la disconnessione mentre l alimenta zione accesa potrebbe causare malfunzionamenti NOTA Sul connettore RS 485 presente una protezione per impedi re l inser...

Страница 49: ...verr aumentato o diminuito automati camente a un livello appropriato Fader del canale di ingresso Regolare il livello inviato alla matrice e ai bus USB Disattiva l audio in ingresso Silenzia il segnal...

Страница 50: ...TTENZIONE i i Completare l installazione del software Windows dedicato nel computer prima di collegare l unit ad esso con il cavo USB i i Se si collegata l unit al computer utilizzando il cavo USB pri...

Страница 51: ...ccare su Programmi e funzionalit 3 Selezionare TASCAM MX 8A versione x xx dall elenco e fare doppio clic su di esso 4 Quindi seguire le istruzioni che appaiono nella schermata Uso degli interruttori p...

Страница 52: ...ssione TCP IP Standard Ethernet 100BASE TX Cavi cavi STP di categoria 5e o pi veloci i i 0dBu 0 775Vrms Prestazioni audio Mic amp EIN Equivalent Input Noise 126dBu o meno MIC IN w LINE OUT Impedenza d...

Страница 53: ...TASCAM MX 8A 53 V P N 1 100 100 DC 20cm 1U 10cm C...

Страница 54: ...54 TASCAM MX 8A V Y V P N O V 5 1...

Страница 55: ...ascam jp jp 0 0 8 8 0 0 Euroblock 0 0 DSP 0 0 Ethernet 0 0 BGM USB 0 0 RS 232C 0 0 RS 485 0 0 1U 0 0 x1 0 0 x1 0 0 x16 0 0 x1 0 0 x1 0 0 x1 53 55 55 55 56 56 56 56 56 56 56 57 57 58 59 DSP 59 59 59 59...

Страница 56: ...56 TASCAM MX 8A 0 0 POWER 0 0 V 0 0 0 40 0 0 0 0 0 0 0 0 1U 0 0 AC IN 0 0 AC100V 50 60Hz 0 0 1 2 TASCAM https tascam jp jp login 0 0 0 0 1 0 0 0 0 0 0 o o MX 8A o o Serial No o o o o o o 0 0 0 0...

Страница 57: ...MX 8A 57 1 POWER 2 USB B USB USB Type A Type B iOS Android 60 USB 44 1k 48kHz 16 24 2 USB iOS Lightning USB USB 3 STATUS STATUS 57 STATUS STATUS STATUS 1 0 5 3 0 1 1 0 5 2 3 1 0 1 3 0 5 3 0 1 2 3 1 0...

Страница 58: ...2C I O Pin No 1 2 RD 3 TD 4 5 GND 6 7 8 9 MX 8A TASCAM Mixer TASCAM https tascam jp jp 6 RS 485 5e Pin No 1 B 2 A 3 4 DC24V 5 GND 6 7 8 GND 9 i i RS 485 LAN i i RS 485 LAN 7 ETHERNET MX 8A TASCAM Mixe...

Страница 59: ...TASCAM MX 8A 59 2 5mm 1 2 5mm 2 AWG16 AWG28 7mm 3 4 DSP 4 USB BGM ANC Ambient Noise Compensator ANC ANC 10...

Страница 60: ...INPUT ETHERNET LAN LAN 5e STP USB Windows USB TASCAM https tascam jp jp i i i i Mac iOS Android OS Windows Windows i i USB Windows i i Windows USB USB Windows 1 TASCAM https tascam jp jp Windows 2 Wi...

Страница 61: ...TASCAM MX 8A 61 5 A N 6 I 7 I Windows 7 8 F USB Windows Windows Update Windows Update Windows 1 w i i Windows 10 i i Windows 8 1 2 L S 3 TASCAM MX 8A x xx 4...

Страница 62: ...Balanced 3 81mm 77 5dBu 26dBu MIC 24dBu LINE 2 2k ANALOG OUT Euroblock Balanced 3 81mm 4dBu Ref Level 9dBFS 6dBu Ref Level 9dBFS 15dBu Ref Level 9dBFS 18dBu Ref Level 14dBFS 20dBu Ref Level 16dBFS 22d...

Страница 63: ...4dBu Fs 44 1k 48kHz MIC IN w LINE OUT GAIN MIN JEITA 106dB 24dBu 1kHz MIC IN w LINE OUT GAIN MIN JEITA 106dB MIC IN w LINE OUT GAIN MIN JEITA JEITA JEITA CP 2150 AC100V 50 60Hz 21W 483 x 45 x 304 1mm...

Страница 64: ...0 30 50 60 70 80 dBu 26 0dBu 2 0dBu 3 5dBu 34 0dBu 57 5dBu 32 5dBu 10 0dBu 77 5dBu 1 5dBu 21 5dBu 4 5dBu 15 5dBu 20 10 0 10 20 30 40 30 50 60 70 80 dBu 11 85dBu 8 15dBu 9 8dBu 10 2dBu 24 0dBu 4 0dBu A...

Страница 65: ...INPUT 5 INPUT 6 INPUT 7 INPUT 8 INPUT MIXER SETTINGS MIXER SETTINGS ROUTING SETTINGS OUTPUT SETTINGS MIXER SETTINGS IN 1 IN 2 IN 3 IN 4 IN 5 IN 6 IN 7 IN 8 IN 1 IN 2 IN 3 IN 4 IN 5 IN 6 IN 7 IN 8 MIX...

Страница 66: ...in binary form must reproduce the above copyright notice this list of conditions and the following dis claimer in the documentation and or other materials provided with the distribution 3 The name of...

Страница 67: ...veredby thewarranty wewillpayreturnsurfaceshippingchargestoanydestinationwithintheUnitedStates LIMITATIONOFIMPLIEDWARRANTIES Any implied warranties INCLUDINGWARRANTIES OF MERCHANTABILITY AND FITNESS F...

Страница 68: ...eur Name des Eigent mers Nome del proprietario Nombre del propietario Address Adresse Adresse Indirizzo Direcci n Dealer s name Nom du d taillant Name des H ndlers Nome del commerciante Nombre del est...

Отзывы: