background image

TASCAM  DV-RA1000HD


The DV-RA1000HD will work with the following 
Microsoft operating systems: Windows 2000 and 
Windows XP.

It will work with the following operating systems from 
Apple Computer: MacOS 9.2.2 and above, and MacOS 
X 10.2 and above.

For all the above operating systems, no driver is 
required. The HD of DV-RA1000HD simply appears as 
a USB mass storage device.

CAUTION

You should always follow your computer’s instruc-
tions on how to disconnect a USB removable drive 
safely from your system. If you do not do this, there 
is a risk of data corruption on your computer.

Only use a high-quality cable certified for use with 
USB 2.0 systems.

NOTE

You can use the DV-RA1000HD with USB 1.1 sys-
tems, but the performance will necessarily not be 
as good as with a USB .0 system.
Avoid connecting the DV-RA1000HD to a com-
puter using a USB hub. Always connect the 
DV-RA1000HD and computer directly.

1

  Press 

MENU

 and select 

USB

. Press 

ENTER

.

2

  A popup menu on the DV-RA1000HD screen asks 

you if you want to connect to the computer. Press 

ENTER

 (or 

CANCEL

 to cancel).

The DV-RA1000HD appears as a mass storage unit (on 
some Microsoft systems, it may initially appear as an 
“unrecognizable device”; this will also happen if the 
DV-RA1000HD is not in USB mode when it is con-
nected to a PC).

All front panel controls are disabled (except the 

CANCEL

 key (see below). Use the computer’s system to 

eject a disc.

Connecting the DV-RA1000HD to a computer

With Windows 2000 and Windows XP, the procedure 
is a little more complex than simply unplugging the 
DV-RA1000HD.

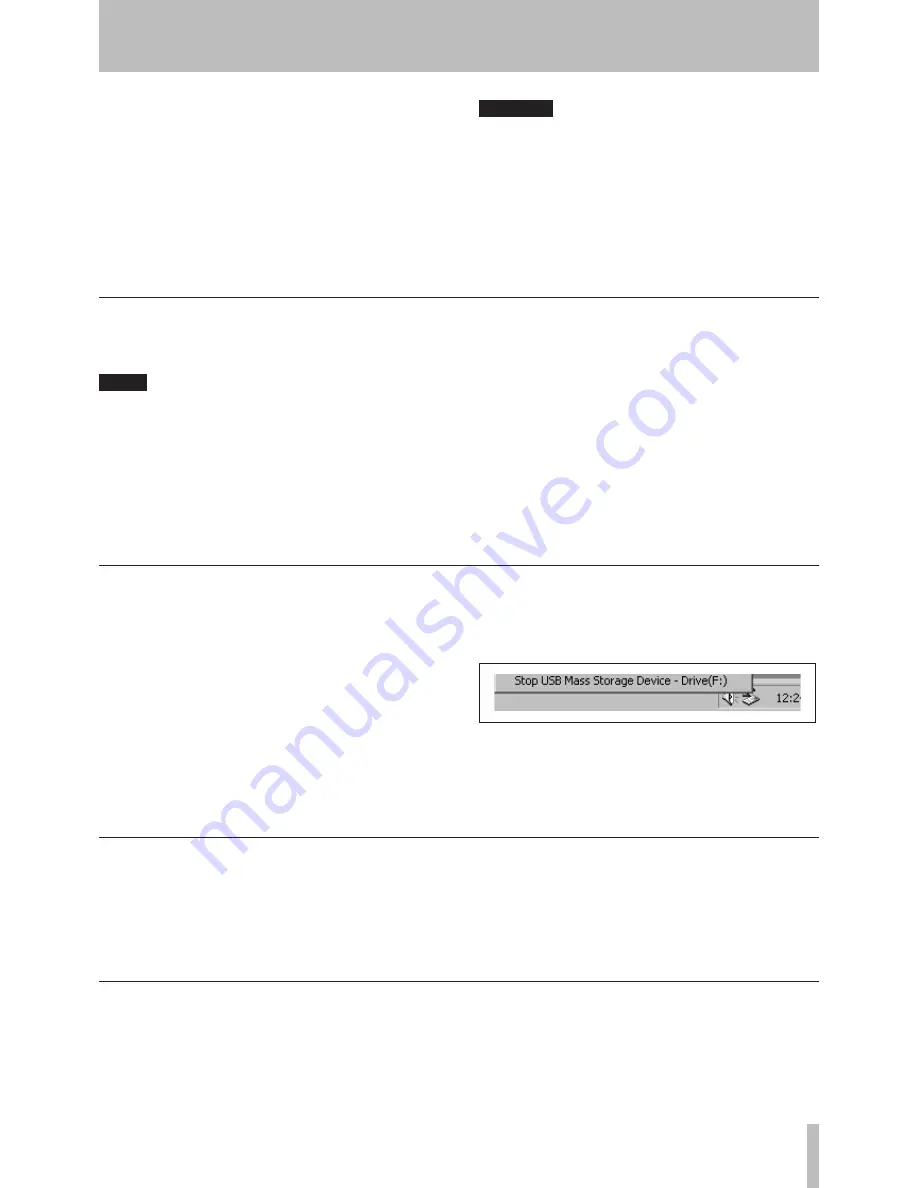
In the system tray (typically at the bottom right of the 
screen), you see an icon picture of a PC card and an 
arrow.

1

  Left-click this icon to show a popup bar. Click 

this popup bar to allow the DV-RA1000HD to be 
removed from the computer.

Figure 9.1: Disconnecting the DV-RA1000HD

2

  Follow the instructions below on disconnecting. 

(See “After “ejecting” from the computer” be-
low.)

Disconnecting from Windows 2000 / XP systems

When you are disconnecting the DV-RA1000HD from 
a Macintosh system (OS 9 or OS X), drag the disk icon 
to the Trash, or press Command-E (OS X 10.3 also has 
a button in the Finder which allows ejecting removable 
media).

When the icon has disappeared from your desktop, you 
can disconnect the DV-RA1000HD as described below.

Disconnecting from Mac OS X systems

When you have used the computer operating system to 
“eject” or disconnect the DV-RA1000HD from the sys-
tem:

1

  Press 

CANCEL

 to start the disconnection process.

2

  A popup appears. Press 

ENTER

 to completely dis-

connect the DV-RA1000HD, or 

CANCEL

 to halt 

the disconnection process.

3

  When the popup disappears, you can disconnect 

the cable from the computer.

After “ejecting” from the computer

9 − Use with a computer

Содержание DV-RA1000HD

Страница 1: ...DV RA1000HD High Definition Audio Master Recorder D00927920A OWNER S MANUAL...

Страница 2: ...t d un produit de Classe A Dans un environnement domestique cet appareil peut provoquer des interf rences radio dans ce cas l utilisateur peut tre amen prendre des mesures appropri es F r Kunden in Eu...

Страница 3: ...tand tripod bracket or table specified by the manufacturer or sold with the apparatus When a cart is used use caution when moving the cart apparatus combination to avoid injury from tip over 13 Unplug...

Страница 4: ...this product is com pletely confined in the protective housings The label required in this regulation is shown at 1 CAUTION DO NOT REMOVE THE PROTECTIVE HOUSING USING A SCREWDRIVER USE OF CONTROLS OR...

Страница 5: ...justing the input level 28 Selecting the reference clock 28 Naming files projects marks etc 29 5 CD playback recording Playback 30 Basic playback operation DVD HD 30 Display DVD HD 30 Programmed playb...

Страница 6: ...tracks from a CD to the HD 53 8 Effects Setting up the effect position 55 Equalization 55 Dynamics processor 56 Effect libraries 57 Recalling library data 57 Storing library data 57 Naming library dat...

Страница 7: ...lease take time to read this manual thoroughly to ensure you under stand how to properly set up and connect the unit as well as the operation of its many useful and convenient functions After you have...

Страница 8: ...A warranty card 1 Contact your TASCAM supplier if any of these items are missing NOTE When transporting the unit always use the origi nal packing materials For this reason we strongly recommend that...

Страница 9: ...lift the disc out hold ing it carefully by the edges Figure 1 2 Handling of discs Finger marks and dust should be carefully wiped off the disc s recorded surface with a soft cloth Unlike conventional...

Страница 10: ...be playable on the unit This is in no way a limitation of the unit itself but of the difference between the different types of media and the methods used to read them The unit supports normal speed 1...

Страница 11: ...on the screen If you plan to purchase discs in a bulk insert a sample disc into the tray to make sure that the disc is supported prior to purchase See Using a non supported disc on page 42 The check s...

Страница 12: ...ckward and forward To change the LCD contrast rotate the JOG DATA dial while pressing and holding down the DISPLAY key 4 MONITOR key Switches between recording source monitoring and playback monitorin...

Страница 13: ...n See About marks on page 39 o DISPLAY key Switches time display mode in the home screen See Display on page 30 p Soft function keys F1 F5 Use the soft function keys to perform the functions displayed...

Страница 14: ...te keys on the remote control unit but are the same key on the main unit short press for skip long for search See Basic playback operation on page 30 j A B key Enables you to set and perform A B repea...

Страница 15: ...se of the switches on the VFP screen feature additional corresponding switch names in parentheses For the function descrip tion see The virtual front panel VFP on page 23 FINALIZE UNFINALIZE UNFINAL E...

Страница 16: ...output NOTE Strictly speaking the format used by these connec tors is called IEC 60958 4 or AES 3 1992 When working in Sampling Frequency 88 2 96 kHz mode there is an option of either using one XLR c...

Страница 17: ...es you to transfer audio files on the HD of DV RA1000HD to the computer and transfer audio files on the computer to the DV RA1000HD See Use with a computer on page 59 CONTROL I O You can use RS 232C s...

Страница 18: ...data directly The hard disk format is FAT32 DVD RW and DVD RW These discs also enable you to record audio data that is compatible with computer based digital audio worksta tions You can also write da...

Страница 19: ...to select an item in the screen Use the JOG DATA dial to adjust a value or setting Press the ENTER key to confirm a setting or selection in the screen Navigating the screens To adjust the display cont...

Страница 20: ...Reference clock 4 Meter 5 Disc type 6 Disc status 7 Audio format of the current project 8 Name of the current project 9 Name of the current file 0 Display mode of track time q Current track number w...

Страница 21: ...ng menu of the DV RA1000HD 1 Press the MENU key The main menu appears 2 Use the JOG DATA dial or the F1 and F2 keys on the unit or the JOG DATA keys on the remote control unit to select highlight a de...

Страница 22: ...R EQ LIBRARY FORMAT FILE LIST COPY ID PREFERENCE PLAY LIST CHECK version check VFP PLAY battery check REC CD etc medium check SYSTEM SETUP I O SELECT REFERENCE CLOCK CALENDAR PROJECT LIST PROJECT TEXT...

Страница 23: ...nd a mark appears above the switch when the switch is turned off NOTE In this manual the procedure of selecting a switch in the virtual front panel and pressing the F5 key is referred to as pressing a...

Страница 24: ...balanced RCA analog con nectors You can select from the following five reference levels Reference level Nominal level Maximal level 9dB 6dBu 15dBu 14dB 4dBu 18dBu 16dB 4dBu 20dBu 18dB 4dBu 22dBu 20dB...

Страница 25: ...mind and you do not want to as sign the menu item to the function key press and hold the function key for at least one second 5 Press and hold the ENTER key for at least one second The setting is con...

Страница 26: ...dia information The screen indicates the support information regarding the currently loaded DVD disc and the number of rewriting operations car ried out on the disc Figure 4 16 Media information Clock...

Страница 27: ...ch the audio is sent and received DSD RAW which is the raw DSD bit stream or SDIF 3 no other options are avail able Consult the documentation for your other equipment to find out what format is most s...

Страница 28: ...tor on the meter lights If a track is normalized to 0 1 dB for example on a DAW be fore recording at unity gain on the DV RA1000HD the OVER indicators may therefore light even though there is no clipp...

Страница 29: ...lay highlight it so that it is shown in inverse video Press the F4 right key to start the naming process Use the JOG DATA dial to scroll through the set of cur rently available characters The availabl...

Страница 30: ...e the key Release the MUTE key to unmute the signal While the signal is muted the MUTE key indicator lights up To skip the tracks backward or forward press the keys To perform cue search during playba...

Страница 31: ...grammed playback off Pressing the PGM switch or PGM key for at least one second brings up the program screen NOTE If you turn programmed playback on while the recorder is in playback ready mode or pl...

Страница 32: ...e and the JOG DATA dial to set the value of the pitch and speed up to 6 away from nominal Press ENTER to make the setting Pitch change DVD HD When the auto cue function is turned on cueing the playbac...

Страница 33: ...ut the A B mode and the A and B points are not memorized CAUTION When using this function remember to shut down the unit properly see Shut down on page 19 before turning off the power to avoid possibl...

Страница 34: ...econds If you plan to divide a recording into tracks repeatedly wait about 30 seconds until you press the RECORD key again CAUTION On a CD two seconds of silence automatically fol low such a track div...

Страница 35: ...so used for the auto cue function see Auto cue on page 32 and auto matic track increment in level mode see Auto matic track increment in level mode on page 34 In DSD mode if you have selected an optio...

Страница 36: ...ding can be rehearsed This allows false starts to be eliminated as the recording start time can be offset by up to 1 7 seconds in 0 01 second increments from the time when input signal level rises abo...

Страница 37: ...ing the input when the DV RA1000HD is recording or in record ready mode Also note that the VFP MONO function see MONO on page 24 can be used to turn monaural monitoring on and off but this does not wo...

Страница 38: ...the Virtual Front Panel see The virtual front panel VFP on page 23 to bring up a pop up message Press ENTER to unfinalize the disc or CANCEL to return to the VFP The screen shows an appropriate messag...

Страница 39: ...marks About marks DVD RW HD A maximum of 99 marks can be added to a disc CD or to a project DVD RW HD to help with location etc These marks can be edited NOTE Although marks can be added to a CD reco...

Страница 40: ...only in copy mode to duplicate data In order for the DV RA1000HD to read the information on a DVD RW disc control information referred as UDFMI UDF Management Information must be writ ten to the disc...

Страница 41: ...nutes 13 5 hours 1417 minutes 23 6 hours Table 6 2 Sampling frequencies and recording times HD recording The total time recordable on the HD is significantly longer than the time recordable on a DVD R...

Страница 42: ...RW disc the DV RA1000HD will automatically carries out the close oper ation NOTE DVD RW During a background format operation the CLOSE indicator for DVD RW or OPEN indicator for DVD RW flashes in the...

Страница 43: ...en disc cannot be read or written on a computer 1 From the main menu select the DISC menu then press the ENTER key The DV RA1000HD displays a disc sub menu 2 Select OPEN then press the ENTER key A pop...

Страница 44: ...c Reformatting a DVD RW disc on the DV RA1000HD will never result in an entirely blank disc but of course all previous data is removed during a format process CAUTION If you attempt recording many tim...

Страница 45: ...rting a recording will create a new track On the other hand in overwrite mode restarting a recording will overwrite data from the current position in the same track For example if you stop then resume...

Страница 46: ...ich can then be used for location pur poses See Editing files on page 47 However when recording to DVD RW HD these marks are written to UDFMI as part of the project Setting marks If you copied audio f...

Страница 47: ...e file to the end of another it is possible to remove unwant ed heads and tails using the editing functions See Dividing files on page 48 1 Select the EDIT sub menu from the main menu 2 From this sub...

Страница 48: ...the JOG DATA dial to trim the division point so that the new file starts at the point you want 3 Press ENTER to set the division point and split the file The name of the second file is automatically...

Страница 49: ...is not inserted into the tray or if you press the CANCEL key at the confirmation popup message the disc tray automatically opens and a popup message requests that you insert a copy source disc into t...

Страница 50: ...ect or deselect a highlighted file press the F1 key To select all files press the F2 ALL SEL key To deselect all selected files press the F3 ALL REL key To display the project selection screen press t...

Страница 51: ...ject 4 After you select a project press the ENTER key If a project in the destination DVD uses the same name as the selected source project the DV RA1000HD displays a duplicate project screen that lis...

Страница 52: ...ts that you insert a disc For more information see Selecting a copy mode and copy source on page 49 Figure 7 6 Selecting a source project 3 Select files to copy First select a project that contains th...

Страница 53: ...that requests that you insert a disc If you do not wish to create another audio CD press the CANCEL key The DV RA1000HD initiates a procedure to quit copy mode During this procedure the DV RA1000HD di...

Страница 54: ...dial to select a character You can also input characters using a keyboard connected to the PS 2 connector 8 When you finish editing the text press the ENTER key The unit displays a message that reques...

Страница 55: ...DV RA1000HD incorporates two signal proces sors a 3 band equalization stage and a dynamics pro cessor These can be inserted either before the final recording process or on playback These effects can b...

Страница 56: ...uencies of the two crossover points of the three band effects can be set the slope of the filters is 6 dB octave The dynamics processor always comes after the EQ effect 1 From the effect setting scree...

Страница 57: ...le the EQ setting screen or dynamics setting screen is displayed press and hold the ENTER key for at least one second The DV RA1000HD displays the EQ library screen or dynamics library screen Figure 8...

Страница 58: ...ers 2 Following the instructions in Naming files projects marks etc on page 29 edit the library data name You can use up to 20 characters for a library data name 3 When you finish editing the name pre...

Страница 59: ...con nected to a PC All front panel controls are disabled except the CANCEL key see below Use the computer s system to eject a disc Connecting the DV RA1000HD to a computer With Windows 2000 and Windo...

Страница 60: ...files between a com puter and the HD you can transfer audio files in the BWF or DSDIFF format between a DVD RW disc formatted with the DV RA1000HD and a computer by inserting the DVD RW disc into the...

Страница 61: ...output level 10 dBV Maximum output level 6 dBV Phones output stereo Connector 1 4 stereo jack T L R R S GND x 1 Max output power 80 mW 80 mW 30 Digital I O PCM inputs XLR Connector 3 pin XLR female x...

Страница 62: ...8 3 Output frequencies kHz 44 1 48 88 2 96 double speed all 6 Data format 16 bit 44 1 kHz CD DA 24 bit 44 1 kHz 48 kHz 88 2 96 kHz to DVD RW or HD Output impedance 75 20 Nominal output level 0 5 Vpp t...

Страница 63: ...performance Frequency response All modes 20 Hz 20 kHz 0 5 dB at 40 kHz 1 dB 1 dB Fs 88 2 96 kHz at 50 kHz 3 dB 1 dB DSD mode at 70 kHz 3 dB 1 dB 2 dB Fs 176 4 192 kHz Total Harmonic Distortion typical...

Страница 64: ...etc 64 TASCAM DV RA1000HD Dimensional drawing Figure 10 1 Dimensions of the DV RA1000HD 483 mm 465 mm 435 mm 76 mm 88 mm 95 mm 15 mm 357 mm 331 mm 11 mm 483 mm 465 mm 435 mm 76 mm 88 mm 95 mm 15 mm 35...

Страница 65: ...A Fade Fade In Out Play On Mute DV RA1000HD Block Diagram dB Mono Mono On Meter Off Stereo Stereo 9 14 16 18 20 9 14 16 18 20 3Band EQ Dither Meter Input Type G R Crossover 3Band Compressor Expander 1...

Страница 66: ...Notes 66 TASCAM DV RA1000HD...

Страница 67: ...Notes TASCAM DV RA1000HD 67...

Страница 68: ...tascam com 5939 Wallace Street Mississauga Ontario L4Z 1Z8 Canada TEAC MEXICO S A De C V Phone 52 555 581 5500 www tascam com Campesinos No 184 Colonia Granjes Esmeralda Delegaacion Iztapalapa CP 0981...

Отзывы: