background image

4 – CD playback & recording

  TASCAM DV-RA1000 Owner’s Manual 

29

3

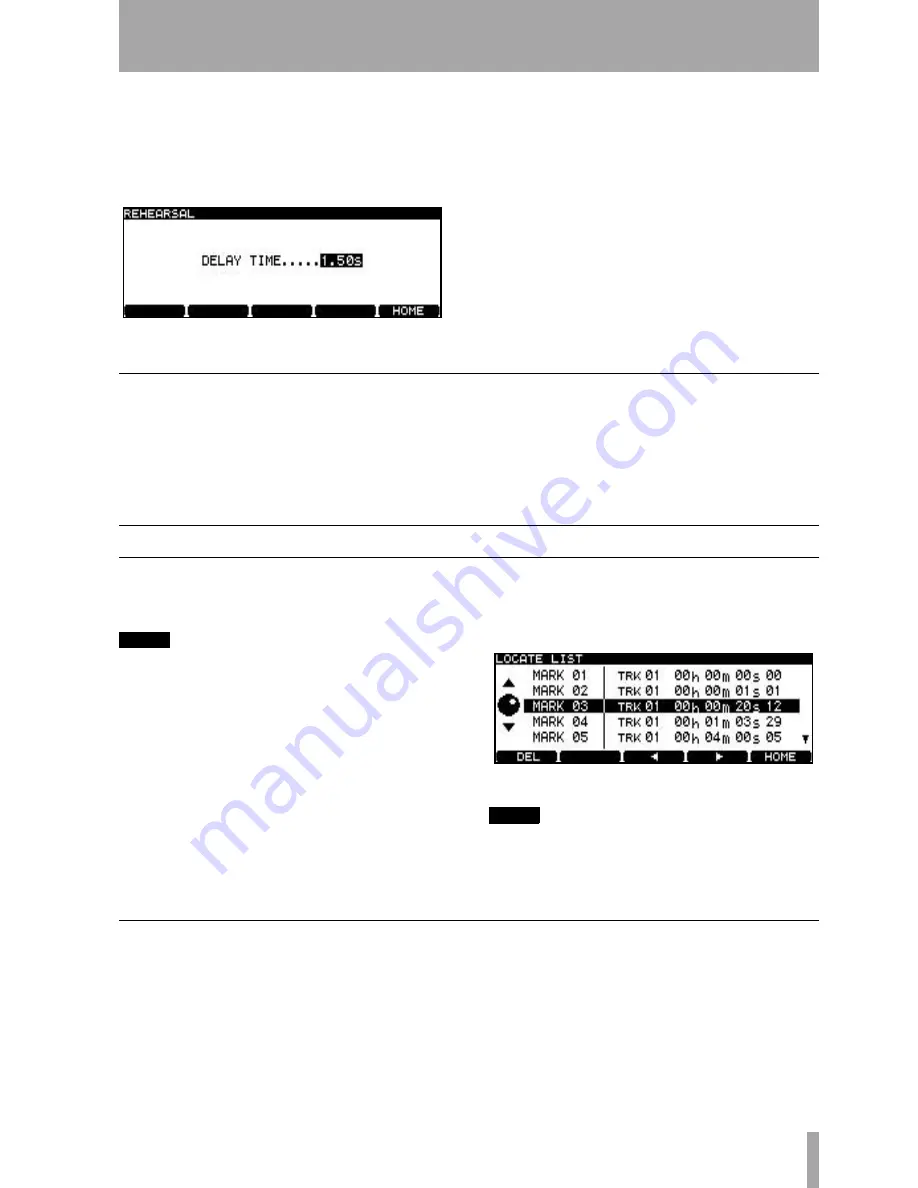
Start the source. The first four seconds of the 
synchronized source after the threshold level 
is exceeded are recorded to a buffer memory 
and looped. The screen shows the rehearsal 
screen (

REHEARSAL

):

4

Use the wheel to delay the record start time (0 
seconds. Press 

ENTER

 when done (

CANCEL


cancels the setting) to return to the home 
screen.

5

The unit is now in 

REC READY

 mode.

Making the recording

1

When the start point has been delayed to the 
point you want, press 

SYNC REC

 again so that 

the indicator lights steadily.

2

Line up the source to a little before the track 
starts.

3

Start playback of the source—recording starts 
when the threshold is exceeded (plus any delay 
added as above).

About marks

A maximum of 99 marks can be added to a disc (CD) 
or to a project (DVD) to help with location, etc. 
These marks can be named and edited.

NOTE

Although marks can be added to a CD recording project 
(or to a pre-recorded CD), they are not stored when the 
CD is ejected. They become part of the project on a 
DVD.

Press the 

MARK

 key to add a mark at the point 

where the key was pressed. A popup message 
appears for a second to let you know the mark 
has been set.

Marks can be added when stopped, paused, 
playing back or recording.

Pressing and holding the 

DISPLAY

 key and 

then pressing the 

MARK

 key brings up the 

locate list screen.

Use the wheel to scroll through the list. Marks 
are displayed in the order they appear in the 
play list (DVD). If the play list order changes, 
so does the mark list order.

NOTE

The 

MARK

 key on the RC-RA1000 remote control unit 

can be used to enter marks, and the 

LOCATE

 key can 

be used to bring up the locate list.

Jumping to a mark

To jump to a location mark, use the wheel to 
highlight it in the list, and press 

ENTER

.

Figure 4.6: Rehearsing synchronized recording

Figure 4.7: The locate list

Содержание DV-RA1000

Страница 1: ...High Definition Audio Master Recorder OWNER S MANUAL D00828701A...

Страница 2: ...tique cet appareil peut provoquer des interf rences radio dans ce cas l utilisateur peut tre amen prendre des mesures appropri es F r Kunden in Europa Warnung Dies is eine Einrichtung welche die Funk...

Страница 3: ...ly at plugs convenience receptacles and the point where they exit from the apparatus 11 Only use attachments accessories specified by the manufacturer 12 Use only with the cart stand tripod bracket or...

Страница 4: ...a class 1 laser product There is no haz ardous invisible laser radiation during operation because invisible laser radiation emitted inside of this product is completely confined in the protective hous...

Страница 5: ...gle 17 RPT repeat 17 PGM program 17 ATRK auto track 17 RMODE recording mode 17 MONO 17 PITCH 17 NSD noise shaped dithering 17 OSC oscillator 17 FINALIZE 17 UNFINALIZE 17 ERASE 17 General preferences 1...

Страница 6: ...ircular discs 10 Figure 1 6 DVD RW logo 11 Figure 2 1 Rear panel connections 12 Figure 3 1 The CD home screen 14 Figure 3 2 The DVD home screen 14 Figure 3 3 Editing the clock settings 15 Figure 3 4 B...

Страница 7: ...l as for more conventional CDs In addition the DV RA1000 provides digital effects a 3 band EQ with a fully parametric mid band and a dynamics processor operating in one or three bands as either a comp...

Страница 8: ...and vibration Keep the unit away from strong magnetic fields TV sets computer monitors large electric motors etc Installation Install the DV RA1000 into a 2U rack space using the supplied mounting kit...

Страница 9: ...gain About CD R and CD RW discs The DV RA1000 uses CD R and CD RW media and can also use CD R and CD RW Digital Audio media CD R media up to 48x are supported Use only CD RW media rated at 1x to 4x Mu...

Страница 10: ...e the disc tray opened unnecessarily Additional notes with regard to CD R and CD RW discs There are additional precautions that you should take when handling CD R and CD RW discs that are dif ferent t...

Страница 11: ...x 24x NOTE Though the DV RA1000 has been tested with a wide variety of commercial discs and media you should be aware that some discs may contain manufacturing defects etc which make them unsuitable f...

Страница 12: ...nnectors each at normal speed double wire If only one XLR connector is being used connections should be made only to XLR connector 1 input and output In quad frequency 176 4 or 192kHz modes both conne...

Страница 13: ...Hz Under these condi tions the input sync can be 6 away from the norm USB Connect a suitably equipped computer using a USB 2 0 cable The DV RA1000 appears as a mass storage device requiring no driver...

Страница 14: ...anese 106 key layout Working without a keyboard However if such a keyboard is not available you can use the front panel to name disc items When a screen allowing you to name an item project or file is...

Страница 15: ...mastering etc 3 Use the cursor keys to navigate around the fields and the wheel to change values NOTE The clock uses 24 hour format i e 16 24 is used rather than 4 24pm This cannot be changed Checking...

Страница 16: ...and return to the previous menu level CANCEL returns up a screen When the F5 key is labeled as HOME on the on screen label pressing it returns to the home screen NOTE Note that the menu system usuall...

Страница 17: ...auto space Automatically puts spaces between tracks on playback SNGL single Enters single track playback mode RPT repeat Sets the playback repeat mode between OFF off ALL all tracks of the disc are re...

Страница 18: ...alendar is described in Setting the clock on page 15 Time zone TIME ZONE allows you to set up your local time zone expressed relative to GMT This may be useful if the discs containing your files are m...

Страница 19: ...B 18dB and 20dB to match your local working practices Resume playback RESUME The DV RA1000 can be set to resume playback or recording from the point where it stopped when the STOP key is pressed When...

Страница 20: ...ack etc There is also a CLEAR key to clear the current numerical entry Dedicated function keys These keys REC MODE A TRACK A READY A CUE A B REPEAT PGM SINGLE are dedicated keys on the remote control...

Страница 21: ...digital signal If you are recording to a quad frequency DVD this option is not available and AES EBU is the only option available If you are recording to a DSD DVD the signals will always be input an...

Страница 22: ...V RA1000 NOTE When the signal on playback or recording is at 0dBFS or over for more than one sample the OVER indicator on the meter lights If a track is normalized to 0dB on a DAW before recording at...

Страница 23: ...d playback To program the order of track playback use the pro gram list accessible from the Virtual Front Panel see The virtual front panel VFP on page 17 The PGM key on the remote control unit can al...

Страница 24: ...be used with DVD playback but not in DSD mode Pitch change This is another VFP function see The virtual front panel VFP on page 17 for playback only The reference clock must be set to the internal clo...

Страница 25: ...Y key lights Note that pressing STOP part of the way through a track when auto ready is turned on returns the play back position to the start of the current track and the READY key lights pressing REA...

Страница 26: ...takes place but the effects of the fade can be previewed and the fade times can be set in playback mode there is no difference between rehearsal and the real thing Use the F1 and F2 cursor keys and t...

Страница 27: ...recording CDs not DVDs The SYSTEM SETUP menu COPY ID allows three choices FREE free no copy prohibit is enabled Digital copying from the disc is possible PROHIBIT prohibited copy prohibit is enabled...

Страница 28: ...NC REC key Setting the threshold level on page 25 Repeated short presses of the SYNC REC key cycle the function through off rehearsal mode indicator is flashing and active indicator is lit Recording s...

Страница 29: ...elp with location etc These marks can be named and edited NOTE Although marks can be added to a CD recording project or to a pre recorded CD they are not stored when the CD is ejected They become part...

Страница 30: ...e fields and the wheel to edit these fields to slip the position of the mark Press ENTER when the editing is complete The mark is then highlighted and you can use it for location Use F1 DEL to delete...

Страница 31: ...s A playlist showing the running order User settings for the DV RA1000 Important note on the file system In order for the DV RA1000 to read the information on a disc control information referred as UD...

Страница 32: ...tarting a new disc When you insert a new DVD RW disc into the tray and close it the screen immediately shows the new project screen 1 Give the project a name Press the F4 key to start editing the name...

Страница 33: ...wheel and ENTER to select the DVD menu From there select the PROJECT sub menu 2 Highlight the PROJECT TEXT sub menu and press ENTER 3 Use the soft keys and wheel or an attached PS 2 keyboard to enter...

Страница 34: ...formatted a new project is automatically added to the disc Reformatting a DVD RW disc on the DV RA1000 will never result in an entirely blank disc but of course all previous data is removed during a f...

Страница 35: ...mble or A on the virtual front panel means that recordings will be assembled If the playback position when record ready is entered is at the end of a track the new material will be added to the end of...

Страница 36: ...sub menu select RENAME Press ENTER 3 Use the wheel to highlight a file and press the F3 or F4 key to start editing 4 Edit the file name as described in The DV RA1000 has two types of home screen depe...

Страница 37: ...e 1 Press MENU and use the wheel and ENTER to select the DVD menu From there select the EDIT sub menu 2 From this sub menu select DIVIDE Press ENTER The DV RA1000 enters pause mode and the first three...

Страница 38: ...that is the input attenuation before the signal enters the effects section and the attenuation after the signal leaves the effects section These levels can be set from 0dB no attenuation to INF infini...

Страница 39: ...AND to make the settings for the dynamics processor For CMPx3 and EXPx3 set tings repeated presses of the F3 key cycle through LOW MID and HIGH bands There is only one setting screen and one set of pa...

Страница 40: ...ectly 1 Press MENU and select USB Press ENTER 2 A popup menu on the DV RA1000 screen asks you if you want to connect to the computer Press ENTER or CANCEL to cancel The DV RA1000 appears as a mass sto...

Страница 41: ...eject or disconnect the DV RA1000 from the system 1 Press CANCEL to start the disconnection pro cess 2 A popup appears Press ENTER to completely disconnect the DV RA1000 or CANCEL to halt the disconn...

Страница 42: ...BV Maximum output level 6dBV Phones output stereo Connector 1 4 stereo jack T L R R S GND x 1 Max output power 50 mW 50 mW 30 PCM inputs XLR Connector 3 pin XLR female x 2 1 GND 2 Hot 3 Cold Signal ty...

Страница 43: ...in jack x 1 Signal type IEC60958 3 Output frequencies kHz 44 1 48 88 2 96 double speed all 6 Data format 16 bit 44 1kHz CD DA 24 bit 44 1kHz 48kHz 88 2 96kHz to DVD RW media Output impedance 75 20 Nom...

Страница 44: ...dB 1dB DSD mode Total Harmonic Distortion inputs at maximum level PCM 0 005 f 1kHz AES 17LPF DSD 0 007 f 1kHz AES 17LPF Signal to noise ratio 103dB A weighting AES 17LPF DVD RW recording 94 dB A weigh...

Страница 45: ...ations etc TASCAM DV RA1000 Owner s Manual 45 Dimensional drawing Figure 8 1 Dimensions of the DV RA1000 483 mm 19 465 mm 18 3 435 mm 17 1 76 mm 3 88 mm 3 5 95 mm 3 75 15 mm 0 6 357 mm 14 1 331 mm 13...

Страница 46: ...8 Specifications etc 46 TASCAM DV RA1000 Owner s Manual Block diagram Figure 8 2 Block diagram 0 0 1 1 12 3 1 4 1 5 66 478 6 478 478 9 478 1 1 2 2 1 0 0...

Страница 47: ......

Страница 48: ...pa CP 09810 Mexico DF TEAC UK LIMITED Phone 44 1923 438880 www tascam co uk 5 Marlin House Croxley Business Park Watford Hertfordshire WD1 8TE U K TEAC EUROPE GmbH Phone 49 611 71580 www tascam de Bah...

Отзывы: