background image

TASCAM DR-70D

 9

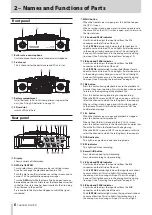
2 – Names and Functions of Parts
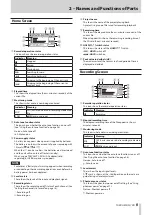
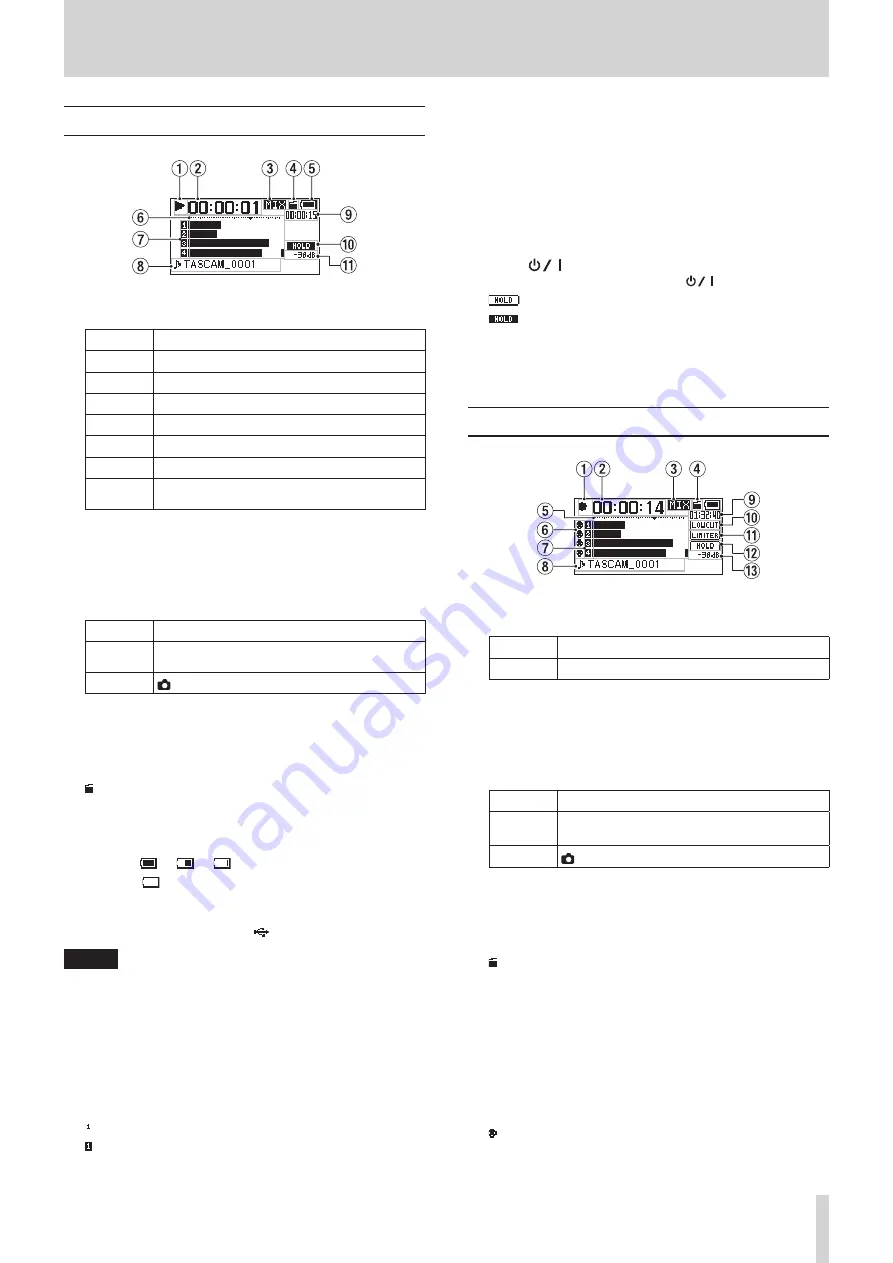
Home Screen

1

  Recorder operation status

This icon shows the recorder operation status.

Indicator Meaning

8

Stopped

9

Paused

7

Playing back

,

Searching forward

m

Searching backward

/

Skipping to the beginning of the next track

.

Skipping to the beginning of the current or 

previous track

2

  Elapsed time

This shows the elapsed time (hours: minutes: seconds) of the 

current file.

3

  Monitoring mode

This shows what audio is now being monitored.

Indicator Meaning

MIX

CH1-4 mix sound or dual recording mode main 

file

CAM

 IN jack sound input

4

  Auto tone function status

This icon shows whether the auto tone function is on or off. 

(See “Using the auto tone function” on page 26.)
No icon: Auto tone off

 : Auto tone on

5

  Power supply status

A battery icon appears when power is supplied by batteries.
The battery icon shows the amount of power remaining with 

10 levels (


e


e


).

When the 

 icon has no bars, the batteries are almost dead 

and the unit will soon turn off (enter standby).
When using a TASCAM PS-P515U AC adapter (sold 

separately) or USB bus power,   appears.

NOTE

Sometimes a “Battery Low” warning appears when recording 

or conducting other demanding operations even before the 

battery power has been depleted.

6

  Level meters

These show the levels of the input and playback signals.

7

  Recording status

These show the recording on/off status of each channel. (See 

“Setting the channels to record” on page 18.)

 : Recording off
 : Recording on

8

  Project name

This shows the name of the project playing back.
A project is a group of files used for recording/playback.

9

  Remaining time

This shows the elapsed time (hours: minutes: seconds) of the 

current file.
When stopped, this shows the remaining recording time of 

the SD card (hours: minutes: seconds).

0

 HOLD/

 switch status

This shows the status of the HOLD/

 switch.

 : HOLD switch off
 : HOLD switch on

q

  Peak value in decibels (dB)

The maximum level that occurs in a fixed period of time is 

displayed in decibels.
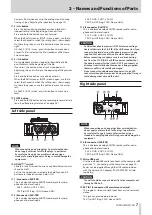
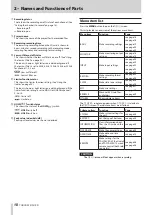
Recording Screen

1

  Recorder operation status

This icon shows the recorder operation status.

Indicator Meaning

0

Recording

2

  Elapsed recording time

The elapsed recording time of the file appears as hours: 

minutes: seconds.

3

  Monitoring mode

This shows what audio is now being monitored.

Indicator Meaning

MIX

CH1-4 mix sound or dual recording mode main 

file

CAM

 IN jack sound input

4

  Auto tone function status

This icon shows whether the auto tone function is on or off. 

(See “Using the auto tone function” on page 26.)
No icon: Auto tone off

: Auto tone on

5

  Level meters

These show the input signal levels.

b

 mark is shown at the −16dB position on the scale as a 

guide for input level adjustment.

6

  Phantom power status

This shows the phantom power on/off setting. (See “Using 

phantom power” on page 21.)
No icon: Phantom power off

: Phantom power on

Содержание DR-70D

Страница 1: ...D01244120C DR 70D Linear PCM Recorder for DSLR Reference Manual...

Страница 2: ...e channels to record 18 Adjusting the input balance 18 Adjusting the input level 19 Setting the recording input source 20 Using plug in power 20 Setting the input gain 20 Using phantom power 21 Settin...

Страница 3: ...factory settings 34 Formatting an SD card 34 Setting the battery type 34 Setting the file name format 35 File name format 35 Setting the WORD item 35 Initializing the count 35 9 Using the REMOTE jack...

Страница 4: ...standby 3 5mm 1 8 line headphones output jack 128x64 dot matrix LCD with backlight Micro B USB 2 0 port Operates on 4 AA batteries an AC adapter TASCAM PS P515U sold separately external battery pack T...

Страница 5: ...global com to find the list or contact the TASCAM customer support service Precautions for use SD cards are delicate media In order to avoid damaging a card or the card slot please take the following...

Страница 6: ...hts if distortion occurs in the analog circuitry during mic input This will not light however if distortion occurs in the analog circuitry during line input See Adjusting the input level on page 19 0...

Страница 7: ...for micro phone and line level inputs XLR 1 GND 2 HOT 3 COLD TRS Tip HOT Ring COLD Sleeve GND s 2 R connector XLR TRS This is a balanced analog XLR TRS combo jack for micro phone and line level input...

Страница 8: ...lume z PHONES volume control Use to adjust the volume output from the PHONES jack CAUTION Before connecting headphones lower the PHONES volume to the minimum level Failure to do so could result in a s...

Страница 9: ...signals 7 Recording status These show the recording on off status of each channel See Setting the channels to record on page 18 Recording off Recording on 8 Project name This shows the name of the pr...

Страница 10: ...h on e Peak value in decibels dB Peak input level values are shown in decibels Menu item list Press the MENU button to open the MENU screen This list provides an overview of the various menu items Men...

Страница 11: ...button to return to the MENU screen or OTHERS screen Press the 1 8 button to return to the Home Screen NOTE When the BASIC or INPUT screen is open press the MENU button again to return to the Home Scr...

Страница 12: ...x both sold separately to power the unit Using an AC adapter sold separately Connect the USB cable to the TASCAM PS P515U AC adapter and the unit s USB port as shown in the illustration AC outlet micr...

Страница 13: ...cted headphones when turning the unit on or off Noise could damage the speakers or harm your hearing Turning the unit on To start the unit when off in standby slide the HOLD switch toward until TASCAM...

Страница 14: ...ow and the unit is not powered by a TASCAM PS P515U AC adapter sold separately or USB bus power When using batteries replace them before they completely lose power Inserting and removing SD cards Inse...

Страница 15: ...t an external stereo mic to the EXT IN 1 2 jack on the right side of the unit To listen with headphones connect them to the PHONES jack To listen with an external monitoring system powered monitor spe...

Страница 16: ...h commercially available 3 5mm stereo mini plug cables 1 Press the MENU button to open the MENU screen 2 Turn the DATA dial to select MONITOR and press the DATA dial The MONITOR SETTING screen opens 3...

Страница 17: ...he output of an external audio device Audio equipment or other external device CAUTION Reduce the output level of the external audio device if the input sound is distorted even after adjusting the inp...

Страница 18: ...SELECT pop up menu item in Folder opera tions on page 30 If no setting is made new files are created in the MUSIC folder Setting the channels to record By default the channel recording settings are O...

Страница 19: ...rn the DATA dial to set the mic input gain Options LOW default MID HIGH HI PLUS NOTE The input gain is different for the LOW MID HIGH and HI PLUS settings Make a selection according to the loudness of...

Страница 20: ...its own battery set INPUT 1 2 to EXT_STEREO Setting it to EXT_POWER could damage such microphones Use headphones to monitor when you are recording with a microphone If you use speakers for monitoring...

Страница 21: ...d this unit could be damaged Turn phantom power ON only when using a condenser microphone that requires phantom power Supplying phantom power to some ribbon mics will break them If you are unsure do n...

Страница 22: ...he sound source NOTE The icon appears on the recording screen when the limiter is on for any channel when set to MONO or LINK When you switch the CH1 CH2 CH3 CH4 limiter setting between MONO and LINK...

Страница 23: ...ENU button to return to the Home Screen This shows the file type format and sampling frequency used for recordings Set the audio file type that you want to record before you start recording 1 Press th...

Страница 24: ...mber 3 Source file 4 Assigned channels Creating a new file without interrupting recording track incrementing You can manually create a new file without pausing recording and set the unit to automatica...

Страница 25: ...E This function cannot be enabled if more than two channels are selected for recording or if the two selected channels prevent the recording of a stereo pair for example CH1 and CH3 5 Press the DATA d...

Страница 26: ...setting of auto and slate tones 1 Press the MENU button to open the MENU screen 2 Turn the DATA dial to select SLATE and press the DATA dial The SLATE SETTING screen appears 3 Turn the DATA dial to s...

Страница 27: ...e MIC SETTING screen opens 4 Turn the DATA dial to select MS MODE 1 2 or MS MODE 3 4 and press the DATA dial 5 Turn the DATA dial to set the decoding mode when using a mid side mic Options Meaning OFF...

Страница 28: ...V BWF 24 bit STEREO 44 1kHz 1 07 4 30 35 44 134 24 48kHz 1 02 4 08 33 04 123 28 96kHz 00 31 2 04 16 32 61 44 The recording times shown above are estimates They might differ depending on the SD SDHC SD...

Страница 29: ...ton to return to the Home Screen and load that file The folder that contains this file becomes the current folder and new recorded files will be saved in it This folder also becomes the playback area...

Страница 30: ...he selected folder at once Press the DATA dial to delete the files or the 1 8 button to cancel deletion NOTE You cannot delete read only files and files that are not recognized by this unit 8 8 CANCEL...

Страница 31: ...iles for playback skipping When the Home Screen is open use the 4 and 3 buttons to select a file for playback If you press the 4 button when the playback position is in the middle of a file it will re...

Страница 32: ...USB connected appears in the display Make sure that an SD card is properly inserted in the unit NOTE Power is supplied from the USB port if the USB cable is connected to a unit that contains batteries...

Страница 33: ...ECT 1 3 page shows information about the currently loaded audio file 8 8 WAV BWF Shows the audio file type For WAV BWF files bit depth stereo mono and sampling frequency Hz are shown 8 8 TITLE Shows t...

Страница 34: ...DATA dial to highlight Exec 2 Press the DATA dial to open a pop up confirmation message 3 Press the DATA dial to initialize the unit Press the 1 8 button to cancel initialization Formatting an SD car...

Страница 35: ...The TYPE item can be set to either WORD or DATE WORD default The 6 characters set with the WORD item is used for file names Example TASCAM_0001S12 wav DATE The date is used for the file name Example 1...

Страница 36: ...WD RECORD1 STOP REC INC RECORD2 STOP REC SLATE INC Track incrementing function All other functions are the same as on the main unit 8 When finished press the 1 8 button to return to the Home Screen Fo...

Страница 37: ...to two layers You cannot create a new folder inside the current folder MBR Error Init CARD The SD card is not formatted properly or the card is broken Change the card or press the DATA dial while this...

Страница 38: ...upported by this unit 8 8 No sound is output Check the connections with the monitoring system Is the volume of the monitoring system minimized Is the OUTPUT LEVEL setting of the unit minimized 8 8 Rec...

Страница 39: ...B HI PLUS 38 dB 8 8 IN connector Connector 3 5mm 1 8 stereo mini jack Input impedance 10 k Nominal input level 10 dBV Maximum input level 6 dBV 8 8 PHONES jack Connector 3 5mm 1 8 stereo mini jack Max...

Страница 40: ...ding 2ch 44 1kHz 16 bit WAV files About 3 15 When XLR TRS input selected phantom power used Recording 2ch 44 1kHz 16 bit WAV files About 10 30 When 3 4 MIC input built in mic selected Using NiMH batte...

Страница 41: ...ration time might be reduced depending on the mic being used 8 8 Dimensions 169 55 2 106 5 mm W H D with top adapter attached 8 8 Weight 625 g including batteries 530 g not including batteries 8 8 Ope...

Страница 42: ...ia 90670 U S A TEAC UK Ltd https tascam eu Phone 44 1923 797205 Meridien House 69 71 Clarendon Road Watford Herts WD17 1DS United Kingdom TEAC EUROPE GmbH https tascam de Phone 49 611 71580 Bahnstrass...

Отзывы: