background image

Targus AMW584 Bluetrace Wireless Mouse

Targus AMW584 Bluetrace Wireless Mouse

13

14

folding line

2 staples here (saddle stitching)

O

pen size: 9”

W x 4.5”

H      F

olde

d S

ize: 4.5”

W x 4.5”

H     M

ater

ial: 80gsm w

oo

df

re

e p

ap

er     C

olo

r: G

ra

ys

ca

le

Die

cu

t

(UG) AMW584GL-50_410-4169-001A

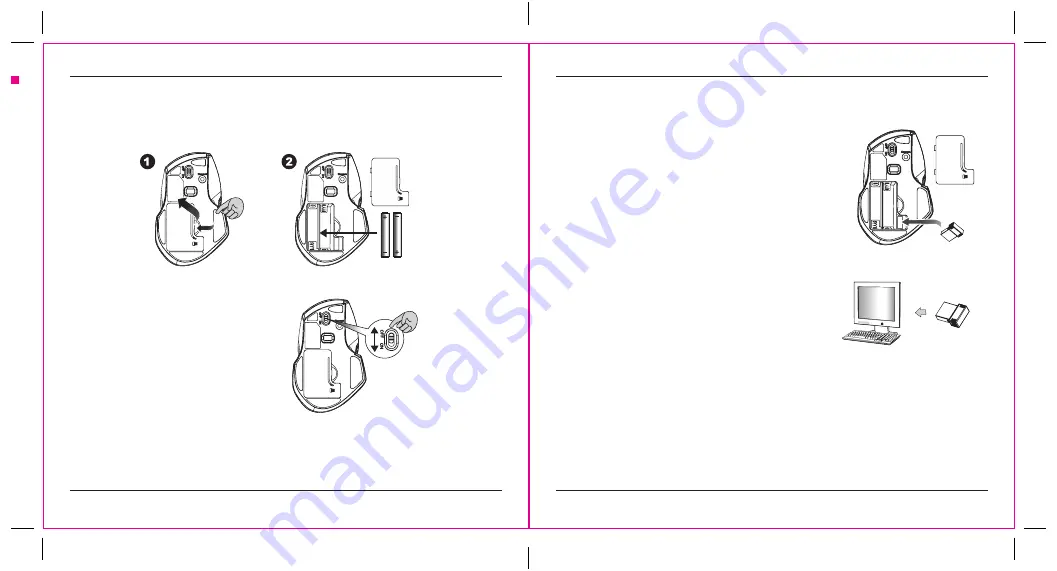
Instalar la batería

Paso 1: Retire la tapa de la batería.

Paso 2: Inserte las pilas como se muestra dentro del compartimiento de la batería.

Paso 3: Coloque la tapa.

Paso 4: Encienda el interruptor.

Paso 5: Si necesita viajar con su mouse inalámbrico, asegúrese de apagar el INTERRUPTOR DE 

ENCENDIDO.

2 pilas AA

Advertencia:

Inserte las pilas en la posición correcta 

según las instrucciones que encontrará en 

el mouse.

Configuración de la conexión entre el receptor y el mouse

1.  Inserte las pilas en el mouse y siga los pasos a continuación.

2.  Mientras tanto, para abrir el mouse, saque el nanorreceptor.

3.  Conecte el nanorreceptor en el puerto USB A de su 

computadora.

4.  Si el mouse no funciona, póngalo en modo emparejamiento.

5.  Emparejamiento: Reconecte el receptor en el puerto USB de su computadora, luego pulse el 

botón de conexión en el mouse. Si el mouse no funciona después de 10 segundos, vuélvalo a 

emparejar. (El receptor tiene una función de emparejamiento automático).

6.  El indicador LED del mouse parpadea de forma continua cuando está en modo emparejamiento 

y deja de parpadear cuando queda correctamente emparejado con el receptor. 

7.  Cuando la batería esté baja, el indicador de batería en el mouse empezará a parpadear.

Содержание AMW584

Страница 1: ... manufactured by Targus including but not limited to laptops smartphones devices or any other product that may be used in connection with the Targus product Targus and DefenseGuard are trademarks or registered trademarks of Targus International LLC in the U S and in certain other countries All logos and registered trademarks are the property of their respective owners 2021 Targus International LLC...

Страница 2: ...rd 5 Backward 6 ZOOM Key 7 DPI Switch Key LED Indicator 8 Battery status LED Indicator 9 Win Key 10 Nano Receiver 11 Battery Cover 12 Connect Button 13 ON OFF Switch Forward Press this button to view the next page in your Internet browser Backward Press this button to view the previous page in your Internet browser Zoom Key Zoom in out Press zoom key scroll to zoom in out Win Key Windows button fo...

Страница 3: ...the cover Step 4 Turn on power switch Step 5 If you need to travel with your wireless mouse made sure you turn off the POWER SWITCH 3 Plug the Nano receiver into the USB A port on your computer 4 If the mouse does not work please put it into pairing mode 5 Pairing Re plug the receiver into the USB port on your computer then press the connect button on the mouse If the mouse does not work after 10 ...

Страница 4: ...70 1 LED Bright 20 40 Introduction Commutateur DPI L indicateur LED sous la molette s allume lorsque vous branchez la souris sur le port USB La luminosité de l indicateur indique le réglage DPI utilisé Il existe trois réglages différents Lumineux 1600 DPI Variateur 1300 DPI Pas de lumière 800 DPI Le paramètre par défaut est 800 DPI Vous pouvez facilement basculer entre les paramètres DPI Afin d éc...

Страница 5: ...lation des piles Étape 1 Retirez le couvercle du compartiment des piles Étape 2 Insérez les piles comme indiqué à l intérieur du compartiment des piles Étape 3 Remettez le couvercle Étape 4 Allumez l interrupteur d alimentation Étape 5 Si vous devez voyager avec votre souris sans fil assurez vous que vous éteignez le BOUTON D ALIMENTATION 2 piles de type AA Avertissement Veuillez insérer les piles...

Страница 6: ...les à nouveau Le récepteur a une fonction d appariement automatique 6 L indicateur LED de la souris clignote régulièrement lorsqu elle est en mode d appariement et cesse de clignoter lorsqu elle est correctement appariée avec le récepteur 7 Lorsque les piles sont faibles l indicateur des piles de la souris commence à clignoter Indicateur LED d alimentation de la touche de commutation DPI Indicateu...

Страница 7: ...o de la batería Indicador LED 9 Tecla Win 10 Nanorreceptor 11 Tapa de la batería 12 Botón de conexión 13 Interruptor ON OFF Requisitos del sistema Windows 10 macOS iOS Android Contenido Mouse inalámbrico Targus 2 pilas Energizer AA Receptor USB Guía del usuario Adelante Pulse este botón para ver la siguiente página en su explorador de internet Atrás Pulse este botón para ver la página anterior en ...

Страница 8: ...iones que encontrará en el mouse Configuración de la conexión entre el receptor y el mouse 1 Inserte las pilas en el mouse y siga los pasos a continuación 2 Mientras tanto para abrir el mouse saque el nanorreceptor 3 Conecte el nanorreceptor en el puerto USB A de su computadora 4 Si el mouse no funciona póngalo en modo emparejamiento 5 Emparejamiento Reconecte el receptor en el puerto USB de su co...

Страница 9: ...LED encendido durante 3 segundos Encendido ON La luz LED parpadea 3 veces Durante el emparejamiento LED apagada cuando se empareja o si hay fallos después de 10 segundos La luz LED parpadea 10 segundos Aviso de batería baja DPI indicado cuando el DPI cambia Indicador LED del estado de encendido o apagado Mise sous tension La LED est allumée pendant 5 secondes Réactivation La LED est allumée pendan...

Страница 10: ...less Mouse Targus AMW584 Bluetrace Wireless Mouse 17 18 folding line 2 staples here saddle stitching Open size 9 W x 4 5 H Folded Size 4 5 W x 4 5 H Material 80gsm woodfree paper Color Grayscale Diecut UG AMW584GL 50_410 4169 001A ...

Страница 11: ...vice or product that is not manufactured by Targus including but not limited to laptops smartphones devices or any other product that may be used in connection with the Targus product Australian customers For complete warranty details see warranty statement enclosed Targus is a registered trademark of Targus International LLC in the U S and in certain other countries Microsoft Windows and Windows ...

Страница 12: ...k you for your purchase Targus warrants to the original purchaser that its products are free from defects in materials and workmanship and during the specified warranty period and lasts as long as the original purchaser owns the product The warranty period is stated on the packaging or in the documentation provided with this Targus product Targus Limited Product Warranty excludes damage caused by ...

Отзывы: