background image


3-6 

3.3  Using the Utility CD 


Trend Micro™ Internet Security 


Trend Micro Internet Security provides you a friendly interface to use 

anti-virus functions.    You can use Trend Micro™ Internet Security 

to scan your e-mail, block unwanted websites and protect your PC 

from virus infected. 


Registering Trend Micro™ Internet Security 

It is better to register your software before starting to use.  After 

registration, you can get the full functionality of the software, 

real-time updates, technical support and product updates. 

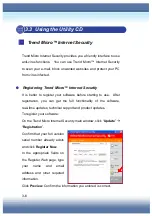
To register your software: 

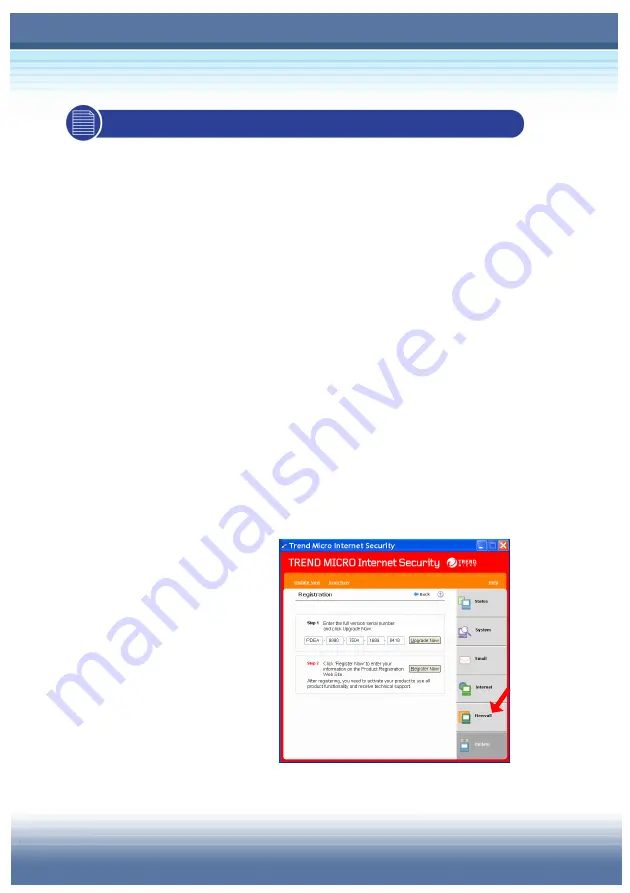
On the Trend Micro Internet Security main window, click “

Update

” 

Æ


Registration

”. 

Confirm that your full version 

serial number already exists 

and click 

Register Now

In the appropriate fields on 

the Register Web page, type 

your name and email 

address and other required 

information. 

Click 

Preview

. Confirm the information you entered is correct. 

Содержание Traveller E210

Страница 1: ...TARGA NOTEBOOK Traveller E210 User s Guide...

Страница 2: ...allation If this equipment does cause harmful interference to radio or television reception which can be determined by turning the equipment off and on the user is encouraged to try to correct the int...

Страница 3: ...ith part 15 of the FCC Rules Operation is subject to the following two conditions 1 This device may not cause harmful interference 2 This device must accept any interference received including interfe...

Страница 4: ...sh VAROITUS Paristo voi r j ht jos se on virheellisesti asennettu Vaihda paristo ainoastaan valmistajan suosittelemaan tyyppiin H vit k ytetty paristo valmistajan ohjeiden mukaisesti French ATTENTION...

Страница 5: ...function other than a cordless type during an electrical storm There may be a remote risk of electric shock from lightning 6 Do not use the telephone function to report a gas leak in the vicinity of...

Страница 6: ...ating Do not cover the openings 6 Make sure that the power voltage is within its safety range and has been adjusted properly to the value of 100 240V before connecting the equipment to the power inlet...

Страница 7: ...as not work well or you can not get it work according to User Guide z The equipment was dropped and damaged z The equipment has obvious signs of breakage 12 Do not leave the equipment in an unconditio...

Страница 8: ...pment please ask your local vendor for help Trademarks All trademarks are the properties of their respective owners Microsoft is a registered trademark of Microsoft Corporation Windows 98 ME 2000 XP a...

Страница 9: ...3 Physical Characteristic 1 3 CPU 1 3 Core Chips 1 3 Memory 1 3 Power 1 3 Storage 1 4 I O Port 1 4 Communication Port 1 4 PCMCIA 1 5 Software BIOS 1 5 Display 1 5 1 2 Quick Components Guide 1 6 Top o...

Страница 10: ...ning On the Computer 1 18 Power On Self Test 1 18 Turning Off the Computer 1 19 Chapter 2 Basics of Using Notebook PC 2 1 Safety and Comfort Tips 2 2 Safety Comfort Tips 2 2 Have a Good Work Habit 2 3...

Страница 11: ...2 14 Inserting the CD 2 15 Removing the CD 2 16 Releasing the CD Manually 2 17 2 6 The Hard Disk Drive 2 18 2 7 Using the Video Function 2 19 Powerful Video Controller 2 19 Configuring the Display Se...

Страница 12: ...curity 3 6 Starting Trend Micro Internet Security 3 6 Configuring Real time Virus Scan Actions 3 8 Identifying Real time Agent Icons 3 8 3 4 Advanced Software 3 9 System Control Manager SCM 3 9 CPU Co...

Страница 13: ...ery Pack 4 7 Replacing the Battery Pack 4 8 4 2 Managing the Power 4 9 Power Options 4 10 Chapter 5 BIOS Setup 5 1 Using BIOS Setup Utility 5 2 When to Use BIOS Setup 5 2 How to Run BIOS Setup 5 2 Con...

Страница 14: ...Device Setting 5 12 Security Settings 5 13 Change Supervisor User Password 5 13 Clear User Password 5 15 Exit Setting 5 16 Chapter 6 Expanding and Upgrading 6 1 Connecting the External Devices 6 2 Co...

Страница 15: ...ower on Password 7 3 Operating System Password 7 3 Using the Anti Virus Protection 7 4 About Computer Virus 7 4 Trend Micro Internet Security 7 4 7 2 Tips for Traveling 7 5 7 3 Taking Care of Your Com...

Страница 16: ...XVI...

Страница 17: ...ebook Traveller E210 Notebook PC This chapter first provides a general introduction on your Notebook PC to let you know the hardware components well and start to work easily Let s read on to learn mor...

Страница 18: ...p the unit in the future The package should contain the following items One Notebook PC TARGA Notebook Traveller E210 One Recovery CD One Software CD containing the drivers and utilities One Nero Burn...

Страница 19: ...nd Intel Pentium M Dothan L2 Cache On die 512K Core Chips North Bridge SiS M661MX South Bridge SiS 963L Memory Technology DDR 226 333 400 Memory DDR SO DIMM X 2 slot 128 256 512 1024MB DDR SDRAM Maxim...

Страница 20: ...SB version 2 0 IEEE 1394 x 1 Mic in Line in x 1 Headphone Out Line out SPDIF out x 1 RJ11 x 1 RJ45 x 1 Card Reader MMC SD MS 3 in 1 Communication Port 56K Fax MODEM Support I F AC97 S W Modem Wake on...

Страница 21: ...tment Adjustment controlled by K B hot keys CRT Support 800x600 max 32bit color 1024x768 max 32bit color 1400x1050 max 32bit color 1152x768 max 32bit color 1280x1024 max 32bit color 1600x1200 max 32bi...

Страница 22: ...of your Notebook PC It will help you to know more about the appearance of this computer before using it Top open View Press the Cover Latch to open the top cover LCD Panel The figure of top open view...

Страница 23: ...turn your Notebook PC power ON and OFF Quick Launch Buttons Just one click on the quick launch buttons can fast the starting of the programs in common use It helps you to do works more efficient Keybo...

Страница 24: ...he IEEE 1394 port is a high speed bus that allows you to connect high end digital devices such as the DV digital video camera Audio Port Connectors Make high quality sound blaster with stereo system a...

Страница 25: ...On Glowing Blue when the AC Power is activated and blinking Blue when computer is getting into sleep mode Battery Status Blinking Green when the battery is being charged and blinking red is in LLB sta...

Страница 26: ...onnector The computer provides a built in modem that allows you to connect an FJ 11 telephone line through this connector With the 56K V 90 modem you can make a dial up connection RJ 45 Connector The...

Страница 27: ...b VGA port allows you to connect an external monitor or other standard VGA compatible device such as a projector for a great view of the computer display Power Connector To connect the AC adapter and...

Страница 28: ...VD disc for installing software accessing data and playing music movie on the computer USB Port This USB Port is in a reverse position PC Card Slot The computer provides a PC card slot to support one...

Страница 29: ...computer to location for security See Caring Your Notebook PC in Chapter 7 for more information Battery Pack Rear View To supply power to your computer when the AC adapter is not connected See Introd...

Страница 30: ...Battery can not be moved when the button is positioned on lock status Once the button is pushed to unlock position the battery is removable Ventilator The ventilator is designed to cool the system DO...

Страница 31: ...e back device as a preparation for releasing the battery pack Press it with one hand and pull the battery pack carefully with the other Ventilator The ventilator is designed to cool the system DO NOT...

Страница 32: ...er is connected the battery is charged immediately Please NOTE that the AC adapter included in the package is correct for your Notebook PC using other adapter model may damage the computer or other de...

Страница 33: ...d always hold the connector part of the cord Never pull the cord directly We Reminds You Disconnecting the AC Power When you disconnect the AC adapter you should 1 Unplug the power cord from the elect...

Страница 34: ...ter 1 Make sure that the computer is connected to the AC power 2 Press the power button Once pressed the power button will light glittering White to indicate that the computer is turned on 3 When the...

Страница 35: ...problems are found during booting these routines alert the user by sounding a series of beeps or displaying a message on the screen Turning Off the Computer In Windows operating system always use the...

Страница 36: ...urn off the computer Otherwise you may lose your data 2 Confirm that the Hard Disk In use LED is OFF before turning off the computer Also remember to remove any CD disk from the drive 3 Gently push do...

Страница 37: ...PC This chapter introduces the operating basics for your Notebook PC including the use of keyboard touchpad LCD panel hard disk drive and optical storage device It also includes the advanced features...

Страница 38: ...desk and chair and adjust their height to fit your posture when operating When sitting on the chair and adjust the chair s back if available to support your back comfortably Place you feet flat and na...

Страница 39: ...ry to you Please keep the following tips in mind when operating Change your posture frequently Stretch and exercise you body regularly Remember to take breaks after working for a period of time Adjust...

Страница 40: ...oard provides all the functions of a full sized 86 key keyboard and an additional Fn key for specific functions on the computer How to use keyboard can divide into four categories Typewriter keys Curs...

Страница 41: ...cate their status Num Lock Press and hold the Fn key and press this key to toggle the Num Lock on and off When this function is activated you can use the numeric keys that are embedded in the typewrit...

Страница 42: ...used to control the cursor movement Move the cursor left for one space Move the cursor right for one space Move the cursor up for one line Move the cursor down for one line Move to the previous page...

Страница 43: ...switch the typing mode between insert and overtype modes Press this key to delete one character to the right of the cursor and move the following text left for one space Press this key to delete one c...

Страница 44: ...menu For more information of the two keys please refer to your Windows manual or online help Fn Key Switch the display output mode between the LCD external monitor and Both Increase the LCD brightnes...

Страница 45: ...mail Internet To launch the web browser such as Internet Explorer to surf the Internet Wireless LAN To enable or disable the wireless LAN function of your computer Search Key To search application and...

Страница 46: ...computer by pointing the location of the cursor on the screen and making selection with its two buttons Cursor Movement Area This pressure sensitive area of the touchpad allows you to place your finge...

Страница 47: ...Click When you have moved and placed the cursor over an icon a menu item or a command that you want to execute simply tap slightly on the touchpad or press the left button to select This procedure cal...

Страница 48: ...ouchpad We Reminds You contact with the touchpad on the second tap Now you can drag the selected item to the desired location by moving your finger on the touchpad and then lift your finger from the t...

Страница 49: ...the functions of the two buttons In addition you can change the size shape moving speed and other advanced features of the cursor on the screen To configure the touchpad you can use the standard Micro...

Страница 50: ...Hard Disk Drive Your computer is equipped with a 2 5 inch IDE Integrated Drive Electronics hard disk drive The hard disk drive is a storage device with much higher speed and larger capacity than other...

Страница 51: ...the CD DVD ROM CD RW DVD Combo and DVD Dual drive The actual device installed in your computer depends on the model you purchased CD ROM Drive Allow you to read CD disks including audio CDs and CD R R...

Страница 52: ...ve 1 Confirm that the computer is turned on 2 Press the Eject Button on the drive s panel and the CD tray will slide out partially Then gently pull the tray out until fully extended 3 Place your CD in...

Страница 53: ...pen We Reminds You Removing the CD 1 Confirm that the computer is turned off 2 Press the Eject Button on the drive s panel and the CD tray will slide out partially Then gently pull the tray out until...

Страница 54: ...lease it manually 1 Confirm that the computer is turned off 2 Insert a pointed object e g a straightened clip into the Emergency Eject Hole and the CD tray will slide out partially Gently pull the tra...

Страница 55: ...screen Powerful Video Controller The powerful features of the SIS M661MX video controller include AGP3 5 and AGP 3 0 Compliant DX9 S W Compliant High Performance 256Bit 3D 128Bit 2D Graphic Engine SIS...

Страница 56: ...ideo subsystem 2 When using the external CRT monitor as the display out put device the resolution depends on the specification of the connected CRT monitor We Reminds You SIS M661MX Graphic Support Mo...

Страница 57: ...Quality 1 Click Start from the taskbar and select Control Panel to open the Control Panel window 2 In the Control Panel double click the Display item to open the Display Properties window 3 In the Scr...

Страница 58: ...he Display Properties window 3 Go to Settings Tab and Click the Advanced button to bring up the following window that contains more settings 4 In Driver Mode Setting field under the Utility Manager ta...

Страница 59: ...er audio quality when enjoying your music and movie on the computer The audio out jack allows you to connect the speakers and headphones the microphone jack allows you to connect the external micropho...

Страница 60: ...2 24...

Страница 61: ...ware Applications Your Notebook PC provides you with the useful software application as well as the required drivers for the system It also provides a Recovery CD that allows you to resume your operat...

Страница 62: ...request for your time zone and set your computer s clock In the Time Zone list click the time zone you are in For example select GMT 05 00 Eastern time US Canada if you live in Boston Mark the check b...

Страница 63: ...Next to continue 5 How will this computer connect to the Internet Choose one of the options to connect this computer to the Internet Click Next 6 Do you want to set up Internet access now You ve finis...

Страница 64: ...operating system from the Recovery CD The package should contain the following items To resume the operating system from the Recovery CD Insert the Recovery CD into the CD DVD ROM drive Press the Del...

Страница 65: ...resume the factory default settings after reboots After resuming the operating system you should reactivate the operating system as like the first time to use the computer See Activating Your System l...

Страница 66: ...o register your software before starting to use After registration you can get the full functionality of the software real time updates technical support and product updates To register your software...

Страница 67: ...address Starting Trend Micro Internet Security When you turn on the computer and login the system Trend Micro Internet Security is automatically launched and shows an icon on the taskbar Double click...

Страница 68: ...tions first Go to System Scan Settings Real time Scan and make sure Enable Real time Scan is checked Then you can configure more detailed settings of Virus Scan Identifying Real time Agent Icons The R...

Страница 69: ...when you buy it You may re install this program in the future by the software CD bundled with the package of your Notebook PC When you turn on your Notebook PC The System Control Manager will automati...

Страница 70: ...mouse and see a menu like below There are four items available under the battery mode and the first item is CPU Control function When you select CPU Control it shows you a submenu under CPU Control T...

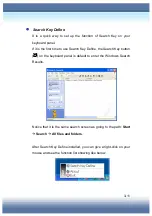
Страница 71: ...se Search Key Define the Search Key button on the keyboard panel is default to enter the Windows Search Results Notice that it is the same search screen as going to the path Start Search All files and...

Страница 72: ...Nero StartSmart and press the button the path where Nero StartSmart locates will be add in the right field Because there is only one path listed so far all you need to do is to click it and make it as...

Страница 73: ...w you may press on the Search Key button to test whether your setup for Search Key button is available If not please open and check your Search Key Define again and make sure you do the setting proces...

Страница 74: ...eference and know every function with its related keys and reminders Function Keys Fn Fx Display Status NA Toggle between internal and external displays without any status reminder Adjustable scroll b...

Страница 75: ...ng e mail quick launch button and starting Outlook Express or Microsoft Outlook Reminder between clicking Internet quick launch button and Webpage opening Toggle between enable and disable wireless co...

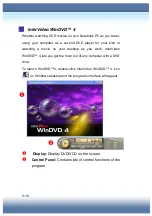
Страница 76: ...or watching a movie on your desktop as you work InterVideo WinDVD 4 lets you get the most out of any computer with a DVD drive To launch WinDVD 4 double click InterVideo WinDVD 4 icon on Windows deskt...

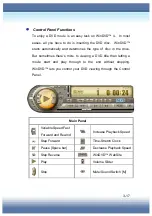
Страница 77: ...e But sometimes there s more to viewing a DVD title than letting a movie start and play through to the end without stopping WinDVD lets you control your DVD viewing through the Control Panel Main Pane...

Страница 78: ...ld the button and slide up and down to adjust the speed of playback Playback Controller Forward Pause Reverse Play and Stop Increase Playback Speed Every one press on the button makes fixed amount of...

Страница 79: ...nt of your disk playing Eject Button Press this button to eject disk You can eject CD directly by Eject button without stopping playing Fast Rewind Select Speed and Fast Forward This set of buttons ca...

Страница 80: ...nal codes are entirely optional for the maker of a disc Discs without codes will play on any player in any country Most DVD ROM drives let you change the region code a few times usually between 0 and...

Страница 81: ...D is bundled with CD DVD Recorder only Nero OEM Installation When you insert Nero OEM CD in your Notebook PC it shows Nero OEM Install software for creating your own CDs DVDs and back up your files Yo...

Страница 82: ...in MRW format on systems that do not support MRW This includes the UDF reader for Windows 95 98 and ME Nero Media Player Installs Nero Media Player an ideal way to listen and watch your music play Co...

Страница 83: ...of Nero ProductCenter You can see information about Installed Version and Latest Available Version and can link to Nero Website to see more information The check box of Automatically check for updates...

Страница 84: ...t MP3 WMA or AAC format Change Colors It is an interesting function to let you change the panel s color Configure Click on this button will bring you to the configuration screen You can set interface...

Страница 85: ...imilarly as Nero StartSmart however its operation is simpler and straighter to meet your needs There are four topics included in Help Button Help Topics to view on line help Enter New Serial Number Ah...

Страница 86: ...D covers When you open a new document it will show you the screen as below You can choose a template from its New document filed as your basic design From here you are going to make a unique CD cover...

Страница 87: ...4 1 4 Chapter 4 Power Management This chapter tells you how to manage the power effectively in order to maintain the longest battery life and increase the productivity when you are using the computer...

Страница 88: ...uded in your Notebook PC is a universal AC adapter that can operate on any voltage ranging from 100 240V AC This allows you to use your computer at any place when traveling The AC adapter is used as a...

Страница 89: ...kage is correct for your Notebook PC using other adapter model may damage the computer or other devices on the computer 2 When unplugging the power cord always hold the connector part of the cord Neve...

Страница 90: ...e the computer Charging the Battery The battery pack can be charged while it is installed in the Notebook PC Connect the AC adapter to the computer and it starts to charge the battery automatically Pl...

Страница 91: ...rging status through the Power Meter in Windows The Power Meter icon is displayed on the taskbar as or depending on the current power source Double click the icon to bring up the Power Meter window wh...

Страница 92: ...ng and caring the battery pack please refer to Taking Care of Your Computer in Chapter 7 We Reminds You If the Power Meter icon does not appear on the taskbar you can configure the setting through Sta...

Страница 93: ...rom your local dealer To remove the battery pack 1 Make sure the computer is turned off 2 Check the Lock Unlock button is in unlocked status 3 Locate the Battery Release Button on the bottom side 4 Pu...

Страница 94: ...lacing the Battery Pack 1 Insert the right side of battery pack into the compartment 2 Slightly slide and press the battery pack into the right place 3 After the right side of the battery pack fitting...

Страница 95: ...on and Power Interface which allows you to manage the computer power easily and efficiently With the ACPI function the power can be distributed to different components individually according to their...

Страница 96: ...tart from the taskbar and then select Control Panel to open the Control Panel window 2 Click Performance and Maintenance 3 In Performance and Maintenance window click the Power Options item to open th...

Страница 97: ...king the options in Low battery alarm and Critical battery alarm fields Once activated adjust the slide bar to set up the low or critical power level the default setting is 10 Click Alarm Action withi...

Страница 98: ...you continue operating 3 Do not use the card reader or other storage devices when the battery power is low The access time may be longer than time you can operate Otherwise you may lose your critical...

Страница 99: ...u activate this function the current and programs are saved to the hard disk drive Therefore you do not need to close the current applications when you are going to exit the operating system temporari...

Страница 100: ...Degrade Always On None None Minimal Power Management Adaptive Adaptive Max Battery Adaptive Degrade Adaptive Performance state chosen based on CPU demand Degrade Starts at lowest performance state th...

Страница 101: ...ing up the configuration of the computer To take full advantage of your computer and connected peripheral devices you should configure the system through BIOS Setup This chapter provides the informati...

Страница 102: ...essage appears on the screen during the system booting up and requests you to run SETUP You want to change the default settings for customized features You want to reload the default BIOS settings How...

Страница 103: ...title Press down arrow to select one item under the menu title Increase the setting value or make changes Decrease the setting value or make changes 1 Open the selected item to change setting options...

Страница 104: ...the basic configuration Main menu Show System Overview information about BIOS version CPU features Memory size and setting of System Time and Date Advanced menu Configure IDE and USB settings Boot Me...

Страница 105: ...llowing is CPU s information about its Type and Speed The variable settings in Main menu are Share Memory Size System Time and System Date Share Memory Size Some devices need to share with PC s memory...

Страница 106: ...You can set up screen wild through BIOS setting There are two options Enable and Disable Enable Screen Expansion can make any image automatically become 16 10 Disable Screen Expansion will input image...

Страница 107: ...PC or get into sleep mode The set format is hour minute second System Date This item allows you to set the system date The date format is day month date year Day Day of the week from Sun to Sat which...

Страница 108: ...U settings y Primary and Secondary IDE Master The two items display the types of the primary and secondary IDE devices installed in the computer Press Enter to bring up a window showing the detailed i...

Страница 109: ...5 9 y Legacy USB Support If you want to use USB device like mouse keyboard portable disk in DOS system or boot your system by USB device you should enable this function by select Enabled...

Страница 110: ...y This function enables USB power supply in modes S3 S4 S5 of power management You can charge your electrical devices with USB interface by enabling this function even when your Notebook PC is getting...

Страница 111: ...etting There are two options OFF ON BOOT and LAST STATE If OFF ON BOOT is selected the OS will boot without radio function turned on If the LAST STATE is selected OS will boot with the last status you...

Страница 112: ...he vendor logo on the boot up screen Settings options Disabled and Enabled The default setting is Enabled y 1 st 2 nd and 3 rd Boot Device Setting The three items allow you to set the sequence of boot...

Страница 113: ...ssage box will appear on the screen as below Type the password you want up to six characters in length and press Enter The password typed now will replace any previously set password from CMOS memory...

Страница 114: ...item Setting options No Access View Only Limited and Full Access The Password Check item is used to specify the type of BIOS password protection that is implemented Settings are described below Setup...

Страница 115: ...5 15 y Clear User Password If you have set the User Password select this item to disable the User Password...

Страница 116: ...ty without saving the changes you have made Discard Changes Abandon your changes and reload the previous configuration before running the utility Load Optimal Defaults Select this item to load the def...

Страница 117: ...6 Expanding and Upgrading You can expand the capabilities of your Notebook PC and upgrade you system for your necessary This chapter introduces the installation of optional devices components for you...

Страница 118: ...t ports on the rear panel of the computer allow you to connect peripheral devices For the information of these I O ports please refer to Quick Components Guide in Chapter 1 Connecting the Peripheral D...

Страница 119: ...y have mouse of PS2 connector please purchase a USB connector first To connect the mouse 1 Turn on the computer and install the mouse driver 2 Connect your mouse to the computer 3 The computer may aut...

Страница 120: ...Add Hardware to add the new device Connecting the Keyboard You can connect a mouse to your computer through the PS2 port or USB port If there is no PS port available on your computer but you only have...

Страница 121: ...quired driver For further instructions please refer to your printer s manual Connecting the External Monitor You can connect an external monitor to your computer through the VGA port for a larger view...

Страница 122: ...you to connect many high end peripheral devices and consumer electronic appliances such as the DV digital video camera The IEEE 1394 standard interface supports plug and play technology so that you ca...

Страница 123: ...of the computer allows you to connect the LAN local area network devices such as a hub switch and gateway to build a network connection This built in 10 100 Base T LAN module supports data transfer ra...

Страница 124: ...age of the modem feature We Reminds You Using the Modem The built in 56Kbps fax data modem allows you to use a telephone line to communicate with others or to dial up to connect the Internet The follo...

Страница 125: ...The following instruction provides you with a basic installation for the PC card including how to install and remove it For more information please refer to the manual of your PC card Installing the P...

Страница 126: ...interference or damage to the PC card 4 Before removing the PC card you should stop the device in Windows operating system We Reminds You Removing the PC card 1 Press the Eject Button to make it stre...

Страница 127: ...ick the icon to bring up the Safely Remove Hardware dialog box You can see all connected peripheral devices here If you want to remove any of the devices move the cursor to the device and click Stop T...

Страница 128: ...ook PC through the following ways 1 Adding memory to a maximum of 2GB 2 Replacing the hard disk drive 3 Replacing the CPU Please NOTE that system upgrade should be done by an authorized retailer or se...

Страница 129: ...ring Your Notebook PC To ensure a trouble free operation and reduce the risk when working you should take good care of your computer This chapter provides the basic guidelines to protect your computer...

Страница 130: ...computer in the public area you can secure your computer on the immovable object such as a desk by connecting a Kensington compatible lock 1 Loop the cable around the immovable object 2 Plug the lock...

Страница 131: ...use by setting up a boot password Once the boot password is set it will bring up a dialog box requesting for the password whenever the computer is turned on Operating System Password In addition to th...

Страница 132: ...le to scrambling the numbers in your spreadsheets to just taunting you with sounds pictures or obnoxious effects Trend Micro Internet Security To protect your computer from being attacked by the compu...

Страница 133: ...re of the units Bring the fully charged Notebook PC to meetings for long time use If the meeting time is longer than 4 hours you are recommended to prepare a second battery pack or an AC adapter Store...

Страница 134: ...C 95 F and humidity not higher than 80 Place the computer on a flat solid and steady surface of objects DO NOT block the ventilator when operating the computer DO NOT move the computer vigorously when...

Страница 135: ...ressor or the brush Using the Battery Pack Battery Safety Tips Replacing or handling the battery incorrectly may present a risk of fire or explosion which could cause serious injury Only replace the m...

Страница 136: ...it for a period of time Disable unneeded settings or remove idle peripherals to conserve power Connect an AC adapter to the system whenever possible Charging the Battery Pack The battery pack can be...

Страница 137: ...charging However to optimized the life of battery we suggest that once a month the power is consumed entirely If you do not use the Notebook PC for a long time it is suggested to remove the battery p...

Страница 138: ...7 10...
Отзывы: