


9
TAPCO SW•10 Features
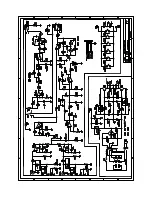
REAR PANEL DESCRIPTION
This is where you connect your signal inputs and
outputs to the subwoofer and make adjustments to
the crossover and input sensitivity.
1. INPUT SENSITIVITY
• The
SW•10 expects a line-level signal at its inputs.
• The left and right low-pass signals are summed
after the crossover section. Use this control to
adjust the sensitivity of the low-pass signal feeding
the internal power amplifi er.
2. CROSSOVER
• There are two crossover controls, one for the left
input signal and one for the right input signal.
• These adjust the crossover frequency for the built-
in 24 dB/octave Linkwitz-Riley variable crossovers.
• The crossover frequency can be adjusted from 55
Hz to 110 Hz.
3. POLARITY
• This switch reverses the polarity of the signal going
into the subwoofer amplifi er by 180°. It has no
effect on the signal at the Left and Right Outputs.
• There is no right or wrong setting for this switch.
Listen to the overall blend of the subwoofer with
the rest of the system, and select the switch
position that gives you the best sound.
4. LEFT AND RIGHT INPUTS
• Balanced XLR female and unbalanced RCA
female connectors are provided for the left and
right inputs. Connect the full-range line-level signal
from the mixer or preamplifi er to these input jacks.
The connectors are wired as follows (per the AES/
IEC standard):
XLR
RCA
Hot (+)
Pin 2
Tip
Cold (–)
Pin
3
—
Shield (GND)
Pin 1
Sleeve
• If connecting a single subwoofer output or LFE
output to the SW•10, you can use either the LEFT or
RIGHT INPUT connector.
•
CAUTION:
NEVER connect the output of an
amplifi er directly to the input of the SW•10. This
could damage the input circuitry of the active
subwoofer.
5. LEFT AND RIGHT OUTPUTS
• Balanced XLR male and unbalanced RCA female
connectors are provided for the line-level left
and right high-pass outputs. Connect these to the
inputs of the main speakers (if they are powered
speakers) or to the inputs of the amplifi er powering
the main speakers.
• The signal at the left and right outputs is post-
crossover. The low-pass output from the crossover
goes to the internal power amplifi er in the SW•10,
while the high-pass output goes to these output
jacks.
6. AC SELECT
Set this switch to the correct voltage setting for the
country you are in, 115 VAC or 230 VAC.
Note:
The SW•10s are shipped with the AC SELECT
switch set to the 230 VAC position. If you are in a
country that uses 100-120 VAC, set the switch to the
115 VAC position and replace the fuse (located in
the IEC socket) with the 1.6 A fuse included in the
accessory bag. See the “Troubleshooting” section on
page 11 for instructions on replacing the fuse.
115V
BROUGHT TO YOU BY THE GROOVY FOLKS
IN WOODINVILLE, WASHINGTON, USA
©2004 MACKIE DESIGNS, INC.
WARNING:
TO REDUCE THE RISK OF FIRE OR ELECTRIC SHOCK, DO NOT EXPOSE THIS
EQUIPMENT TO RAIN OR MOISTURE. DO NOT REMOVE COVER. NO USER SERVICEABLE PARTS INSIDE.
REFER SERVICING TO QUALIFIED PERSONNEL.
AVIS:
RISQUE DE CHOC ELECTRIQUE — NE PAS OUVRIR
RISK OF ELECTRIC SHOCK
DO NOT OPEN
INPUT
SENSITIVITY
POLARITY
OUTPUT
LEFT
RIGHT
AC SELECT
SW
•
10 ACTIVE STUDIO SUBWOOFER
ON
~100-120 VAC/220-240VAC
50-60 Hz 110W
L
R
UNBALANCED
180
O
0
O
MIN
MAX
INPUT
L
R
UNBALANCED
CROSSOVER
55
110
CROSSOVER
55
80
80
110
CAUTION:
REPLACE WITH THE SAME FUSE AND RATING.
DISCONNECT SUPPLY CORD BEFORE CHANGING FUSE.
~220-240VAC = T 800 m A L /250V FUSE
~100-120VAC = T 1.6 A L / 250V FUSE
SERIAL / DATE CODE
1
2
3
4
5
6
7
8
9
2
Содержание SW-10
Страница 1: ...active studio subwoofer...