background image

Eng

5

Eng

4

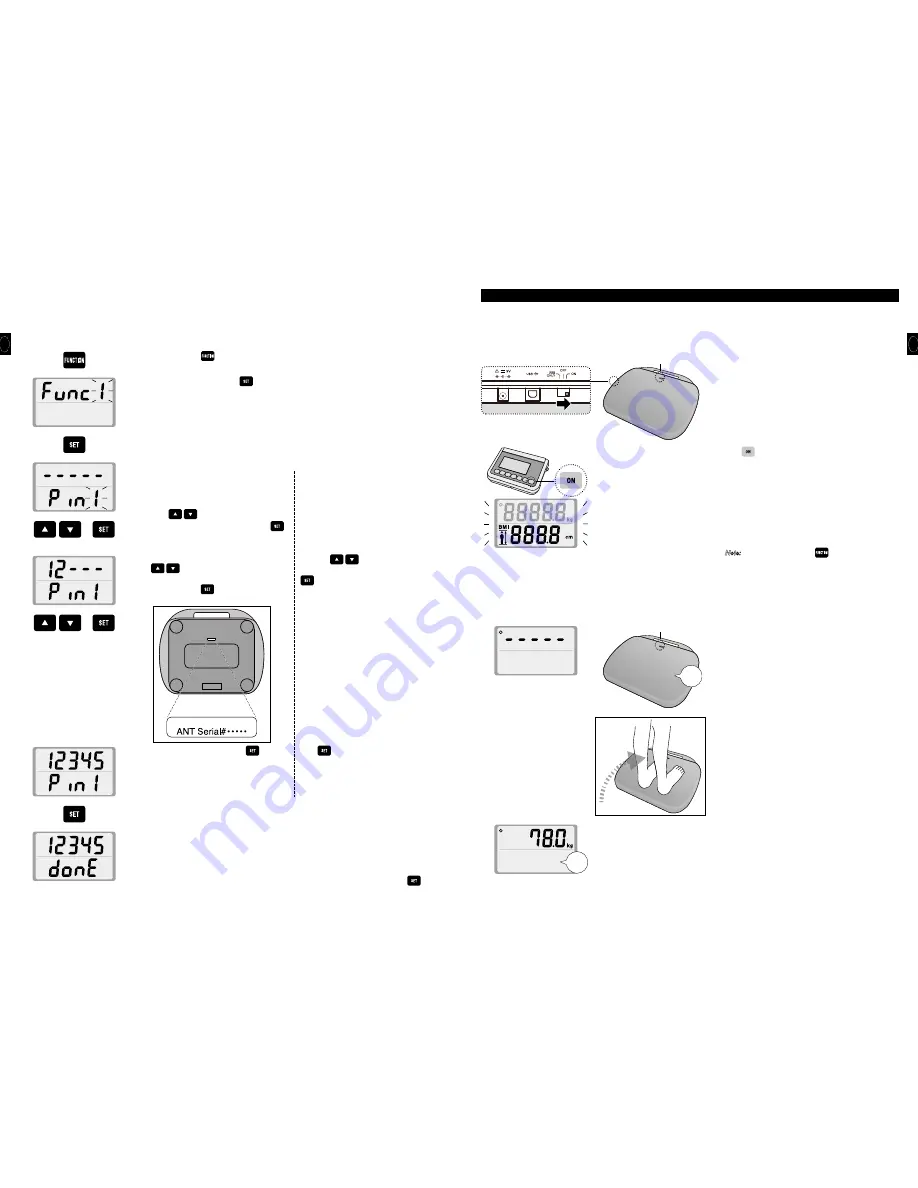
2. Setting the Serial Number

Before proceeding, make sure that the WB

8000RW and D

8000 are within 17 feet (5m) of each other.

The serial number must be set in order for the WB-8000RW and the D-8000 to communicate.
The same assigned serial number should be set for the WB-8000RW as for its corresponding D-8000.
This must be performed when using the device for the first time, or when using the D-8000 with a different WB-8000RW. If it is not performed,
measurement values will not be displayed on the D-8000.

1. Press the D-8000 

.

2. When “Func1” appears, press 

.

3

“Pin1” will be displayed.

[When configuring the WB-8000RW for the first
time]

You  can  register  up  to  4  WB-8000RWs  in
advance.
Press 

to select the Pin* number you

wish to register (Pin1 to Pin4), and press 

.

*Pin : Preset Input Number

[When  configuring  a  WB-8000RW  which  has
previously been registered]

When the Pin number of a WB-8000RW whose
serial  number  has  previously been  registered
is displayed, the top half of the LCD will show
the registered serial number.

4

When  the  top  half  of  the  LCD  blinks,  press

to enter the 5 digit number printed

on  the  bottom  of  the  WB-8000RW  (see  figure
below).  Press 

to  move  to  the  next 

number.

Press  the 

keys  to  select  the  desired

Pin number (5 digit serial number), and press

.

5. After entering every digit, press 

.

Press 

.

6

When “donE” appears, the configuration process is complete.
* To register a different serial number with a different Pin, repeat the process from step 1.
* The D-8000 cannot be connected simultaneously to multiple WB-8000RWs. To measure using a

different WB-8000RW, set the correct Pin and then perform the measurement.

* To register a different serial number for a Pin to which a serial number has already been

assigned, overwrite the existing serial number with the new serial number, and press

.

d

d

d

d

d

d

d

d

d

5. Operation

1. Standard Weighing Procedures <weight mode>

1) Place the WB-8000RW on a hard, flat surface where there is

minimal vibration to ensure safe and accurate measurement.

2) Set the WB-8000RW switch to the ON position.

The unit will go into standby mode, and the LED will blink
green every 4 seconds.

3) Press 

on the D-8000.

The unit will start using the Pin which has been previously
set, and will begin communicating with the corresponding
WB-8000RW.
After  the  unit  indicates  it  is  in  standby  mode,  when 
communication  between  the  two  devices  is  established,
“-----” will  be  displayed  on  the  top  half  of  the  LCD.  The
WB-8000RW  will  start,  and  it  will  beep  and  switch  to 
measurement mode (the LED will blink green in 1 second
intervals).

Note:

•Pressing  and  holding 

for  2  or  more  seconds

will  cause  the  currently  selected  Pin  to  be 
displayed.

•To  set  or  change  the  Pin,  see  Setting  the  Serial

Number page in the Setup section.

•When  the  D-8000  cannot  communicate  with  the

paired  WB-8000RW,  the  display  will  indicate 
“ErrC”, and the D-8000 power will turn off.

4) Step onto the WB-8000RW while the Green Indicator Light is

blinking on every second.

After the measurement is complete, the platform will beep
twice,  the  Green  Indicator  light  on  longer  blinks  (remains
solid),  and  weight  will  automatically  be  displayed  on 
D-8000.

d

d

d

d

Before proceeding, make sure that the WB

8000RW and D

8000 are within 17 feet (5m) of each other.

<LED: Blinking Green (4 Second Intervals)>

<LED: Blinking Green (1 Second Intervals)>

Pi

PiPi

Содержание WB-8000RW

Страница 1: ...d accurately calibrated product Please observe the following instructions If the equipment is moved to a place with a temperature difference of 10 C 18 F or more leave if for at least two 2 hours before use Avoid subjecting the equipment to excessive shocks or vibrations Never disassemble or adjust the equipment as this may cause malfunctions When not in use for an extended period of time unplug t...

Страница 2: ...ED will be blue OFF OFF Mode Power is off ON ON Mode Both wireless transmission and USB output output only can be used When this mode is selected the LED will be green DC Jack Port Please use the included AC adapter WB 8000RW AC adapter Instruction CD or Leaflet Warranty Registration Card Specifications Model WB 8000RW Strain Gauge Load Cell 505 x 415 x 51 mm 19 9 x 16 1 x 2 0 inch USB B type 60mA...

Страница 3: ...0RW set the correct Pin and then perform the measurement To register a different serial number for a Pin to which a serial number has already been assigned overwrite the existing serial number with the new serial number and press d d d d d d d d d 5 Operation 1 Standard Weighing Procedures weight mode 1 Place the WB 8000RW on a hard flat surface where there is minimal vibration to ensure safe and ...

Страница 4: ...e OFF position d d d Measurement Ended d LED Blinking Green 4 Second Intervals LED Blinking Green 1 Second Intervals Pi d 2 BMI mode Press to enter your height in cm Note When the weight display unit is set to pounds enter your height in inches 2 Once you have finished entering your height press 3 Step onto the WB 8000RW Note Enter your height within 30 seconds of the D 8000 displaying 4 After wei...

Страница 5: ...ot capable of receiving instructions from an external device When using the ON mode Note USB connector B Type 4 pin female is located on the side of the WB 8000RW Please provide your own cable as necessary as none are included USB cable A Type 4 pin male B Type 4 pin male You must install the necessary driver onto your PC available download from http www tanita com List of Valid Commands In the ch...

Страница 6: ...e0 State1 State2 State5 State6 State7 Stop Weighing Command Response Height value set before weighing is stop is retained Error Commands Weighing error E0 Weight limit exceeded E1 Start BMI measurement command sent without height being set E4 Set height value exceeds input parameters BMI under 6 0 E6 7 Troubleshooting If you are concerned that the scale may not be functioning correctly please chec...

Страница 7: ...es Pour la prévention des risques d incendie n utilisez qu une prise à câblage correct et n utilisez pas de rallonge multiprise ATTENTION Placez sans faute le pèse personne sur une surface plane et stable En cas d utilisation d un pèse personne instable parce que tous ses pieds ne reposent pas sur la surface il y a risque de blessure ou de mesure imprécise Ne sautez jamais sur le pèse personne en ...

Страница 8: ...e ON Mode ON La transmission sans fil et la sortie USB sortie seulement peuvent toutes les deux être utilisées La DEL sera verte lorsque ce mode est sélectionné Prise pour connecteur CC Utilisez l adaptateur CA inclus WB 8000RW Adaptateur secteur CA Manuel CD ou brochure Garantie Carte d enregistrement Spécifications Modèle WB 8000RW Capteur à jauge de contrainte 505 x 415 x 51 mm 19 9 x 16 1 x 2 ...

Страница 9: ... Pour enregistrer un numéro de série différent pour un numéro Pin auquel un numéro de série a déjà été assigné écrasez le numéro de série existant avec le nouveau numéro de série et appuyez sur d d d d d d d d d 5 Utilisation 1 Procédure standard de pesée mode de poids 1 Placez le WB 8000RW sur une surface dure et plane où les vibrations sont minimales pour assurer des mesures sûres et précises 2 ...

Страница 10: ...rt intervalles d 1 seconde Bip d 2 Pesée pour IMC indice de masse corporelle Appuyez sur pour entrer votre taille en cm Note Lorsque l unité d affichage du poids est configurée sur pounds entrez votre taille en pieds 2 Une fois que votre taille est entrée appuyez su 3 Montez sur le WB 8000RW Note Entrez votre taille dans les 30 secondes suivant l affichage de par le D 8000 4 Après la pesée le D 80...

Страница 11: ...est sur USB ONLY Ce mode est utilisé pour commander le WB 8000RW au moyen d un ordinateur Ce pèse personne ne peut recevoir d instructions provenant d un appareil externe lorsque le mode ON est utilisé Note Le connecteur USB Type B 4 broches femelle se trouve sur le côté du WB 8000RW Procurez vous un câble USB si nécessaire car celui ci n est pas fourni Câble USB Type A 4 broches mâle Type B 4 bro...

Страница 12: ... q Etat0 Etat1 Etat2 Etat5 Etat6 Etat7 Arrêt de la pesée Commande Réponse La valeur de la taille configurée avant l arrêt de la pesée est conservée Commandes d erreur WeiErreur de pesée E0 Limite de charge dépassée E1 Commande Démarrer mesure IMC envoyée sans configuration de la taille E4 Valeur de taille configurée dépasse paramètres d entrée IMC inférieur à 6 0 E6 7 Dépannage En cas de doute sur...

Страница 13: ...ía sufrir lesiones MANTENIMIENTO Este producto se ha fabricado y se ha calibrado con la máxima precisión Por favor cumpla las siguientes instrucciones Si traslada este aparato a un lugar con una diferencia de temperatura de 10 C 18 F o más espere al menos dos horas 2 h antes de usarlo de nuevo No someta el aparato a golpes o vibraciones excesivas Nunca desmonte ni ajuste el aparato pues podrían pr...

Страница 14: ...do elija esta opción la luz LED se verá de color azul OFF Opción OFF La corriente eléctrica está desconectada ON Opción ON Se puede usar tanto la transmisión inalámbrica como la salida USB salida solamente Cuando elija esta opción la luz LED se verá de color verde Conexión para clavija de CC Utilice el adaptador de CA suministrado WB 8000RW Adaptador de CA Instrucciones CD o folleto Garantía Tarje...

Страница 15: ...Para registrar un número de serie diferente en una memoria pin a la cual ya se ha asignado un número de serie sobreescriba el número de serie antiguo con el nuevo número de serie y pulse d d d d d d d d d 5 Modo de empleo 1 Modo usual de pesar el modo de peso 1 Para lograr mediciones de forma precisa y segura sitúe la báscula WB 8000RW sobre una superficie plana y dura donde las vibraciones sean m...

Страница 16: ...Destellos de color verde a intervalos de un segundo Pi d 2 Medición del Índice de Masa Corporal IMC Pulse para introducir su estatura en centímetros Nota Cuando en la báscula haya seleccionado libras introduzca su estatura en pulgadas 2 Una vez que haya finalizado la introducción de su estatura pulse 3 Súbase a la báscula WB 8000RW Nota Introduzca su estatura durante los 30 segundos en los que la ...

Страница 17: ...uptor de selección de opciones está en la posición USB ONLY Esta opción se utiliza para controlar la báscula WB 8000RW desde una computadora Esta sección explica cómo se envían datos desde la báscula a un aparato externo PC p ej usando una señal compatible con USB Nota El conector USB tipo B hembra con cuatro clavijas está situado en un lado de la WB 8000RW El cable no está incluido tendrá que pro...

Страница 18: ... cambia al Estado1 o al Estado2 Ninguna Acción Mensaje q Estado0 Estado1 Estado2 Estado5 Estado6 Estado7 Finaliza la medición del peso Comando Respuesta Se memoriza la estatura introducida antes de cancelar la medición del peso Comandos de error Error al pesar E0 Límite de peso excedido E1 El comando de medición del IMC se ha enviado sin introducir la estatura E4 La estatura excede los parámetros ...

Страница 19: ... 2012 TANITA Corporation All Rights Reserved E Feb 2012 TY WB80007601 0 ...

Отзывы: