background image

15

OPTIONAL ANTI-ROTATION FEATURE

Deck-Mount Models: EC-3100 & EC-3102 

(Figure 2H)

Note: The anti-rotation feature uses a pin to anchor the faucet in position and is intended for use ONLY 
on stainless steel sinks.

Use the mounting hole diagram or the faucet base gasket as a template by placing it in position 
over the faucet mounting hole. Mark the stainless steel mounting surface at the center of the 
small hole at the bottom of the base gasket. Drill a 5/32” (4 mm) diameter hole through the 
stainless steel mounting surface. Install the faucet aligning the pin with the small hole.  Assemble 
the washer and nut to secure the faucet in place.

Note: The pin can be removed with pliers if not needed.

CARACTERÍSTICA OPCIONAL PARA EVITAR LA ROTACIÓN

Modelos de montaje sobre cubierta: EC-3100 y EC-3102 

(Figura 2H)

Nota: La característica para evitar la rotación cuenta con un tornillo de ajuste para fi jar el grifo en posición y 
está diseñado para usarse ÚNICAMENTE en lavabos de acero inoxidable.

ES

EN

OPTIONALER VERDREHSCHUTZ

Modell Wandbefestigung: EC-3101 

(Abbildung 2G)

Hinweis: Der Verdrehschutz erfolgt über eine Stellschraube, um die Armatur in vertikaler Position zu verankern 
und ist AUSSCHLIESSLICH für die Verwendung mit Edelstahlspülen vorgesehen.

Nutzen Sie das Montagelochbild oder die Fußdichtung der Armatur als Vorlage, durch dessen 
Platzierung auf dem Armaturen-Montageloch. Markieren Sie die Edelstahlbefestigungsfl äche in der 
Mitte der kleinen Kerbe an der Unterseite der Fußdichtung. Bohren Sie ein Loch mit 7,14 mm (9/32”) 
Durchmesser in die Edelstahlbefestigungsfl äche. Verlängern Sie die 1/4-20 Stellschraube an der 
Rückseite des Armaturenkörpers durch Lösen der Schraube (gegen den Uhrzeigersinn) mit einem 1/8” 
Innensechskantschlüssel. Lösen Sie die Schraube weit genug, sodass sie über die Fußdichtung hinaus 
und in die 7,14 mm Bohrung hineinragt. Die Unterlegscheibe und Mutter anbringen, um die Armatur 
sicher zu befestigen.

可选配的防转特点

墙式型号:EC-3101 

(图2G)

注意:带防转特点的龙头用一个螺钉将龙头固定在垂直位置,只适用于不锈钢水槽。
使用安装孔图或者龙头底座衬垫作为模板,将其放在水龙头安装孔上方的位置。在不锈

钢安装面的底座衬垫上的小凹槽中央坐上标记。穿过不锈钢安装面,钻一个直径为9/32”

(7.14mm)的孔。用1/8”的六角套筒扳手(逆时针方向)拧开在龙头本体后方的1/4-20的

固定螺钉,将其拧松足够长,使其伸长穿过底座衬垫,进入钻好的9/32”的孔内。装好垫圈

和螺母,确保龙头固定在适当的位置。

DE

CN

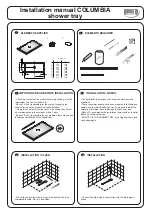
EC-3100 & EC-3102 MOUNTING HOLE DIAGRAM

DIAGRAMA DEL ORIFICIO DE MONTAJE EC-3100 Y EC-3102
DIAGRAMME DU TROU DE FIXATION EC-3100 & EC-3102
MONTAGELOCHBILD für EC-3100 und EC-3102
EC-3100 & EC-3102 

安装孔径

Ø1” THRU

Ø5/32” For Anti-Rotation

Ø5/32” Para evitar la rotación
Ø5/32 po. Pour l’anti-rotation
Ø5/32” Für Verdrehschutz
Ø5/32” (3.97mm) 

定位销

2H

Ø1” THRU

PASO DE 1” DE DIÁMETRO
Ø1 po. EN TRAVERS
Ø1” DURCH
Ø1” 

(25mm)

7/8”

(22.2mm)

Содержание ChekPoint EC-3100

Страница 1: ...ntract which might arise is hereby excluded and disclaimed Any implied warranties of merchantability or fitness for a particular purpose are limited to three years in duration Under no circumstances shall T S be liable for loss of use or any special consequential costs expenses or damages Some states do not allow limitations on how long and implied warranty lasts or the exclusion or limitation of ...

Страница 2: ...2 Exploded View 3 2 1 4 5 10 8 6 9 7 EC 3100 ...

Страница 3: ...3 1 2 3 4 6 7 9 8 5 10 Exploded View EC 3101 ...

Страница 4: ...4 1 3 5 6 7 2 8 4 Exploded View EC 3102 ...

Страница 5: ...5 1 3 4 5 6 7 2 8 Exploded View EC 3103 ...

Страница 6: ...6 Exploded View EC 3104 3 2 1 4 5 6 7 8 ...

Страница 7: ...7 Exploded View EC 3105 ...

Страница 8: ...8 Exploded View 6 5 4 3 2 1 EC 3106 ...

Страница 9: ...4 UN Female x 1 2 NPSM 5EF 0005 10 Vandal Resistant Key 015425 45 EC 3102 EC 3103 EC 3104 Electronic Faucets 1 Aerator Vandal Resistant 2 2 GPM B 0199 08 2 Angled Sensor w Cable 017195 45 3 Inlet Hose Faucet 1 2 NPSM F x 1 4 NPSM F 016297 45 4 Electronic Module 016647 45 5 A C Transformer 5EF 0002 6 Manual Mixing Valve 5EF 0006 7 Supply Hose 9 16 24 UN Female x 1 2 NPSM 5EF 0005 8 Vandal Resistant...

Страница 10: ...CTRIQUE DOIT ÊTRE INSTALLÉ CONFORMÉMENT AUX CODES ET RÉGLEMENTATIONS NATIONAUX LOCAUX TOUTE LA PLOMBERIE DOIT ÊTRE INSTALLÉE CONFORMÉMENT AUX CODES ET RÉGLEMENTATIONS APPLICABLES PRENEZ LES PRÉCAUTIONS APPROPRIÉES LORS DE LA CONNEXION DUTRANSFORMATEUR À UNE SOURCE D ALIMENTATION EN 120VCA NE BRANCHEZ PAS LETRANSFORMATEUR DANS LA SOURCE D ALIMENTATION LA PRISE DE COURANT TANT QUE LE CÂBLAGE N EST P...

Страница 11: ...00mm adjustable wrench Slotted screwdriver 3 16 1 8 hex key wrench Phillips head screwdriver 1 Basin wrench Pliers Herramientas requeridas para la instalación de los grifos Llave ajustable de 8 200 mm Destornillador ranurado 3 16 Llave de cuña hexagonal de 1 8 Destornillador de cabeza Phillips n 1 Llave para lavabo Pinzas Outils nécessaires pour l installation des robinets Clé à ouverture variable...

Страница 12: ...geur Lors de l installation du robinet avec la vanne mélangeuse les instructions de la page 15 doivent être respectées Installation des robinets de la série ChekPoint Le robinet actionné par capteur de la série ChekPoint de T S est un robinet pré tempéré Un mitigeur fourni doit être utilisé avec le robinet La température de l eau peut être contrôlée en réglant le mitigeur Avant l installation Avan...

Страница 13: ...usammenbau der Armatur Abbildungen 2A 2B 2C 2D 2E 2F Das Armaturenkabel und den Auslaufschaft durch die Fußdichtung und anschließend durch das Befestigungsloch des Waschtisches oder Waschbeckens führen Mit dem enthaltenen Federring und der Mutter befestigen 混水阀 安装带有混水阀的龙头时 必须遵守第16页的安装说明 ChekPoint龙头的安装 天仕ChekPoint感应龙头是一种预调龙头 龙头必须与混水阀 提供 并用 混水阀可调节 水温 安装龙头组件 图2A 2B 2C 2D 2E 2F 将感应线与龙头进水口手柄一起穿过底座衬垫 然后...

Страница 14: ...ble Extienda el tornillo de sujeción 1 4 20 instalado en la parte posterior del cuerpo del grifo desatornillándolo hacia la izquierda con una llave de cuña hexagonal de 1 8 Destornille lo suficiente para que sobresalga del empaque de la base y dentro del orificio perforado de 7 14 mm 9 32 Ensamble con la tuerca y la arandela para fijar el grifo en su sitio FONCTIONNALITÉ ANTI ROTATION EN OPTION Mo...

Страница 15: ...elstahlspülenvorgesehen Nutzen Sie das Montagelochbild oder die Fußdichtung der Armatur alsVorlage durch dessen Platzierung auf dem Armaturen Montageloch Markieren Sie die Edelstahlbefestigungsfläche in der Mitte der kleinen Kerbe an der Unterseite der Fußdichtung Bohren Sie ein Loch mit 7 14 mm 9 32 Durchmesser in die Edelstahlbefestigungsfläche Verlängern Sie die 1 4 20 Stellschraube an der Rück...

Страница 16: ...turinPositionzuverankernundistAUS SCHLIESSLICHfürdieVerwendungmitEdelstahlspülenvorgesehen Nutzen Sie das Montagelochbild oder die Fußdichtung der Armatur alsVorlage durch dessen Platzierung auf dem Armaturen Montageloch Markieren Sie die Edelstahlbefestigungsfläche in der Mitte des kleinen Lochs an der Unterseite der Fußdichtung Bohren Sie ein Loch mit 4 mm 5 32 Durchmesser in die Edelstahlbefest...

Страница 17: ...o comprarlas conT S Purgue cualquier residuo de las líneas de suministro Ajuste las juntas de compresión de forma segura en las líneas de suministro Fixez le module de commande sur le mur Installez le module de commande à un endroit approprié Une fois installé tous les câbles et tuyaux souples doivent avoir un peu de jeu Fixez le module de commande au mur au moyen des vis de fixation et de chevill...

Страница 18: ... Branchements du câble du capteur et de la conduite d arrivée d eau Figures 4 4A et 4B Acheminez le câble du capteur depuis le bec jusqu au sommet du module de commande Alignez les 2 flèches blanches une du côté mâle et l autre du côté femelle branchez ensemble les deux connecteurs Relâchez le manchon chromé par dessus la fiche du capteur et vissez pour serrer Figure 4A Fixez la conduite d arrivée...

Страница 19: ...e of Transformer is designed to be plugged into a 120 VAC wall receptacle The Transformer is supplied with a 6 foot Cable Remove the rubber plug from the transformer connector on the control module Plug the transformer cable into the transformer connector OPCIÓN CON TRANSFORMADOR Figura 5 Importante NO conecte el transformador a un tomacorrientes hasta haber instalado todo el cableado 5 Este tipo ...

Страница 20: ... l option d alimentation du l Hydro Generator EC HYDROGEN consultez le manuel d utilisation dans le kit EC HYDROGEN commandé séparément Pour le câblage et les options de raccorde ment d alimentation câblée EC HARDWIRE et facile EC EASYWIRE consultez le manuel d utilisation de chaque kit respectif commandé séparément BATTERIEBETRIEBENE OPTION Hinweis Falls Sie sich dazu entscheiden Ihre Sensorarmat...

Страница 21: ...in conjunction with the optional AC adapter the faucet will automatically switch to AC power and conserve its battery power Fresh alkaline batteries should last 450 000 on off cycles CONFIGURACIÓN DEL RANGO DEL SENSOR El rango del sensor se ajusta previamente en el grifo durante el ensamblado pero puede volverlo a ajustar siguiendo estos pasos 1 La distancia de detección se puede ajustar desde 2 c...

Страница 22: ... bouton marche arrêt l eau s écoule Après avoir maintenu le bouton pendant 5 à 7 secondes l eau cesse de couler et la DEL rouge de la lentille du capteur devient fixe 4 Relâchez le bouton marche arrêt La DEL rouge s éteint pour indiquer que le capteur est prêt pour le réglage pendant les 15 secondes qui suivent 5 Placez la main immobile à la distance voulue devant le capteur La DEL rouge clignote ...

Страница 23: ...rhalb des Erfassungsbereichs befinden und nach 15 Sekunden Zeit anpass bar abschalten 2 Die Abdeckung des elektronischen Auges ist sauber zu halten 3 Ein rotes Blinklicht im elektronischen Auge zeigt den Niedrigstand der Batterien an Ersatzbatterien AA Alkali 4 Ein dauerhaftes rotes Licht im elektronischen Auge und kein Wasserfluss zeigen an dass die Batterien erschöpft sind 5 Bei einer Verwendung...

Страница 24: ...ic en el botón rojo La ventana de la parte superior de la unidad cambiará de auto a OFF La unidad estará ahora en el modo manual y funcionará como un grifo manual suministrando agua según el ajuste de temperatura en la válvula mezcladora manual Para activar el flujo de agua gire la parte superior de la unidad 90 grados hacia la izquierda para apagarla gírela 90 grados hacia la derecha Para regresa...

Страница 25: ...the blue control module removed the by pass valve must be closed with a flat head screwdriver by accessing the shut off screw on the bottom side of the manifold Fig 6 The controller can then be removed for servicing and the faucet can continue to be used by changing it to the manual mode as described above Funcionamiento en derivación del módulo de sensor únicamente EC 3106 Si el grifo con sensor ...

Страница 26: ...micos limpiadores o abrasivos en el lente del sensor ya que esto lo dañará y afectará su funcionamiento ENTRETIEN ET NETTOYAGE DU CHROME ET DES FINITIONS SPÉCIALES N UTILISEZ aucun produit abrasif ou chimique même de l eau de Javel pour nettoyer les robinets car ces produits peuvent endommager le lustre et attaquer le chrome ou les finitions décoratives spéciales N UTILISEZ que de l eau et du savo...

Страница 27: ...Enable OFF Disable CARACTERÍSTICAS PERIODO DE EXPLORACIÓN DEL AJUSTE AUTOMÁTICO Los dos periodos de exploración de ajuste automático son de 0 4 y 0 7 segundos El periodo de exploración a los 0 4 segundos ocurre mientras el grifo se encuentra en espera El periodo de exploración cambiará a 0 7 segundos cuando el grifo detecte un objeto frente al sensor AJUSTES DEL CONTROL DEL FLUJO DE AGUA Los contr...

Страница 28: ...érieur du module de commande ChekPoint dans un boîtier noir près du compartiment de piles Pour accéder aux commutateurs retirez les 4 vis et le capot arrière du module de commande RÉGLAGE DE L ARRÊT AUTOMATIQUE COMMUTATEURS 1 3 Le contrôleur du modèle ChekPoint permet de choisir entre six durées pour l arrêt de l écoulement de l eau lorsque l objet est laissé en face de l œil électronique Ces duré...

Страница 29: ...weis Die nachfolgende Tabelle zeigt die Schalterstellungen die für jeden Auto Timeout Modus erforderlich sind AUTO FLUSH Automatisches Spülen SCHALTER 4 Der ChekPoint Regler bietet die Möglichkeit den Auto Flush Modus in Schalterstellung 4 zu wählen Wenn dieser aktiviert ist wird der Regler die ChekPoint Armatur alle 12 Stunden für 25 30 Sekunden spülen wenn die Armatur nicht verwendet wird Stelle...

Страница 30: ...ot detected object motion within 30 minutes the controller will enter its lowest scan period of 1 4 seconds When object motion is detected the controller will change the scan period from 0 4 seconds to 0 7 seconds and change back to 0 4 seconds when the object removed ANTI INTEFERENCE SYSTEM Sunlight or other types of lighting may interfere with the distance sensing range In this case the controll...

Страница 31: ...ance de détection en la ramenant à une plage de sécurité temporaire Le contrôleur ajuste la distance conformément à la plage normale lorsqu aucune interférence n est détectée ERKENNUNG SCHWACHER BATTERIELEISTUNG Ein rotes Blinklicht im elektronischen Auge zeigt den Niedrigstand der Batterien an Ein dauerhaftes rotes Licht im elektronischen Auge und kein Wasserfluss zeigen an dass die Batterien ers...

Страница 32: ... con un paño suave P Por qué no se corta el suministro de agua después de retirar las manos y colocarlas lejos del ojo electrónico R El rango del sensor podría ser muy largo El usuario tendrá que ajustar el rango del sensor P No fluye el agua del grifo y el LED rojo permanece encendido Cuál es el problema R Reemplace las baterías Q R Q Puis je utiliser le robinet manuellement sans utiliser l œil é...

Страница 33: ... 拭 问 为什么我的手离开电子眼后水不会自动关闭 答 感应器距离可能过长 使用者可能需要调节感应距离 问 没有水从龙头流出 红色LED保持亮起 是什么问题 答 更换电池 PROBLEM No Water When Activated Red LED in electronic eye POSSIBLE CAUSE SOLUTION If red LED stays on or is flashing 1 Replace batteries and or make sure trans former is plugged in 2 If appropriate action from no 1 does not correct problem Sensor range too long picking up sink Reduce range Sensor is faulty replace...

Страница 34: ... muy reflejantes luz solar etc 1 Residuos en la válvula de solenoide no cierra apropiadamente 2 El módulo de control está averiado cam bie el módulo de control Flujo escaso o lento Activación en falso La unidad se enciende por sí sola Continúa fluyendo Incluso después de haber desconectado la alimentación hacia el grifo GUÍA DE SOLUCIÓN DE PROBLEMAS PROBLÈME Pas de débit d eau lorsque le robinet e...

Страница 35: ...icher dass derTransformator eingesteckt ist 2 Falls die erforderliche Maßnahme Nr 1 das Problem nicht behebt Sensorbereich zu lang Waschbecken wird wahrgenommen Bereich reduzieren Sensor ist fehlerhaft Sensormodul ersetzen 1 Absperrung en überprüfen öffnen wenn geschlossen 2 Rückstände im Magnetfilter entfernen säubern und wieder einbauen 3 Rückstände im Strahlregler oder Sprühkopf entfernen säube...

Страница 36: ...否插入电源 2 如果第1种方法没有解决问题 感应距离过长 抬起水槽 减小距离 传感器损坏 更换感应模块 1 检查供水开关 如果开关处于关闭状 态 请打开开关 2 过滤器中有杂质 除去杂质 清洗并重 新安装 3 在起泡器或者喷头中有杂质 除去杂 质 清洗并重新安装 1 感应距离过长 减小感应器侦测范围 检查可能会影响到感应范围的龙头周围事 物 比如 明亮的灯光 高反射面 阳光 等 1 电磁阀中有杂质 无法准确关闭 2 控制模块损坏 更换控制模块 水流非常小或者缓慢滴水 误触发 龙头自己打开 持续流水 即使已经切断连接到龙头的电源 故障检修指南 CN ...

Страница 37: ...Travelers Rest SC 29690 De Veenhoeve Phone 864 834 4102 Oude Nieuwveenseweg 84 Fax 864 834 3518 2441 CW Nieuwveen E mail tsbrass tsbrass com The Netherlands EC 3130 ChekPoint Above Deck Electronic Faucet Swivel Goosneck w 2 2 GPM Aerator EC 3132 ChekPoint Above Deck Electronic Faucet Cast Spout w 2 2 GPM Aerator RELATED T S BRASS PRODUCT LINE ...

Отзывы: