background image

What’s in this guide?

Getting started

Making calls

Using the phone book

In-call features

Advanced settings

Getting started

8

D14503.01 USER GUIDE TANDBERG QUICK SET C20—July 2009

Entering text in text fields

Some menu fields expect text information to be entered. Apart from the 
need to enter the number or identity of the person you want to call, you 
will also—among other things—need this ability to search and maintain 
your list of contacts in the phone book.

What happens when you press a number key?

Pressing a number key outside calls will cause the 

CALL

 menu to be 

shown.

When the cursor is positioned inside an entry field expecting text 
entries, the system automatically switches to text mode (

ABC

). Entering 

letters is similar to as on a cell phone—see right.

When the cursor is positioned inside an entry field requiring number 
entries, the system automatically switches to number mode (

123

allowing numbers to be dialed with the number keys as usual.

Using the number keys in text fields

Whenever text entries are expected by the system, a small 

abc

 or 

ABC


appears in the right lower corner of the entry field. For entry fields 
expecting numbers, 

123

 will appear instead. In text mode, entries from 

the number keys are automatically interpreted as text entries in the 
same way as on a cell phone.

Guidelines:

Press the key that corresponds to the required letter as many times 
as needed to produce that letter.

Switch between lower case (

abc

) and upper case (

ABC

) letters with 

the 

# a/A


key.

Switch between text mode (

abc

) and number mode (

123

) by keeping 

the 

# abc/123

 key depressed for more than a second.

To insert space, press the 

0 _ 

key.

To insert the

 @ 

sign, press the 

1-

key twice, while the keypad is in 

text mode.

To insert the 

.

 sign, press the 

.

-key once, while the keypad is in 

number mode.

To write digits and numbers in a text input field, repeatedly press the 
corresponding key until the digit appears.

To erase erroneous inputs, use the 

C

 key.

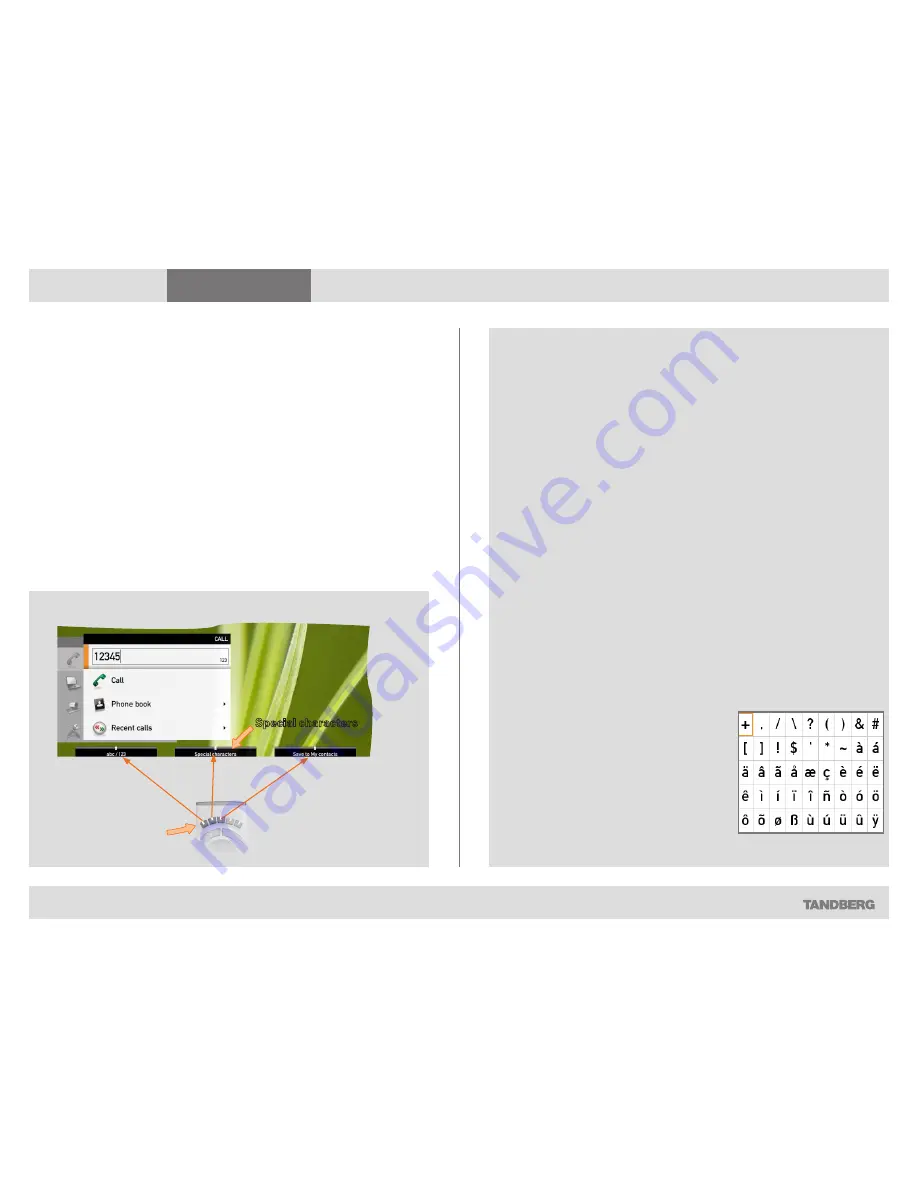
Special characters

Sometimes you will need to make use 
of special characters, e.g. when entering 
names in 

My contacts

Whenever it is likely that special characters 
are needed, the softbutton 

SPECIAL


CHARACTERS

 giving you access to the special 

characters menu will be displayed.

If needed, press 
this key repeatedly 
until the input field 
is set as required 
(123/abc/ABC).

Special characters

Содержание Codec C20

Страница 1: ...his guide Getting started Making calls Using the phone book In call features Advanced settings 1 D14503 01 USER GUIDE TANDBERG QUICK SET C20 July 2009 User guide TANDBERG QUICK SET C20 C20 Plus www ta...

Страница 2: ...ring tone 18 Setting ring tone volume 18 Setting key tone to on or off 19 Setting wallpaper on your screen 19 Inserting your own wallpaper 20 System information 20 Making calls 21 Making calls by dial...

Страница 3: ...n this guide Getting started Making calls Using the phone book In call features Advanced settings Getting started 3 D14503 01 USER GUIDE TANDBERG QUICK SET C20 July 2009 TANDBERG QUICK SET C20 GETTING...

Страница 4: ...he welcome screen which contains the main menu and it will display the main camera image in the background U The IP number and or the system name will be displayed in the upper left corner U The IP nu...

Страница 5: ...ROW keys to navigate in the menu and to move the camera pan tilt when the menu on screen is not displayed OK SELECT Press the key to confirm your choice or selection ARROW LEFT Press the ARROW key to...

Страница 6: ...cters in a text field END CALL STANDBY Press the key to end a call or when idle to go into standby mode Alphanumeric keypad Use the keypad in the same way as you would use a cell phone abc 123 Press t...

Страница 7: ...bers to the left of the cursor position Press the key to produce the HOME menu on the screen The element currently selected is indicated by an orange rectangle Use the vertical ARROW keys to navigate...

Страница 8: ...ppears in the right lower corner of the entry field For entry fields expecting numbers 123 will appear instead In text mode entries from the number keys are automatically interpreted as text entries i...

Страница 9: ...st softkey Layout control used during a call gives you the possibility to include selfview Adding wallpaper to your screen In the Settings submenu navigate down to Wallpaper Press again In the Home me...

Страница 10: ...control to display the Layout menu Select Selfview to be shown as required In this way you will see what other will see of you in a call 2 Press the key on the remote control to display the Home menu...

Страница 11: ...just camera position and zoom using the four ARROW keys and the ZOOM key 3 Press the key on the remote control to display the Home menu and select Camera control 4 This will cause softbuttons to appea...

Страница 12: ...y take up to 5 seconds U The detection of faces works better when people look towards the camera U The area from the eyebrows down to just below the lips should be uncovered U Beard is normally not a...

Страница 13: ...3 This will cause softbuttons to appear Press the FUNCTION key corresponding to Camera settings FUNCTION key number 2 from the left 4 Follow the procedures outlined to the right Adjusting the exposure...

Страница 14: ...OW key to leave the menu going one step back Further details are shown on the next page This feature is also available as a softbutton when you select Camera control Call settings an overview The Call...

Страница 15: ...lt call rate The Call settings menu lets you set the default call rate expressed as default number of kilobits per second You may want to consult your system administrator to discuss the best setting...

Страница 16: ...and press the key again Use the UP and DOWN arrow keys to select Press the key to exit the menu putting changes into effect or the LEFT ARROW key to leave the menu going one step back About the settin...

Страница 17: ...to Manual previous page Using the below Fig as example set everything as required using the ARROW keys and the key in the usual manner Setting date and time automatically You may have the date and ti...

Страница 18: ...DOWN arrow keys to move about the ring tones Each ring tone will be played as you position the cursor at it Press the key to exit the menu putting changes into effect or the LEFT ARROW key to leave th...

Страница 19: ...nd DOWN arrow keys to select Press the key to exit the menu putting changes into effect or the LEFT ARROW key to leave the menu going one step back Setting wallpaper on your screen The system lets you...

Страница 20: ...the Upload button Toggle once between None and Custom wallpaper to put the change into effect See the Appendices section of the Administrator Guide for your system for further details about the web i...

Страница 21: ...in this guide Getting started Making calls Using the phone book In call features Advanced settings Making calls 21 D14503 01 USER GUIDE TANDBERG QUICK SET C20 July 2009 TANDBERG QUICK SET C20 MAKING...

Страница 22: ...g Respond to an incoming call by pressing the key on the remote control to accept it or press the key to reject it Press the key to produce the CALL menu if needed Position the cursor at Call and pres...

Страница 23: ...your way navigate down to the folder required and press to produce the contents of that folder Use the ARROW keys to locate whom to call and press to place the call Alternatively you may search for an...

Страница 24: ...in access to the RECENT CALLS list just press the key on the remote control You may also copy entries in the recent calls list to your phone book see Using the phone book for details Select what type...

Страница 25: ...guide Getting started Making calls Using the phone book In call features Advanced settings Using the phone book 25 D14503 01 USER GUIDE TANDBERG QUICK SET C20 July 2009 TANDBERG QUICK SET C20 USING T...

Страница 26: ...separately You cannot edit the corporate list yourself but you may add entries to My Contacts These may be edited ad libitum Navigating in the phone book U Basic navigation in the phone book is done...

Страница 27: ...the 2 key once to get an A 2 Press the key once to switch between upper and lower case letters 3 Press the 5 key three times to get an l 4 Press the 4 key three times to get an I 5 Press the 2 key thr...

Страница 28: ...Alternatively navigate down to Cancel and press the key to exit the dialog box without saving the new entry Adding new contacts New contacts can be added to My contacts only Other entries must be ent...

Страница 29: ...o time when corporate phone book changes are made Editing entries in the phone book Open the phone book Since entries in My contacts are the only ones that may be subject to editing navigate to My con...

Страница 30: ...this guide Getting started Making calls Using the phone book In call features Advanced settings In call features 30 D14503 01 USER GUIDE TANDBERG QUICK SET C20 July 2009 TANDBERG QUICK SET C20 IN CALL...

Страница 31: ...ny of the microphones as this will reduce the audio quality at the far end 2 Locate the DVI cable and connect the PC to the video system 3 When pressing the PRESENTATION button on the remote control t...

Страница 32: ...his guide Getting started Making calls Using the phone book In call features Advanced settings Advanced settings 32 D14503 01 USER GUIDE TANDBERG QUICK SET C20 July 2009 TANDBERG QUICK SET C20 ADVANCE...

Страница 33: ...from the Home menu navigate down to Settings and press the key Then navigate to Advanced and press the key again to display the options available shown below Advanced configuration password The Advanc...

Страница 34: ...nced and press the key again to display the options available shown below 3 Expand the Programmable softbuttons and select whether the definitions shall apply when in idle or when in call You may defi...

Страница 35: ...uttons options as shown on page 34 Make sure you have decided whether your setting shall apply to idle or in call If you want it to apply to both situations you must do this twice one setting for each...

Страница 36: ...s In the following we will use SOFTBUTTON 1 as an example but the function may be assigned to any of the five softbuttons Do as follows 1 Navigate down to the softbuttons options as shown on page 34 M...

Страница 37: ...use SOFTBUTTON 1 as an example but the function may be assigned to any of the five softbuttons Do as follows 1 Navigate down to the softbuttons options as shown on page 34 Make sure you have decided...

Страница 38: ...at the bottom of the menu You do not have to clear a softbutton function in order to assign the softbutton to another function That may be done right away For more on how to get to the below menu see...

Страница 39: ...rder to take account of recent advances Information on intellectual property rights trademark disclaimers patent information copyright notice safety instructions and environmental issues can all be fo...

Отзывы: