background image

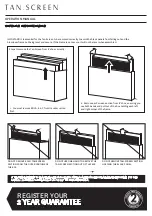
There are 3 x Screen sections that make up the final 


Tan.Screen.  This is labeled on each box (Outer Carton)


Each screen section is to be assembled in order A (Bottom Piece)-B (Mid-
dle) and then C(Top Piece).  
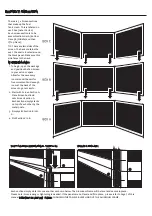
TIP: There are two sides of the screen. The back contains the seal. The seal 
is located around the black panel. Make sure this side faces to the back.  
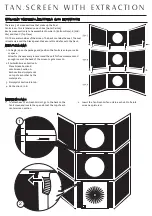
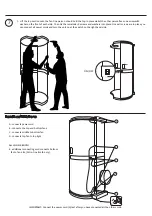
REFER TO DIAGRAM:

1. To begin, open the package and position the Tan.Screen in your salon 

or space. 


Allow for the necessary room around the unit for free movement and 
enough room at the back of the screen to get access to.  

2. Start with Screen Section A.  


 Place Screen Section B   


 onto Screen Section A. 


 Each section simply stacks 


 on top of each other by the 


 metal posts. 

3.   Simply slot Section B into A.  
4. Slot Section C in B.

ASSEMBLY: TAN FRESH AIR SCREEN WITH EXTRACTION

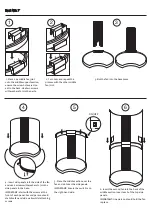
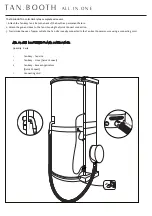
REFER TO DIAGRAM: 
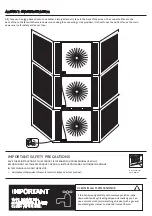
1.   To attach each Tan.Fresh Air Unit, go to the back on the 


Tan.Screen and locate the open slots at the top of each 


center screen section.  

2.   Insert the Tan.Fresh Air fan unit in each slot to fix into 


screen as pictured.  


2

1

T A N . S C R E E N   W I T H   E X T R A C T I O N

Содержание TAN.LITE 32000

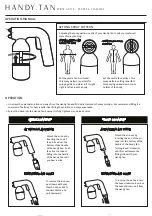
Страница 1: ...Y S C R E E N T A N E A S Y S C R E E N W I T H E X T R A C T I O N T A N B O O T H W I T H E X T R A C T I O N A L L I N O N E T A N B O O T H SPRAY GUNS 1 TAN EASY SPRAY GUNS MACHINES 2 HANDY TAN 3 TAN LITE 32000 4 TAN EXPERT TOWER 38000 EXTRACTION 5 TAN FRESH AIR PORTABLE UNIT 6 TAN FRESH AIR DOUBLE FAN UNIT SCREENS 7 TAN EASY SCREEN 8 TAN EASY SCREEN WITH EXTRACTION BOOTH 9 TAN BOOTH EXTRACTIO...
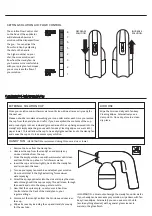
Страница 2: ...spray pattern is perfect for spraying side to side ie left to right right to left across the body H A N D Y T A N SPRAY GUNS EXCESS FL AWLESS OPERATION MANUAL ATTACHING AIR HOSE Attach the air hose by inserting the end of the air hose into the bottom of the handle of the handy tan Push the click to connect fitting into the handle of the handy tan until you hear a click REMOVING AIR HOSE To remove ...

Страница 3: ...ust your solution Flow Control dial to the highest setting for maximum water spraying 6 Direct the spray applicator into the sink and spray the clean water through until the cup is empty This will clean through the needle and out to the spray pattern nozzle 7 Now that the cup is empty re set your solution Flow Control dial on the back of the Handy Tan to your regular settings 8 Disconnect the Hand...

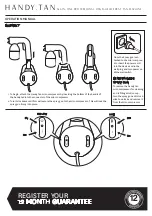
Страница 4: ...ini compressor 2 Turn it clockwise until firm will secure the spray gun to the mini compressor This will lock the spray gun firmly into place To remove the handy tan mini compressor for cleaning and refilling solution cup turn the spray gun anti clock wise to unlock and remove it from the mini compressor Once the Spray gun is at tached to the mini compres sor Insert the power cord into the device ...

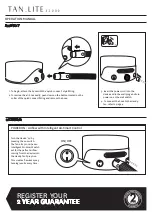
Страница 5: ...n by pressing the on switch The Tan Lite 32000 has an intelligent Air Smart Switch set for the perfect airflow coming from the device into the Handy Tan Spray Gun This creates flawless spray tanning results every time 3 Insert the power cord into the device and in the wall plug and turn power on at the wall switch 4 To connect the hose to the Handy Tan refer to page 4 REGISTER YOUR 2 YEAR GUARANTE...

Страница 6: ... switch on the top of the device The Tan Expert Tower 38000 has an intelligent Duel Air Smart Switch set for the perfect airflow coming from the device into the Handy Tan Spray Gun To Change the airflow speed press the Air Smart Switch control button I indicate a medium Airflow speed II indicates a high Airflow speed This creates flawless spray tanning results every time 3 Insert the power cord in...

Страница 7: ...ter 3 Please leave to dry completely Consideration The filter may require more frequent washing if product is located close to spraying Please Note We recommend your spray machine be placed a minimum of 50cm behind you This ensures minimum cleaning with your machine HVLP technology recirculates air from the environment With your machine by your side spray tan solution will be sucked back into the ...

Страница 8: ...brasive with a general household glass cleaner to maintain its clean finish WARNING ALWAYS UNPLUG THE DEVICE BEFORE CLEANING REPLACING THE FRESH AIR FILTER The Tan Fresh Air filter captures any fine mist and reduces mess to ensure the environment is comfortable for both clients the user 1 Switch off power supply to ensure the Tan Fresh Air Unit is not in operation 2 Peel back the filter from one c...

Страница 9: ...spose of the old filter 4 Using your hands carefully slide new filter into the lip created by the frame and evenly work the filter into position using your hands A E C B D DOUBLE FAN UNITS ARE USED IN THE TAN BOOTH A connects power cord B connects the top and bottom fans C connects middle to bottom fan D connects top fan to top light ALL IN ONE BOOTH E additional connecting cord connects bottom fa...

Страница 10: ... for the Tan Screen to be removed correctly to avoid the black panels from falling out and the Aluminum frame not being level and secure If the Frame is not secure it will not be level when assembled A B C DO NOT REMOVE EACH TAN SCREEN SECTION FROM THE OUTER CARTONS OF THE BOX DO NOT USE ONE HAND TO REMOVE THE TAN SCREEN SECTION OUT OF THIS BOX DO NOT REMOVE TAN SCREEN SECTION HOLDING THE BLACK PA...

Страница 11: ...nd the unit for free movement and enough room at the back of the screen to get access to 2 Start with Screen Section A Place Screen Section B onto Screen Section A Each section simply stacks on top of each other by the metal posts 3 Simply slot Section B into A 4 Slot Section C in B Each section simply slots into one another as shown below The Aluminum Frame will be level and secure in place Pleas...

Страница 12: ...llow for the necessary room around the unit for free movement and enough room at the back of the screen to get access to 2 Start with Screen Section A Place Screen Section B onto Screen Section A Each section simply stacks on top of each other by the metal posts 3 Simply slot Section B into A 4 Slot Section C in B ASSEMBLY TAN FRESH AIR SCREEN WITH EXTRACTION REFER TO DIAGRAM 1 To attach each Tan ...

Страница 13: ...ed onto one another Simply attach all 3 fans to the back of the screen The connect all fans to the back of the to the fan with the main power souce using the connecting cords provided It is best to use the bottom fan as the main power source for safety and ease of use IMPORTANT WIPE DOWN TAN SCREEN WITH A DAMP CLOTH AFTER USE CLEANING MAINTENANCE If the Tan Screen gets dirty with overspray solutio...

Страница 14: ...uminum Frame PROBLEM My Screen will not fit together correctly and I have metal posts sticking out at the top and bottom REASON Each section has not been stacked correctly Some Sections have been stacked with front facing or back facing ACTION Ensure you have stacked each section correctly Section A being on the bottom Section C being the top Ensure each section is facing all the same way Front Ba...

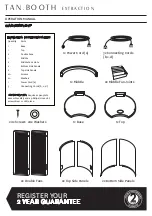
Страница 15: ...2 2 2 20 20 1 3 OPERATION MANUAL T A N B O O T H E X T R A C T I O N COMPONENTS LIST REGISTER YOUR 2 YEAR GUARANTEE 1x Power Cord a 1x Middle 1x Base 1x Top 2x Bottom Side Panels 2x Top Side Panels 2x Double Fans 20x Screws 20x Washers 2x Middle Fan Joints 3x Connecting Cords b c d IMPORTANT ON Requires 2 people to assemble safely and a phillips cross slot screwdriver or drill piece ...
Страница 16: ...start with the screws at the front of each panel Second person should stabilise fan and side walls whilst attaching screws 5 Place the middle section over the fan and slot over the side panels IMPORTANT Ensure the switch is on the right hand side 6 Insert the second fan into the back of the middle section Insert each of the top side panels IMPORTANT One person should hold the fan in place 2 Turn o...

Страница 17: ...h washer on the front of each side Then Fix the remainder 6 screws and washers into place Once all screws are in place you can connect all power cords and turn the unit on at the switch on the right hand side A connects power cord B connects the top and bottom fans C connects middle to bottom fan D connects top fan to top light ALL IN ONE BOOTH E additional connecting cord connects bottom fan to T...

Страница 18: ...N ONE BOOTH ADDITIONAL COMPONENTS The TAN BOOTH ALL IN ONE is the complete salon unit 1 Attach the Tan Easy Tan Lite to the back of the booth as permanent fixture 2 Attach the gun and hose to the Tan Lite using the Quick Connect connection 3 To minimise the use of power outlets the Tan Lite is easily connected to the Tan Booth power source using a connecting cord ...

Страница 19: ...ease ensure you have read all trouble shooting questions at www taneasyprotools com If there is a defect with the device it will be replaced free of charge with a comparable unit Guarantee shall not apply to any defect failure or damage caused by improper use or improper or inadequate maintenance and care The manufacturer shall not be obligated under this guarantee 1 To repair damage resulting fro...

Страница 20: ... authorized Tan Easy manufacturer 6 If device is not working as it should has been dropped damaged left outdoors or dropped into water do not use contact Tan Easy Pro Tools Customer Care via the website or regional telephone number 7 Do not pull or carry by cable use cable as a handle close a door on cable or pull cable around sharp edges or corners Keep cable away from heated surfaces 8 Do not un...

Отзывы: