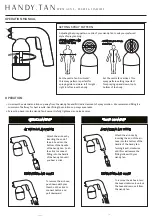
OPERATION MANUAL
REGISTER YOUR
12 MONTH GUARANTEE
H A N D Y . T A N
A L L- I N - O N E P R O F E S S I O N A L H A N D - H E L D S P R A Y T A N M A C H I N E
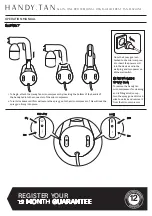
ASSEMBLY
REMOVING THE
SPRAY GUN
1. To begin, attach the Handy Tan mini-compressor by inserting the bottom of the handle of
the handy tan into the connector of the mini-compressor.
2. Turn it clockwise until firm will secure the spray gun to the mini-compressor. This will lock the
spray gun firmly into place.
To remove the handy tan
mini-compressor for cleaning
and refilling solution cup,
turn the spray gun anti-clock-
wise to unlock and remove it
from the mini-compressor.
Once the Spray gun is at-
tached to the mini compres-
sor, Insert the power cord
into the device and in the
wall plug and turn power on
at the wall switch.
OFF
ON
OFF
ON
AIRFLOW
HEAT


