background image


5   Talon 

T a l o n   -   N E T   D V R


4. Using Net Software


4.1. Talon Login Setup


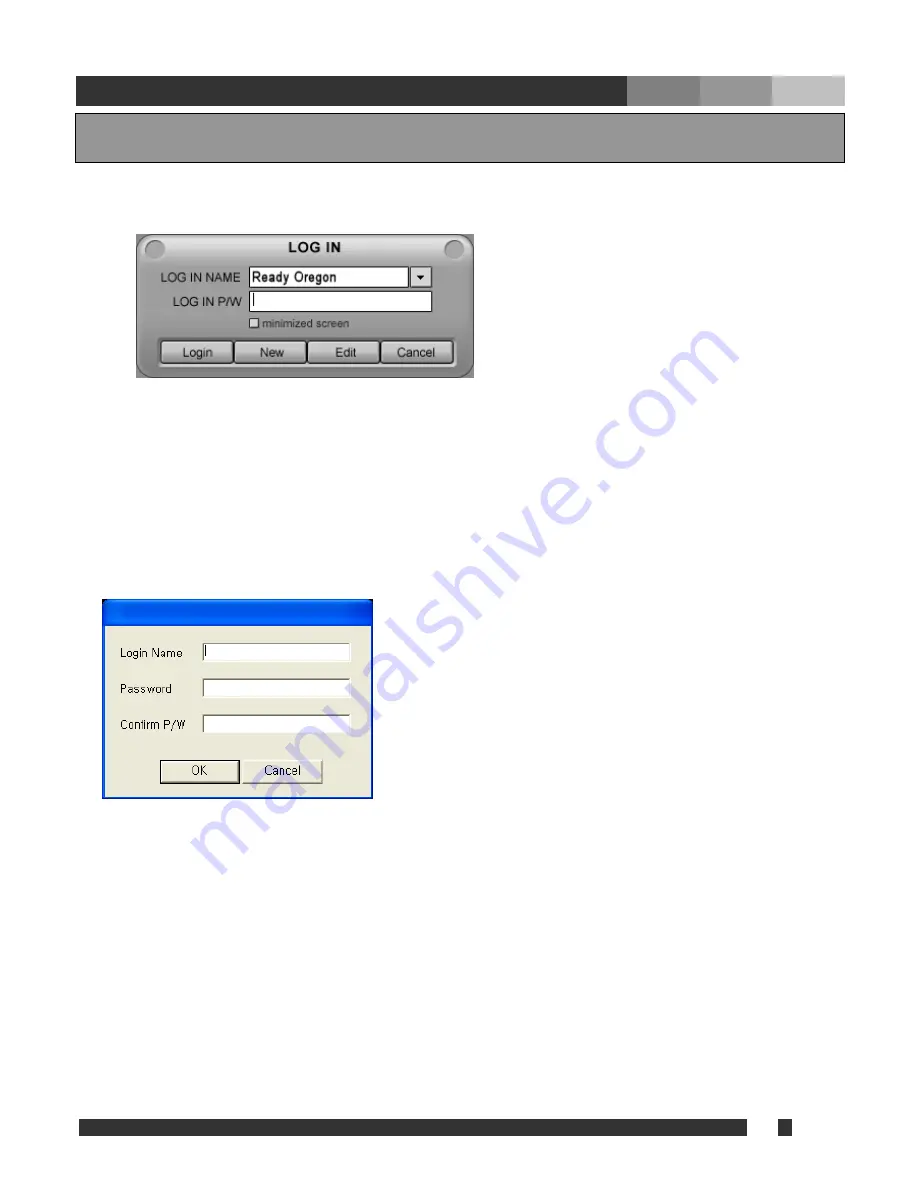
Run Talon Net. Then following dialogue box appears, which asks for ID of Talon Net. 


• 

Login:

 ID / password are for the authorized manager who controls the local network system. Note 

that login name and password here is for Talon Net program. It is different login and password 

than that of DVR–main. 

• 

New:

 Create a new user (management) who wants to have the new network system.     

• 

Edit:

 Change the existing information of registered user.   

• 

Cancel:

 Exit without change.   

• 

Minimized screen:

 Make the tray icon of this network program. Used for Remote Notify. 


For the first time, or to add a new user, click “New” and type the information of user as follows.     


• 

Login name: 

ID for a Talon Net program user.   

• 

Password:

   Password for Login. 

• 

Confirm P/W:

 Reconfirm the password 


Note: The user created here is for local manager, which is not related the user(s) registered at Talon 

DVR System. 


After you input the above information, click “OK”. Then, “Add, Delete and Edit site information” 

screen will be appeared. 

Содержание Digital Video Security System

Страница 1: ...Talon Net Integration Ver 11 06 x Installation and User s Guide Digital Video Security System Digital Video Recorder All contents of this document may change without prior notice ...

Страница 2: ...Configuration 9 4 1 4 IP Server Setup 9 4 1 5 Change Login Password 10 4 2 Accessing Talon Net 11 4 3 Remote Search 15 4 4 Remote Setup 18 4 5 Event Viewer 18 5 Appendix 19 5 1 Changing Position 19 5 2 Movie Clip Snapshot 19 5 3 Event Notification 20 5 4 Dial Up Connection 21 5 4 1 Installation of Dial Up Server 21 5 4 2 Installation of Dial Up Client 26 5 4 3 Using Dial Up Connection 29 ...

Страница 3: ...ust overlook many DVR systems To overcome these difficulties Talon Net has been introduced With Talon Net you can now enjoy all the functions of a Talon system anytime any remote location by connecting to the main server computer over modem LAN or Internet The functions include checking the system status searching the stored data and even changing the user settings and the recording schedule The a...

Страница 4: ...ation capabilities with the Talon DVR system PAN TILT ZOOM FOCUS remote control PTZ Controls can be attained by manipulating Talon Net program Manipulate Talon DVR Settings Ability to change settings of Talon DVR system from Talon Net such as enable disable of cameras change recording schedule and change setting of sensors Remote Notify function Automatically message alert sent from Talon DVR When...

Страница 5: ...d follow the procedure After installation following folder will be created in the Start menu Talon Net Talon Net program AVI Viewer Program to view video clips recorded at the local storage Event Viewer Program to view event log Uninstall Talon Net remove program ...

Страница 6: ... the new network system Edit Change the existing information of registered user Cancel Exit without change Minimized screen Make the tray icon of this network program Used for Remote Notify For the first time or to add a new user click New and type the information of user as follows Login name ID for a Talon Net program user Password Password for Login Confirm P W Reconfirm the password Note The u...

Страница 7: ... Close or Apply without Save will loose all changed information The same site name can not be registered twice Click New to add a new site information Site name Assign system s name or site name In the use of IP Server put the Code No The code for Server side can be set at system Use IP Server in the Talon DVR Setting Note This code is also necessary for Remote notify Method Select TCP IP when you...

Страница 8: ... main User s Guide It is recommended to use the default data stored in DVR program unless it is necessary to use others Click OK to finish a new site setting then the added site will be listed as following In order to edit the site information already stored double click on the site name to change the data Save must be clicked to take effect ...

Страница 9: ...ned as following Site name select a site to connect Camera number s Choose a camera number all or partial All Choose to display all available cameras sequentially from the selected site Partial Choose to display multiple cameras from the site Number of cameras must be assigned For example the position 8 will display camera 1 3 6 9 and 14 sequentially from site name Office Save must be clicked to t...

Страница 10: ...log file Save must be clicked to take effect 4 1 4 IP Server Setup Use IP Server Enables to use IP Server if checked Server IP address of the IP Server Code Assigns unique code name to be registered at the IP Server Code must be named less than 10 digits using case sensitive alpha numeric characters Interval Selects the time interval to notify current IP address to the IP Server Save must be click...

Страница 11: ...10 Talon Ta l o n N E T D V R 4 1 5 Change Login Password Old Password Enter current password New Password Enter new password Confirm Password Confirm new password Save must be clicked to take effect ...

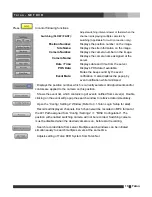
Страница 12: ...DVR Net L Event Information ate any of event To Transfer Status nly N m tray Click at right bottom corner will bring the full window ogin name User ID currently logged in with It is the place to indic notification from connected site s receive notification Remote notification of events must be checked on DVR main This is indicating the connecting speed as bench mark o Refresh the connection ...

Страница 13: ...ver settings of preset and tour must be made at Talon DVR System And No of available preset points are depending on the camera s feature Press to show image control Adjusts the image quality such as Brightness Contrast Saturation and Hue by pushing the arrow buttons Press to adjust resolution and compression rate Compression Rate can be adjusted between 10 90 to enhance the transmission speed for ...

Страница 14: ...le minimized contols are applied to t Displays the position number which is currently selected All adjustments and or he camera on this position Sh click search window to retreive data immediately ows the event list which contains log of events notified from server s Double ing on the event will popup the Open the Config Settings Window Refer to 4 1 Talon Login Setup for etail Records all displaye...

Страница 15: ...splays status of current screen ns r d Click this to exit from Talon Net ed on the PTZ camera connected Us d tilt the camera and scroll to zoom in and he screen to p D mode Pink color indicates positio currently on screen To control voice communications between Talon Net and Talon DVR System Fo this function Sound Recording of Settings in Talon DVR System must be checke The functions of four taps ...

Страница 16: ...ick the remote search button to start The window on the left will show up with list of registered sites Select the site to search and click OK to start search which to search through Days with stored recorded data will be highlighted red g Talon Net The calendar allows the user to choose the specific date in ...

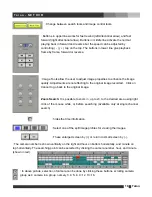
Страница 17: ...st controlling tap on the top quality Adjustments are not effecting to the origin Cancel to go back to the original image Zoom Search It is possible to zoom in up to x3 to the de click of the mouse while or before searching A search hides the time information Select one of the split image profiles for viewing the images These enlarged screen by or retu The camera number is shown vertically on the ...

Страница 18: ...king the icon w The ra Click Save As to save the current image jpg format Print the image currently on display es as a movie clip MP4 format Save imag Initia re shown below te Smart Search featu Note Please refer to the Talon DVR manual r detail information about this feature Motion Sensitivity may be different than n DVR server and the result might differ even if same condition Exit Search fo run...

Страница 19: ...nd User s Guide for Talon DVR System 4 5 Event Viewer Event Viewer allows user to review the even log of Net software It also contains all event record notified by Talon DVR System Please refer to the 5 3 System Allow remote connections on Installation and opens the following Event Viewer window an be reviewed and or searched by categories Double clicking on a recorded event under Motion and Senso...

Страница 20: ... image It will bring up a snapshot window with a captured image and the image can be saved a napshot window ging Position endix 5 App 5 1 Cha At the connection of Net s It is possible to relocate the camera position to the desired location by left click on the image that needs to be relocated drag it to the new position and release the mouse button Snapshot ie Clip check to create mp4 format movie...

Страница 21: ...otion of Camera Setup check Detective motion Notification Click on Properties and check Remote Notify to send notifications when an event occurs Check Use Notify Schedule to utilize the schedule to notify the Talon Net If selected notification schesule on the folloing page must be configured event occurs such as motion and required at the DVR Main Open Syst the Talon DVR System to configure settin...

Страница 22: ...ized d 5 4 Dial Up Connection In order to connect to the Talon DVR System through regular phone con ection both Talon DVR System and Net system need to be equipped with modem and Dial Up Server Client must be configured The following instruction is based on the Windows XP environment 5 4 1 Installation of Dial Up Server On Talon DVR System click Start Control panel Network Connections Click Create...

Страница 23: ...22 Talon T l o n N E T D V R a Click Next connection and Click Next onnection Select Set up an advanced Check Accept incoming c and Click Next ...

Страница 24: ... T D V R Select a proper modem from device list and click Next Select Do not allow virtual private connections and click Next Click Add o add a new user The user must be created to System t allow connection to the Talon DVR ...

Страница 25: ...ser information and click OK Client w ich will be discussed on the next chapter h Note The Allowed User means RAS User who can access the Dial Up server from Dial Up Client After a user created make sure to check the user created and click Next Select Internet Protocol TCP IP and click Properties ...

Страница 26: ...ll be assigned to the client Specify Finish e may be used for connection name Upon completion of Network Connection Wizard the new connection icon will be located in Network Connection Check Allow callers to access my local ar In TCP IP address assignment check Specify TCP I addresses and fill out from and to IP address as shown will be the virtual IP of the server Talon DVR System the connection ...

Страница 27: ...l o n N E T D V R 5 4 2 Installation of Dial Up Client On Talon Net system click Start Setup Co Click Next Selec xt ntrol pad Network Connection Click Create a new connection t Connect to the Internet and Click Ne ...

Страница 28: ...27 Talon Ta l o n N E T D V R Click Nex Select Connect using a dial up modem and Click Nex Set ISP Name as you want and Click Next Select Set up my connection manually and t t ...

Страница 29: ... o n N E T D V R Enter the phone number which is assigned to the Talon DVR System and Click Next VR System and Click Next Enter the user information which was created on the Talon D Click Finish to complete setting ...

Страница 30: ... to dial Then click on Dial to establish the connection If the connection fails check modem drivers on both Talon DVR and Net systems under Device Manager and check the Dial up server and client setting If connected run Talon Net and register a site with following information Method TCP IP Address the virtual IP registered at From in Dial up server Username Password user information registered at ...

Отзывы: