background image

Impostazioni

Questa sezione descrive come impostare la posizione di strappo, la prima riga di stampa, la
distanza della testina di stampa, il font e la densità dei caratteri.

Impostazione della
posizione di strappo

Se la posizione di strappo della carta non corrisponde al bordo di strappo della stampante, la
si può regolare. La carta deve essere a volte strappata e riportata nella posizione di parcheggio.

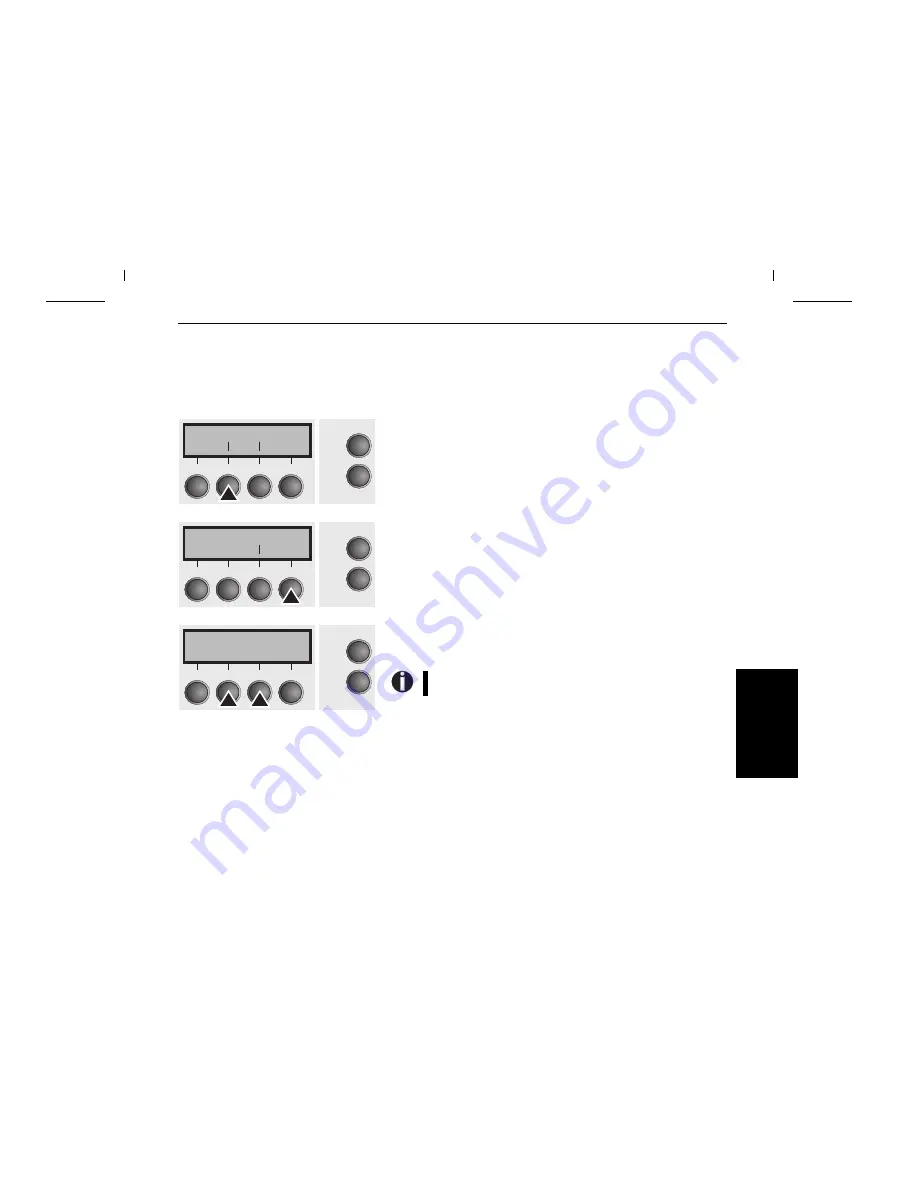
Premere il tasto Setup. La stampante passa al modo Setup. 
Premere il tasto Regolaz (2).

Premere il tasto Stp. (4).

Premendo il tasto  

< (2) o > (3), spostare la perforazione nella posizione

desiderata. Confermare il valore premendo il tasto OK (1).
Premere il tasto Setup. La stampante torna nella posizione di riferimento.

Regolaz Dir.Cart
Menu        Char

Online

Setup

2

1

3

4

TOF

Test.       Stp.

Online

Setup

2

1

3

4

Reg Stp= 00/72"*
OK   <   >  Esci

Online

Setup

2

1

3

4

La correzione settata resta in memoria anche in caso di spegnimen-
to della stampante.

IT

A

L

IA

N

O

Per cominciare subito

Impostazioni

19

Содержание T2150

Страница 1: ...Quick Start Guide Kurzanleitung Guide de d marrage rapide Guida di avvio rapida Gu a de instalaci n T2150 T2250 Matrix Printer...

Страница 2: ...ng devices in accordance with the specification in subpart J of part 15 of FCC rules which are designed to provide reasonable protection against such interference in a residential installation However...

Страница 3: ...voltage 7 Connecting the printer 8 Switching on the printer 8 Control panel 9 Online mode 9 Offline mode 9 Setup mode 10 Changing the ribbon cassette 11 Paper handling 13 Paper path quick selection 1...

Страница 4: ...hly before starting up your printer in order to prevent injuries and avoid damage to the device Keep this Operator s Manual in a place which is easily accessible at all times Place the printer on a so...

Страница 5: ...ndows 2000 Windows XP 2003 Server Windows Vista Windows 7 2008 Server Additional documentations Programming instructions and descriptions of the available options If your CD ROM should be defective or...

Страница 6: ...ottom cover Manual single sheet feeder closed Power inlet and fuse Interface connector Top cover Latches Tear edge Printhead Rear cover Ribbon cassette pu ll to op en Printer in fanfold paper mode Tra...

Страница 7: ...cardboard box towards you and remove the remaining packaging material Check the printer for any visible transport damage and com pleteness ApartfromthisOperator sManual the CD ROM at the back of this...

Страница 8: ...sily inflammable gas or explosive substances Do not expose the printer to direct sunlight If you cannot avoid placing the printer near a win dow protect it from the sunlight with a curtain When connec...

Страница 9: ...this may result in severe damage You can set the printer to the correct mains voltage yourself To do this cautiously place the printer on its back side Use a suitable object e g a screwdriver but neve...

Страница 10: ...n the printer and the computer Connect the power cable to the power inlet of the printer Connect the power cable plug to a mains socket Switching on the printer The power switch for switching on the p...

Страница 11: ...the printer to offline mode Offline mode Onlyinthismodeitispossibletoperformstep line orformfeedsfromthecontrolpanel see page 17 Paper transport however data cannot be received Paper transport Park k...

Страница 12: ...st printing line and print head gap Paperway key 3 Paper path Char key 4 Font and number of characters per inch Access to the other menu settings Menu may be disabled by the manufacturer For informati...

Страница 13: ...o the top cover of the printer and remove it Cautiously slide the print head carriage to the left stop viewed from the printer front Raise the printer bar cover and remove the used cassette 90 The pri...

Страница 14: ...il it clicks into place In this way the cartridge is automat ically positioned correctly Use the knob on the right side of the cassette to take up slack of the ribbon again Thereby the ribbon will sli...

Страница 15: ...ay Then press any key If a single sheet is loaded in the printer it is ejected Use one of the marked keys to select the desired paper path for example Single 2 The display alternates between the basic...

Страница 16: ...over taking it by the areas marked with arrows on the left and right Open the right and left tractor flaps You may also want to remove the bottom cover in order to facilitate loading the fanfold paper...

Страница 17: ...active paper source Tractor1 appears in the display The paper is automatically loaded when the printer is in online mode and receivesdatafromthecomputer Press the Load 4 key to load paper before star...

Страница 18: ...o the width of the paper used Insert the single sheet into the input tray as far as possible Press the Online key to set the printer to ready status The sheet is automatically loaded when the printer...

Страница 19: ...it is ejected Key 2 Short keypress Paper is transported upwards step by step Long keypress Continuous transport upwards Key 3 Short keypress Paper is transported downwards step by step Long keypress C...

Страница 20: ...tear edge see below The display alternates between and After having torn off the paper press the Exit 4 key The printer returns the paper to the first printing position If a print job is active the pr...

Страница 21: ...the park position Press the Setup key The printer changes to setup mode Press the Adjust 2 key Press the Tear 4 key Press the 2 or 3 key to move the perforation to the desired position Confirm the set...

Страница 22: ...ear edge The factory setting for the first printing position TOF is 12 72 Press the 2 or 3 key to move the first printing line to the desired position You can set values in the range from 0 to 220 72...

Страница 23: ...er Guide on the online CD ROM Press the Setup key The printer changes to setup mode Press the Adjust 2 key Press the Head 1 key Use the 2 or 3 key to set the range within which the automatic gap adjus...

Страница 24: ...ect the desired font Confirm the selection by pressing the Set 1 key You can cancel the selection and leave the setting unchanged by pressing the Exit 4 key Press the Setup key The printer is reset to...

Страница 25: ...at blank paper is inserted in the valid paper source default is Tractor 1 Keep the key 4 depressed for approx 5 seconds while turning on the printer After completion of the initialization the printer...

Страница 26: ...g rate 430 pages h 7 2 pages min ECMA Character density 5 6 7 5 8 6 10 12 15 17 1 20 cpi Resolution max Horizontally 360 dpi Vertically 360 dpi Emulations Standard MTPL Tally Printer Language Epson LQ...

Страница 27: ...weight No of copies Form thickness max 60 120 g m2 1 5 0 60 mm Single sheet input tray Continuous single forms Continuous set of forms requires individual testing Paper weight No of copies Form thick...

Страница 28: ......

Страница 29: ...lie en 8 Drucker einschalten 8 Bedienfeld 9 Online Modus 9 Offline Modus 9 Setup Modus 9 Farbbandkassette wechseln 10 Papierhandhabung 12 Papierweg Schnellumschaltung 12 Papier einlegen 13 Endlospapie...

Страница 30: ...genau durch bevor Sie den Drucker in Betrieb nehmen Dadurch sch tzen Sie sich und vermeiden Sch den an dem Ger t Bewahren Sie diese Bedienungsanleitung an einem jederzeit zug nglichen Ort auf Den Dru...

Страница 31: ...ruckers und seiner Leistungs merkmale Treiber Windows 2000 Windows XP 2003 Server Windows Vista Windows 7 2008 Server weitere Dokumentationen Programmieranleitungen und Beschreibung der Optionen F r d...

Страница 32: ...r Einzelblatteinzug geschlossen Netzanschlu und Sicherung Schnittstellenstecker Obere Abdeckung Rasthaken Abrei kante Druckkopf Hintere Abdeckung Farbbandkassette pu ll to op en Drucker im Endlospapie...

Страница 33: ...ausziehen und die restliche Verpackung entfernen berpr fen Sie den Drucker auf sichtbare Transportsch den und Vollst ndigkeit Neben dieser Bedienungsanleitung mu die CD ROM befindet sich auf der vorle...

Страница 34: ...explosiven Stoffen auf Den Drucker keiner direkten Sonneneinstrahlung aussetzen L t es sich nicht vermeiden da das Ger t an einem Fenster steht sch tzen Sie es mit einem Vorhang vor Sonnenlicht Achten...

Страница 35: ...den f hren kann Sie k nnen den Drucker selbst auf die richtige Spannung ein stellen Dazu zuerst den Drucker vorsichtig auf seine R ckseite stellen Anschlie end den auf der linken Seite der Druckerunt...

Страница 36: ...erbinden Sie das Netzkabel wie im Bild gezeigt mit der An schlu buchse des Druckers Stecken Sie den Stecker des Netz kabels in eine Steckdose Drucker einschalten Der Netzschalter mit dem der Drucker e...

Страница 37: ...lumschaltung Taste 2 Kurzer Tastendruck Mikroschritt nach vorn Langer Tastendruck dauerhafter Papiervorschub Taste 3 Kurzer Tastendruck Mikroschritt zur ck Langer Tastendruck dauerhafter Papierr cksch...

Страница 38: ...chobenklappen und herausnehmen Den Druckkopfschlitten vorsichtig bis zum Anschlag nach links von der Druckervorderseite aus betrachtet schieben Die Druckbalkenabdeckung anheben und die verbrauchte Kas...

Страница 39: ...t sich die Kassette automatisch in der richtigen Position Das Farbband mit Hilfe des Knopfes auf der rechten Kassetten seite noch einmal spannen Dadurch gleitet das Farbband ber die Plastiknasen links...

Страница 40: ...t Papier abrei en Dann eine beliebige Taste dr cken Be findet sich ein Einzelblatt im Drucker wird es ausgeworfen Mit einer der markierten Tasten den gew nschten Papierweg w hlen in unse rem Beispiel...

Страница 41: ...ellen fassen und nach oben klappen Die rechte und linke Traktorklappe ffnen Falls gew nscht kann die untere Abdeckung abgenommen werden um das Einlegen von Endlospapier zu erleichtern Der Traktor kann...

Страница 42: ...Der aktive Einzugsschacht Trak tor1 erscheint in der Anzeige Papier wird automatisch ein gezogen wenn der Drucker Online ist und Daten vom Compu ter erh lt Taste Load 4 dr cken um Papier vor Druckbeg...

Страница 43: ...chend des verwendeten Papierformats einstellen Das Einzelblatt bis zum Anschlag in die Papierf hrung einf h ren Die Taste Online dr cken um den Drucker betriebsbereit zu machen Das Einzelblatt wird au...

Страница 44: ...im Drucker wird es ausgeworfen Taste 2 Kurzer Tastendruck Papier wird schrittweise nach oben bewegt Langer Tastendruck Dauertransport nach oben Taste 3 Kurzer Tastendruck Papier wird schrittweise nach...

Страница 45: ...he unten Die Anzeige wechselt zwischen und NachAbrei endesPapiersTasteExit 4 dr cken Der Drucker f hrt das Papier zur ck in die erste Druckposition Liegt ein Druckauftrag vor f hrt der Drucker das Pap...

Страница 46: ...sition zur ckgefahren werden Taste Setup dr cken Der Drucker wechselt in den Setup Modus Taste Adjust 2 dr cken Taste Tear 4 dr cken Durch Dr cken der Taste 2 oder 3 die Perforation in die gew nschte...

Страница 47: ...Druckposition auf 12 72 eingestellt Durch Dr cken der Taste 2 oder 3 die erste Druckzeile in die ge w nschte Position bewegen Es k nnen Werte von 0 bis 220 72 f r Endlos papier und f r Einzelbl tter e...

Страница 48: ...andbuch auf der Online CD ROM Taste Setup dr cken Der Drucker wechselt in den Setup Modus Taste Adjust 2 dr cken Taste Kopf 1 dr cken Mit Taste 2 oder 3 den Bereich einstellen innerhalb dessen die aut...

Страница 49: ...riftart ausw hlen Die Auswahl durch Dr cken der Taste Setze 1 be st tigen Durch Dr cken der Taste Exit 4 kann die Auswahl ohne nderung verlassen werden Taste Setup dr cken Der Drucker geht in die Grun...

Страница 50: ...oren Stellen Sie sicher dass im aktuellen Papierweg Standardvoreinstellung ist Traktor 1 unbedrucktes Papier eingelegt ist Halten Sie beim Einschalten des Druckers Taste 4 f r ca 5 Sekunden gedr ckt N...

Страница 51: ...g 430 Seiten h 7 2 Seiten min ECMA Zeichendichten 5 6 7 5 8 6 10 12 15 17 1 20 cpi Aufl sung max Horizontal 360 dpi Vertikal 360 dpi Emulationen Standard MTPL Tally Printer Language Epson LQ2550 IBM X...

Страница 52: ...Minuten Betriebszustand Aus PAus 0 W Ger uschpegel Schalldruckpegel LPA 55 dB A Schalleistungspegel LAWd 70 dB A Aufgrund der Ger uschentwicklung w hrend des Druckbetriebs empfehlen wir im Bedarfsfal...

Страница 53: ...tzerhandbuch auf der Online CD ROM Der schnelle Einstieg Zubeh r 25 Bestellnummer Farbbandkassetten schmaler Drucker 3 5 Mio Zeichen 060 426 Farbbandkassetten breiter Drucker 5 Mio Zeichen 060 425 Zus...

Страница 54: ......

Страница 55: ...mante 8 Panneau de commande 9 Mode Online 9 Mode Offline 9 Mode Setup 10 Remplacement de la cartouche du ruban encreur 11 Manipulation du papier 13 S lection rapide du chemin de papier 13 Chargement d...

Страница 56: ...ctions suivantes avant de mettre l imprimante en service pour viter de vous blesser et d endommager l imprimante Veiller ce que le pr sent manuel soit toujours parfaitement accessible Placer l imprima...

Страница 57: ...et de ses capacit s Pilotes Windows 2000 Windows XP 2003 Server Windows Vista Windows 7 2008 Server Autres documentations instructions de programmation et description des options Si le CD ROM est d fe...

Страница 58: ...e manuelle ferm e Prise secteur et fusible Connecteur d interface Capot sup rieur Leviers de verrouillage Ar te de s paration T te d impression Capot arri re Cartouche du ruban encreur pu ll to op en...

Страница 59: ...creur Sortir l imprimante du carton d emballage vers vous et enlever le reste de l emballage V rifier si l imprimante est compl te et en parfait tat Outre le manuel d utilisation le CD ROM l avant der...

Страница 60: ...s de gaz ais ment inflammables ou de substances explosives Eviter d exposer l imprimante la lumi re directe du soleil Si vous devez placer l impri mante pr s d une fen tre la prot ger des rayons du so...

Страница 61: ...aves endommagements Vous pouvez r gler vous m mes l imprimante la tension correcte Pour cela poser d abord l imprimante sur la face arri re avec pr caution R gler ensuite le r gulateur coulisse dispos...

Страница 62: ...es Raccorder le c ble secteur la prise femelle de l imprimante comme sur la figure Raccorder le connecteur du c ble secteur une prise Mise sous tension de l imprimante L interrupteur secteur qui sert...

Страница 63: ...pas pas le changement de ligne ou de page ne peuvent tre effectu s via le panneau de commande que dans ce mode voir p 17 Transport du papier Il n est cependant pas possible de recevoir des donn es Tou...

Страница 64: ...d impression et cartement de la t te d impression Touche Chem Pap 3 fonction papier Touche Char 4 police et nombre de caract res par pouce L acc s aux autres r glages de menu Menu peut tre verrouill...

Страница 65: ...et d posez le Pousser avec pr caution le chariot de t te d impression vers la but e gauche vu de l avant de l imprimante Relever le capot de la barre d impression et d poser la cartouche usag e 90 La...

Страница 66: ...cartouche s enclenche De cette fa on la cartouche est enclench e automatiquement dans la bonne position Retender le ruban encreur en tournant la molette plac e droite de la cartouche Le ruban encreur...

Страница 67: ...tre choix Si une feuille simple est charg e dans l imprimante elle est alors ject e S lectionner la fonction papier d sir e en appuyant sur l une des touches indiqu es Insert 2 dans l exemple repr sen...

Страница 68: ...es fl ches gauche et droite et le rabattre vers le haut Ouvrir les volets de tracteur gauche et droite Vous pouvez galement d poser le capot inf rieur afin de fa ciliter le chargement du papier contin...

Страница 69: ...e bac de chargement actif Tract 1 s affiche Le papier est charg automatiquement si l imprimante est Online et re oit des donn es de l ordinateur Appuyer sur la touche Load 4 pour charger le papier ava...

Страница 70: ...ilis Ins rer la feuille simple dans le guide papier jusqu la but e Appuyer sur la touche Online pour que l imprimante soit pr te fonctionner La feuille simple est charg e automatiquement si l impriman...

Страница 71: ...ment sur la touche le papier est transport progressivement vers le haut appuyer longuement sur la touche transport continu vers le haut Touche 3 appuyer bri vement sur la touche le papier est transpor...

Страница 72: ...te de s paration voir ci dessous L affichage alterne entre et Appuyer sur la touche Quit 4 apr s avoir d chir le papier L imprimante ram ne le papier en position de d but d impression Si un travail d...

Страница 73: ...acer en position d attente Appuyer sur la touche Setup L imprimante passe en mode Setup Appuyer sur la touche Ajuster 2 Appuyer sur la touche Coupe 4 Appuyer sur la touche 2 ou 3 pour amener la perfor...

Страница 74: ...s paration La position du d but d impression est r gl e en usine sur 12 72 Appuyer sur la touche 2 ou 3 pour amener la premi re ligne d im pression dans la position d sir e Vous pouvez r gler des vale...

Страница 75: ...de d utilisateur sur le CD ROM Online Appuyer sur la touche Setup L imprimante passe en mode Setup Appuyer sur la touche Ajuster 2 Appuyer sur la touche T te 1 Appuyer sur la touche 2 ou 3 pour r gler...

Страница 76: ...police d sir e en appuyant sur la touche 2 ou 3 Valider la s lection en appuyant sur la touche Valid 1 Vous pouvez annuler la s lection et quitter le r glage inchang en appuyant sur la touche Quit 4...

Страница 77: ...nser dans la source de papier active r glage initial Tract 1 Tenez la touche 4 enfonc e pendant environ 5 secondes la fin de l initialisation l imprimante tire le papier en position impression et comm...

Страница 78: ...ance d impression 430 pages h 7 2 pages min ECMA Densit s des caract res 5 6 7 5 8 6 10 12 15 17 1 20 cpi R solution maximale Horizontale 360 dpi Verticale 360 dpi Emulations Standard MTPL Tally Print...

Страница 79: ...mulaires Seules les liasses de formulaires dont les bords d en t te sont coll s peuvent tre utilis es Les liasses multiples doivent tre charg es avec le collage en bas en premier Un essai pr alable es...

Страница 80: ......

Страница 81: ...stampante 8 Pannello comandi 9 Modo Online 9 Modo Offline 9 Modo Setup 10 Come cambiare la cartuccia nastro 11 Modalit di gestione della carta 13 Commutazione rapida del percorso carta 13 Caricamento...

Страница 82: ...ntamente le seguenti indicazioni In questo modo si possono evitare rischi per la propria incolumit personale e danni all appa recchio Conservare le presenti istruzioni per l uso in un luogo sempre acc...

Страница 83: ...stiche Driver Windows 2000 Windows XP 2003 Server Windows Vista Windows 7 2008 Server altra documentazione Istruzioni di programmazione e descrizione delle opzioni Se il CD ROM difettoso o non allegat...

Страница 84: ...o Presa di ali mentazione e fusibile Connettore di interfaccia Coperchio superiore Ganci Bordo di strappo Testina di stampa Coperchio posteriore Cartuccia nastro pu ll to op en Stampante configurata p...

Страница 85: ...eriali di imballaggio Verificare che la stampante non abbia riportato danni dovuti al trasporto e che la documentazione sia completa Oltre alle presenti istruzioni per l uso la dotazione comprende il...

Страница 86: ...di gas facilmente infiammabili o di sostanze esplosive Non esporre la stampante alla luce solare diretta Qualora fosse inevitabile installare la stampante in corrispondenza di una finestra proteggerl...

Страница 87: ...da soli la regolazione della corretta ten sione per la stampante E necessario innanzitutto posizionare con cautela la stampante sul lato posteriore Successivamente regolare sulla tensione necessaria i...

Страница 88: ...legare il cavo di rete come mostrato nella figura alla presa della stampante Inserire la spina del cavo di rete in una presa Accensione della stampante L interruttore di rete con il quale si pu accend...

Страница 89: ...sono eseguire le funzioni di avanzamento passo passo riga per riga o di un modulo per volta dal pannello comandi vedere pagina 17 Trasporto carta In questo modo operativo tuttavia non si possono ricev...

Страница 90: ...rima riga di stampa e distanza testina di stampa Tasto Dir Cart 3 Percorso carta Tasto Char 4 Font e numero di caratteri per pollice L accesso alle altre impostazioni di menu Menu pu essere bloccato d...

Страница 91: ...cie superiore della stampante e rimuoverlo Spostare la testina di stampa fino al fermo di sinistra visto dal lato anteriore della stampante Aprire il premicarta ed estrarre la cartuccia esaurita 90 Du...

Страница 92: ...tuccia verr a trovarsi automaticamente nella posizione corretta Tendere di nuovo il nastro con l ausilio dell apposita manopola posta sul lato destro della cartuccia In questo modo il nastro scivola a...

Страница 93: ...appato la carta premere un tasto a piacere Se nella stampante caricato un foglio singolo questo viene espulso Con uno dei tasti indicati selezionare il percorso carta desiderato nel nostro esempio Fog...

Страница 94: ...a destra con frecce e ribaltarla verso l alto Sganciare i coperchietti dei trascinamoduli destro e sinistro Se desiderato per facilitare il caricamento dei moduli continui si pu rimuovere il coperchi...

Страница 95: ...display compare il cassetto carta attivo Trattor1 trascinamoduli 1 La carta viene automati camente trascinata all interno della stampante se quest ultima nella condizione Online e riceve dati dal com...

Страница 96: ...erire il foglio nella guida carta fino in fondo Premere il tasto Online per portare la stampante nella condi zione pronta al funzionamento Il foglio viene automaticamente trascinato all interno della...

Страница 97: ...Tasto 2 Breve pressione del tasto avanzamento della carta passo passo Pressione del tasto prolungata avanzamento della carta in continuo Tasto 3 Breve pressione del tasto ritorno della carta passo pa...

Страница 98: ...rappo vedi sotto Il display passa dall indicazione all indicazione Dopo lo strappo della carta premere il tasto Esci 4 La stampante riporta la carta nella posizione di inizio stampa Se in coda c un la...

Страница 99: ...nedi parcheggio Premere il tasto Setup La stampante passa al modo Setup Premere il tasto Regolaz 2 Premere il tasto Stp 4 Premendo il tasto 2 o 3 spostare la perforazione nella posizione desiderata Co...

Страница 100: ...di inizio stampa impostata a 12 72 Premendo il tasto 2 o 3 portare la prima riga di stampa nella posizione desiderata Si possono impostare valori compresi tra 0 e 220 72 per i moduli continui e per i...

Страница 101: ...si rimanda al Manuale dell utente sul CD ROM online Premere il tasto Setup La stampante passa al modo Setup Premere il tasto Regolaz 2 Premere il tasto Test 1 Con il tasto 2 o 3 settare l intervallo d...

Страница 102: ...zionare il tipo di carattere desiderato Confermare la scelta premendo il tasto OK 1 Premendo il tasto Esci 4 si pu abbandonare la scelta oppure la modifica Premere il tasto Setup La stampante torna al...

Страница 103: ...carta in bianco inserita nella fonte di carta valida regolazione di difetto Trattor1 Tenere premuto il tasto 4 per ca 5 secondi Dopo che la compi lazione dell inizio lo stampatore tiri la carta nella...

Страница 104: ...0 cpi matrice 24 x 36 Produttivit 430 pagine ora 7 2 pagine min ECMA Densit caratteri 5 6 7 5 8 6 10 12 15 17 1 20 cpi Risoluzione max orizzontale 360 dpi verticale 360 dpi Emulazioni Standard MTPL Ta...

Страница 105: ...tilizzare esclusivamente moduli con bordo incollato in testa I moduli multicopia vanno inseriti dalla parte del bordo incollato E necessario in tal caso verificarne l idoneit Accessori Per cominciare...

Страница 106: ......

Страница 107: ...de la impresora 7 Conectar la impresora 8 Encender la impresora 8 Panel de mando 9 Modo Online 9 Modo Offline 9 Modo Setup 10 Cambiar el cartucho de cinta 11 Manejo del papel 13 Selecci n r pida del o...

Страница 108: ...e seguridad importantes Lea las siguientes instrucciones con esmero antes de poner la impresora en servicio Con esto se protege Ud a su mismo y evita da ar el equipo Guarde las presentes instrucciones...

Страница 109: ...tallada de la impresora y sus caracter sticas de rendimiento driver Windows 2000 Windows XP 2003 Server Windows Vista Windows 7 2008 Server m s documentaciones instrucciones para la programaci n y una...

Страница 110: ...ual cerrado Conexi n de corriente el ctrica y fusible Conexi n de interface Cubierta superior Cierres Hoja de corte Cabeza de impresi n Cubierta posterior Cartucho de cinta pu ll to op en Impresora en...

Страница 111: ...te y quite el resto del material de embalaje Compruebe la impresora en cuanto a da o evidente de trans porte y en cuanto a integridad Adem s de las presentes instruc ciones de servicio deben estar inc...

Страница 112: ...o sustancias explosivas No exponga la impresora a la irradiaci n solar directa Si no se pueda evitar colocar el equipo bajo una ventana prot jalo contra la luz solar con una cortina Al conectarse el o...

Страница 113: ...ausar da o grave Ud mismo puede poner la impresora a la tensi n de alimenta ci n correcta Para ello primero coloque la impresora en la parte posterior con cuidado Ponga el conmutador corredizo a la iz...

Страница 114: ...el cable de la red a la conexi n de corriente el ctrica de la impresora seg n la figura Conecte la clavija de la cable de la red a un enchufe Encender la impresora El interruptor de la red con el cua...

Страница 115: ...te mode puedenefectuarseavancesdepaso l neaoformulariomedianteelpanel de mando v ase p gina 17 Arrastre de papel sin embargo no pueden recibirse los datos Pulsador Park 1 Libera el camino del papel si...

Страница 116: ...n y distancia de cabeza Pulsador Aliment 3 Origen de papel Pulsador Char 4 Fuente y n mero de caracteres por pulgada El acceso a los ajustes adicionales de men Men puede haber sido bloqueado en f bri...

Страница 117: ...uite la cubierta Empuje el carro de la cabeza a la izquierda hasta el tope con cuidado visto del frente de la impresora Levante la cubierta de barra de impresi n y quite el cartucho usado 90 La cabeza...

Страница 118: ...que se engatilla As se posiciona el cartucho correctamente sin m s Tensar la cinta otra vez mediante el bot n a la derecha del cartucho Con esto la cinta pasa automaticamente a su posici n correcta po...

Страница 119: ...r pulsador Si se encuentra una hoja suelta en la impresora se la expulsa Seleccione el origen de papel deseado con uno de los pulsadores marcados por ejemplo Sueltas 2 Alternan el men inicial y el men...

Страница 120: ...en los lugares marcados con flechas a la izquierda y derecha Abra las abrazaderas de papel izquierda y derecha Es posible tambi n de quitar la tapa inferior para facilitar la carga de papel continuo...

Страница 121: ...parece el origen de papel activo Trac tor1 en el visualizador Se carga el papel automaticamente si la impresora est en modo Online y recibe datos del ordenador Presione el pulsador Load 4 para cargar...

Страница 122: ...gu a lateral derecha al tama o del papel utilizado Insierte la hoja suelta hasta el tope en el dispositivo de alimen taci n de papel Presione el pulsador Online para poner la impresora en estado list...

Страница 123: ...impresora se la expulsa Pulsador 2 Pulsaci n breve Se transporta el papel hacia arriba por pasos Pulsaci n larga Transporte continuo hacia arriba Pulsador 3 Pulsaci n breve Se transporta el papel haci...

Страница 124: ...corte v ase abajo La visualizaci n alterna entre y Despu s de cortar el papel presione el pulsador Salir 4 La impresora reposiciona el papel a la primera posici n de impresi n Si hay una tarea de impr...

Страница 125: ...a posici n de aparcamiento Presione el pulsador Setup La impresora cambia al modo Setup Presione el pulsador Ajustar 2 Presione el pulsador Tirar 4 Por medio del pulsador 2 o 3 ponga la perforaci n a...

Страница 126: ...ineada con la hoja de corte Se ha ajustado la primera posici n de impresi n a 12 72 en f brica Por medio del pulsador 2 o 3 ajuste la primera l nea de impresi n a la posici n deseada Se pueden ajustar...

Страница 127: ...v ase gu a del usuario en el disco CD ROM Presione el pulsador Setup La impresora cambia al modo Setup Presione el pulsador Ajustar 2 Presione el pulsador Ajust 1 Por medio del pulsador 2 o 3 ajuste...

Страница 128: ...ne la fuente deseada con el pulsador 2 o 3 Confirme la selecci n presionando el pulsador Set 1 Puede cancelar la selecci n presionando Salir 4 Presione el pulsador Setup La impresora se pone al estado...

Страница 129: ...anco inserita nella fonte di carta valida regolazione di difetto Trattor1 Tenere premuto il tasto 4 per ca 5 secondi Dopo che la compi lazione dell inizio lo stampatore tiri la carta nella posizione d...

Страница 130: ...4 x 36 Rendimiento de impresi n 430 p ginas h 7 2 p ginas min ECMA Densidad de caracteres 5 6 7 5 8 6 10 12 15 17 1 20 cpp Resoluci n m xima Horizontal 360 ppp Vertical 360 ppp Emulaciones Est ndard M...

Страница 131: ...ueden manejar formularios del tipo encolado por los cantos de cabeza Los formularios m ltiples requieren inserci n con el canto encolado hacia abajo Hay que comprobarlos en cuanto a aptitud Accesorios...

Страница 132: ......

Страница 133: ...on cuidado pero no podemos responsabilizarnos por eventuales errores e imperfecciones del presente manual ni por da os consiguientes que resulten de ellos TRADEMARK ACKNOWLEDGEMENTS CENTRONICS is a tr...

Страница 134: ...l Building Singapore 669569 Phone 65 6760 8833 Fax 65 6760 1066 www dascom com TALLY REPRESENTATIVES UNITED KINGDOM DASCOM GB Ltd ViewPoint Basing View Basingstoke Hampshire RG21 4RG England Phone 44...

Отзывы: