background image

7-2. Neck cushion and head pillow(consumable parts)

Use dry cloth to wipe off water and dry in shade.
Dump cloth with neutral detergent and wipe to remove coloring or perm solution.

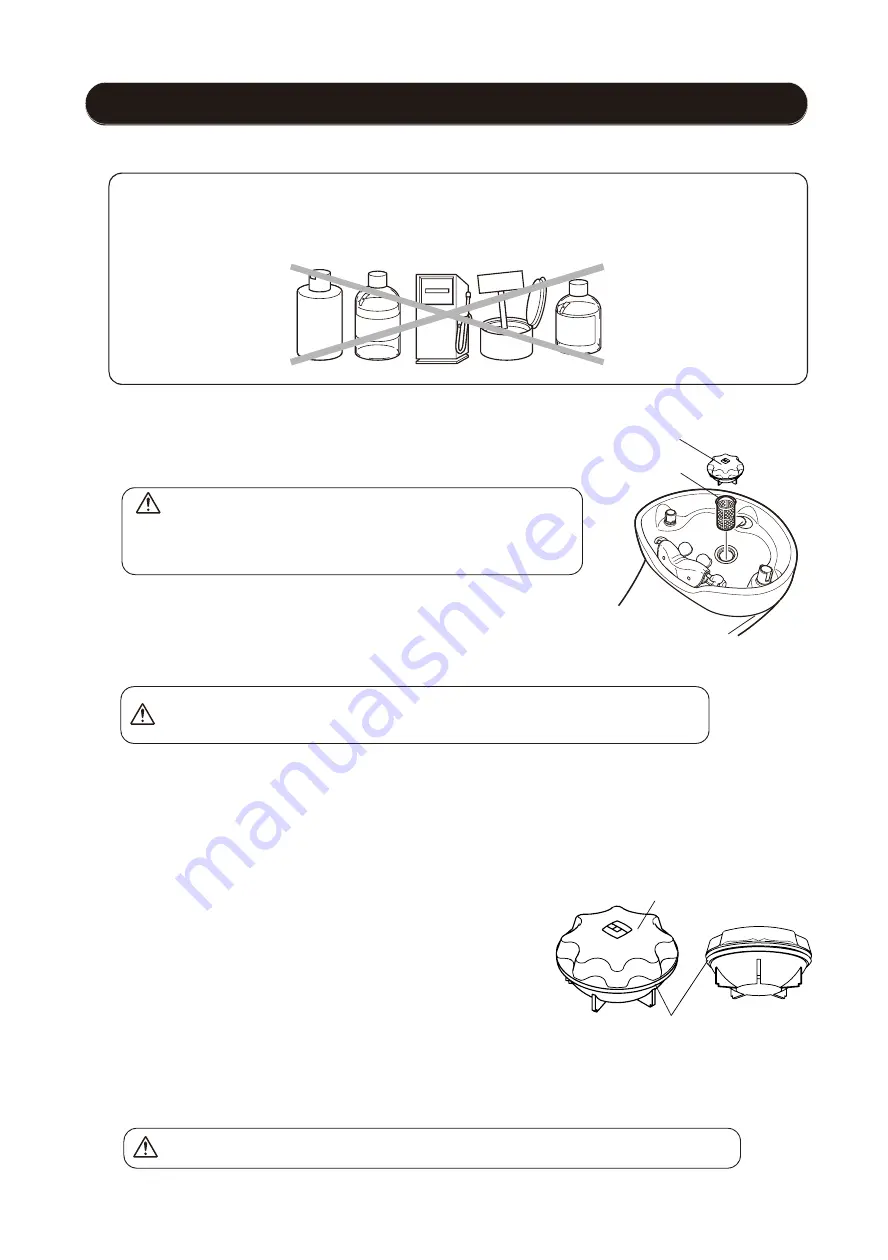
7-1. Hair Catcher

T ake out the hair catcher under the drain cap and remove hairs 
from the hair catcher.

Drain C ap 

Hair C atcher

Alcohol

Notice

Do not use the following substances.

Thinner, alcohol, gasoline, kerosene or other volatile chemicals; waxes containing abrasives; 
sponges containing abrasives, etc. 

Thinner

G asoline

Waxes

C ontaining

abrasives

Chemicals

7-3. Use dry and soft cloth to clean upholstery, plastics, plated and painted surface.

Dump cloth with neutral detergent and wipe to remove stubborn stains and dirt. Use only mild 
neutral detergent. Use cotton buds etc. to clean around the neck cushion and head pillow 
mounting parts.

7-4. Drain cap

Wash around the drain cap, and remove any hair 
or dirt from solvents.
T he drain cap is a consumable supply. 
If it is extremely dirty, remove the packing from 
the drain cap, wash with detergent solution diluted 
using water, and rinse carefully with water.

Drain C ap 

Drain C ap G asket

C aution

Clean the hair catcher as often as possible. If using the hair catcher not 
cleaned, it may cause clogging of the port, overflow or poor sanitary.
Cleaning the hair catcher every after each shampooing is recommended.

R inse the cushion immediately after chemical is splashed on the neck cushion.
Splashed chemical may cause deterioration or discoloration.

C aution

Wipe the bowl with diluted neutral detergent.

Do NOT  use metal scrub brushes, paper files. Using them may be a cause of scars.

C aution

7-5. Cleaning of bowl

7. Maintenance

-8-

Содержание Yume DX

Страница 1: ...Operating Instructions Thank you for purchasing our product Please read through this manual and this note carefully before installing or using These instructions provide important information for corr...

Страница 2: ...1 Locations of Warning Labels 1 2 Dimension and Specifications 2 3 Overall View and Major Components 3 4 Accessories 4 5 Preparation 4 6 Operating Instruction 5 7 Maintenance 8 8 Troubleshooting 10 9...

Страница 3: ...tlet Drain Cap The drain cap must be detached from the drain outlet when the product is not in use 1 Locations of W arning Labels Be careful not to pinch a hand and etc Be careful not to pinch a hand...

Страница 4: ...l Requirements 230V 50Hz 1 7A appliance itself CE Spec Usage Environment Operational Temperature 10 40 C Water and Hot Water 0 08 0 6Mpa 0 8 6kgf Supply Pressure Water Supply Pressure Hot Water Supply...

Страница 5: ...foot switch E X YM2NR A R ight side foot switch Leg rest Lever UP DOWN E X YM2NLA and E X YM2NR A only UP DOWN UP DOWN Preset S hampoo position Backrest return Preset S hampoo position Backrest return...

Страница 6: ...e Reduction Tape 1 Anti water dropping device 1 5 Preparation 5 1 Attach the Neck Cushion 1 Attach the neck cushion on metal fittings as shown in figure 2 Both side hooks of the neck cushion is fixed...

Страница 7: ...rest reclining button until the backrest is reclined to the desired position D Backrest Raising K eep depressing Backrest raising button until the backrest is raised to the desired position Caution E...

Страница 8: ...ny side of the buttons on the foot control will cancel the automatic movement immediately 6 3 Auto Mode Position Adjustment Preset position adjustment A Set the seat and the backrest to the desired pr...

Страница 9: ...rain Cap 6 5 Adjustment the Water Hot Water A Turn the tap to counter clockwise B Adjust the water temperature with temperature control knob C Press stop button on the temperature control knob to rele...

Страница 10: ...detergent Use cotton buds etc to clean around the neck cushion and head pillow mounting parts 7 4 Drain cap Wash around the drain cap and remove any hair or dirt from solvents The drain cap is a consu...

Страница 11: ...hot water stop valves and remove strainer by flat head screw driver and wipe off the water by cloth E After cleaning the strainer put it back and tighten up F Wipe water off and remove cloth G Turn on...

Страница 12: ...on Make sure that the power plug is properly plugged into the outlet If you have a breaker box check for tripped breakers Main S witch ON Fuse Box or Breaker No Water Hot Water Make sure that the wate...

Страница 13: ......

Страница 14: ......

Страница 15: ......

Страница 16: ...ion Be careful of use Children shall not play with the appliance Be careful of use Cleaning and user maintenance shall not be made by children without supervision 2 1 1 Higashishinsaibashi Chuo ku Osa...

Отзывы: