


5. USE
5.10 Language selection
1. Select
SET
and enter it by pressing key .
2. Select
LANGUAGE
and enter it by pressing key .
3. Select English / French / German / Danish / Swedish/
Finnish / Norwegian / Italian and confirm the selection
key .
by pressing
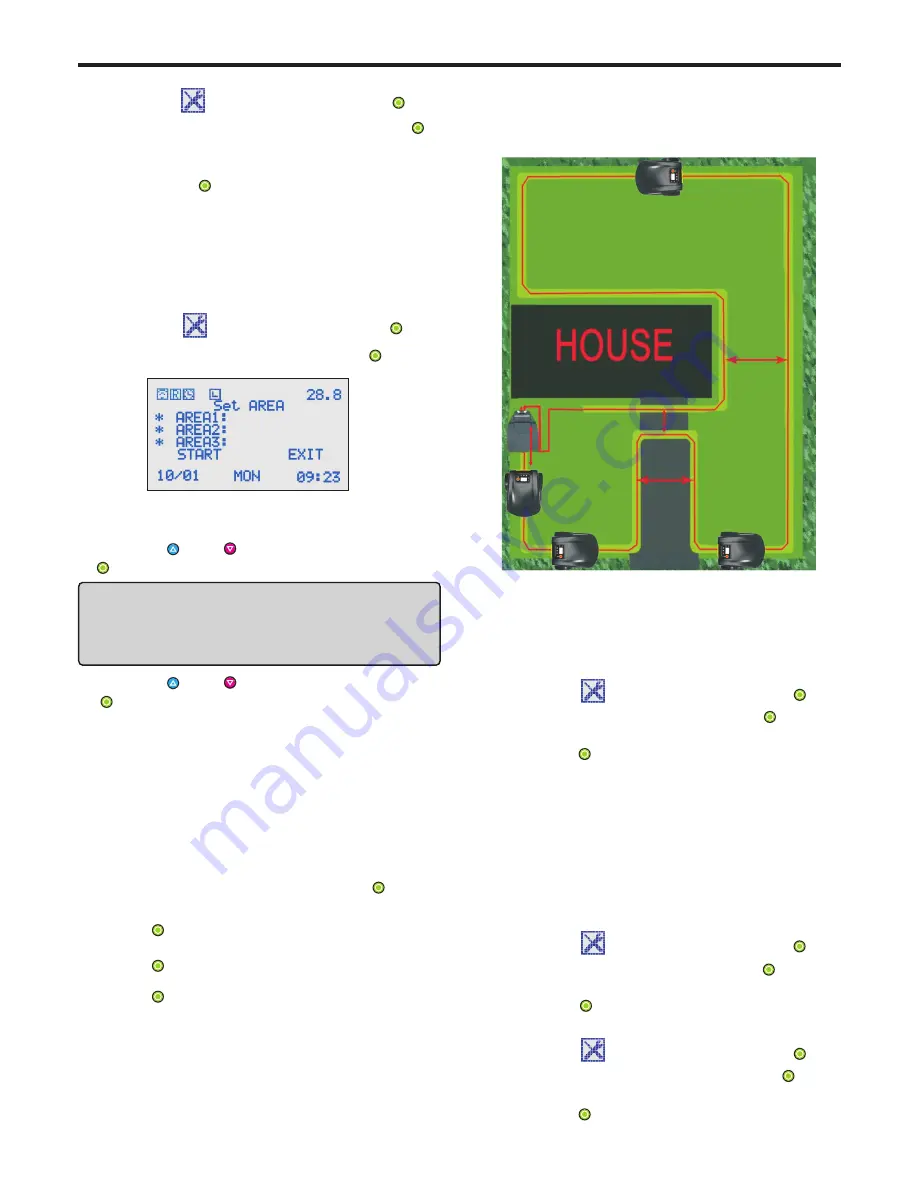
5.11 Area setting
This function is to increase the efficacity of the mower
into 3 small areas. The function should be used
together with
.
P13-5.6 SCHEDULE SETTING
in a large area. It allows you to separate a larger area
1. Select
SET
and enter it by pressing key .
- AREA 1 is non-optional, selects this by default.
2. Select
AREA
and enter it by pressing key .
- Put mower onto virtual wire with a maximum distance of
3. To select the working area.
- Press key or key to scroll to AREA 2 and press key
to select AREA 2 works. “*” comes in front of AREA 2.
IMPORTANT INFORMATION
If user does not select working in AREA 2, he can not
set the robot working in AREA 3.
- Press key or key to scroll to AREA 3 and press key
to select working in AREA 3. “*”comes in front of AREA3.
4. To set the Memory Point.
is to program the mower to leave the
A Memory point
virtual wire. Each area should with a Memory point,
3 Memory points maximum in one mower.
- Select
START
and confirm it by pressing key . Then
1meter from charging station, and put the backside of
the robot starts follow virtual wire walking.
- Press key to set Memory point in AREA 1 when mower
arrives at Memory 1.
Please keep the voltage of mower more than 27V
- Put the robot back to charging station and wait for working.
5.12 Rain
1. Select
SET
and enter it by pressing key .
2. Select
RAIN
and enter it by pressing key .
3. Select
YES / NO
and confirm the selection by
key .
pressing
RAIN ON: mower goes back to charging station when it
is raining.
RAIN OFF: mower goes on working when it is raining.
5.13 LINE
1. Select
SET
and enter it by pressing key .
LINE ON: every time the mower started, it has to find
LINE OFF: if mower is not put onto virtual wire, it will not
virtual wire and follow it back to charging
station.
follow virtual wire walking when starts it.
2. Select
LINE
and enter it by pressing key .
3. Select
YES / NO
and confirm the selection by
key .
pressing
- It’s best to set the Memory point in the middle of two
corners.
- A better position of Memory point is a 3 meters length
of virtual wire at the beginning or the end of an area.
- 14 -
mower towards to charging station.
Press key to set Memory point in AREA 2 when mower
arrives at Memory 2.
Press key to set Memory point in AREA 3 when mower
arrives at Memory 3.
Take Memory 1, Memory 2, Memory 3 as below picture
before setting the memory points.
for example.
Area 1
Area 2
Area 3
Memory 1
Memory 2
Memory 3
Min: 50cm
Min: 0.8m
Max: 1m
Min: 50cm
Passage
- Route the wire around the passage to separate the area.
The virtual wire to and from the edge of passage is 1meter
at least. check the setting as below picture.
- A minimum distance between the to and from virtual wire which
are to make a passage from one area to another one is 50cm.
the robot will follow the virtual wire cutting
for one circle, and finish cutting on the virtual
wire first.
5.14 Range setting
1. Select
SET
and enter it by pressing key .
2. Select
RANGE
and enter it by pressing key .
3. Select
1/2/3/4
and confirm the selection by
key .
pressing
Содержание S520
Страница 2: ......
Страница 21: ...8 EXPLODED VIEW Robot Exploded View 18 ...
Страница 23: ......
Страница 24: ...USER MANUAL Robot lawn mower ...


