8
1
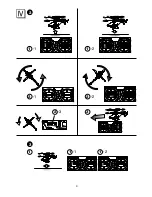
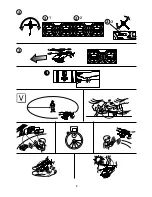
Slowly move the throttle stick (left)
up to make the helicopter take off.
When the helicopter is slightly
floating, slowly move the stick back
to make it land. Gradually increase
the height as you get accustomed
to the controls, and fine adjust the
stick up and down to get the feeling
of hovering.
* To move the helicopter down, move
the throttle stick back more slowly
than when moving the helicopter up.
* The throttle stick is moved in small
increment of a few millimeters. For
this operation, proper training is
required.
As a feature of a contra-rotating rotor
helicopter, hovering can be achieved
rather easily.
1
-1 Up
1
-2 Down
2
When the helicopter reaches
hovering, make it rotate at its
position. Move the rudder stick (left)
of the transmitter left or right to
change the direction of the
helicopter.
* If the helicopter rotates by itself,
adjust the rudder trim to stop the
rotating.
2
-1 Left turn
2
-2 Right turn
2
- Rudder trim
3
When you get accustomed to the
control of hovering and rotating,
move the forward stick (right) on the
transmitter up to fly the helicopter
forward. The helicopter keeps flying
forward while the stick is moved up
and held in position. To stop it, move
the stick back.
* The helicopter cannot smoothly fly
forward while it is rotating. Stop the
rotating before flying the helicopter
forward.
If you get the feeling through steps 1 to
, try to conduct two operations at the
same time. After that, you can freely
fly the helicopter by conducting any
combinations of operations.
Important:
When the helicopter crashes,
immediately move the throttle stick
(left) back, otherwise a damage may
result from the idling of the main motor.
4
After use
Turn off the switch on the helicopter
then turn off the transmitter. Be sure
to retract the transmitter antenna.
Important:
• This helicopter is equipped with a
feature for monitoring the battery
level of the builtin battery. The LED
lamp blinks if the battery level
becomes low.
Turn off the switch when the LED lamp
starts blinking. Failure to do so may
adversely affect batteries, resulting in
disabled charge.
V. Flight Location and Condition
Flight Location
First you have to find a suitable
location for flight.
Check that there are no obstacles
around the flight location before flying
the helicopter.
Fly the helicopter in a safe area away
from roads, other persons and animals,
trees, buildings, overhead power lines
and other obstacles.
Check that there are no such obstacles
in the surroundings before flying the
helicopter.
Flight Condition
Fly the helicopter in warm days, since
it may suffer degradation in flight
performance in a low-temperature
condition. Avoid locations exposed
to wind, otherwise the helicopter may
become uncontrollable. Be sure to fly
the helicopter in calm condition.
Do not fly the helicopter in bad weather
with heavy thunderstorm, rain, sleet,
snow and the like.
Important:
• Check if a near transmitter produces
interference or signals with the
same frequency.
• Keep supervision to the helicopter
in flight.
• Children are recommended to play
under adult supervision.
* The helicopter is intended for outdoor
use only.
VI. Maintenance
Care and Service
• The life of the helicopter can be
extended by daily care. Wipe the he-
licopter clean if dust or the like builds
up and check if any loose part.
• The helicopter body is made of
polystyrene foam. If damaged, use
scotch tape or suitable adhesives
to repair.
* Never use instant glue which will
make the polystyrene foam dissolve.
• The helicopter may lose balance if
broken and will not fly correctly.
Содержание A60827
Страница 1: ...Sparc is distributed exclusively by Horizon Hobby Inc 4105 Fieldstone Road Champaign IL 61822 2006 ...
Страница 3: ... A B D C 1 2 3 5 6 7 8 9 4 1 2 1 1 2 1 2 3 5 6 4 ...
Страница 4: ... 1 2 1 1 1 1 1 1 1 1 1 1 2 2 2 3 3 3 4 4 1 2 2 ...
Страница 5: ... 1 2 1 2 1 2 3 1 1 1 2 3 3 2 1 1 2 2 ...
Страница 6: ... 1 2 3 2 2 3 1 2 2 ...


