21
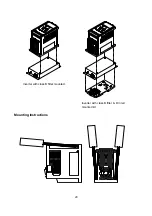
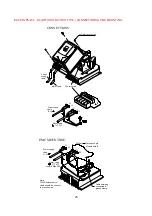
Mounting plate
Pull mounting plate
1
2
Screwdriver
Din Rail Mounting Diagram
Additional DIN Rail Installation
A mounting clamp and a 35mm width rail must be used to install the Drive on the rail.
middle rib
Retention rib
Inserting hole
Step1-
Aim and insert the 4
retention ribs of the
DIN Rail at the 4
holes in rear panel
of inverter
Step2-
Push the DIN Rail
forward until the
middle rib grips
firmly with back
panel
Step1-
Use a small
screwdriver
inserting it into the
middle rib of DIN
Rail and press the
screwdriver in
order to remove
the DIN Rail from
inverter
Install Drive
Dismounting Drive
1 Pull the mounting plate downward.
2 Rotate the inverter module to dismount it.
First place the groove on the back of
module on the upper edge of din rail,
and then push the module down to lock
up position. Finally press the mounting
plate upward into module.
Содержание E2 Series
Страница 22: ...20 Mounting Instructions Inverter with class B filter mounted Inverter with class B filter Din rail mounted kit...
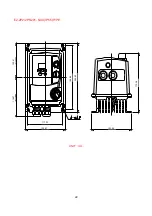
Страница 25: ...23 E2 202 203 401 402 403 N4X IP65 TYPE UNIT mm...
Страница 82: ...20 Mounting Instructions Inverter with class B filter mounted Inverter with class B filter Din rail mounted kit...
Страница 85: ...23 E2 202 203 401 402 403 N4X IP65 TYPE UNIT mm...

