T.O.M TST254A Скачать руководство пользователя страница 1

SCIE CIRCULAIRE DE TABLE 

TABLE SAW 

TST254A 

Manuel d’utilisation

Operating instructions

Bedienungsanleitung

TISCHKREISSÄGE

Содержание TST254A

Страница 1: ...SCIE CIRCULAIRE DE TABLE TABLE SAW TST254A Manuel d utilisation Operating instructions Bedienungsanleitung TISCHKREISS GE...

Страница 2: ......

Страница 3: ...R 210 stand parts list 38 conformity and warranty 43 deutsch allgemeine sicherheitsregeln 23 zus tzliche sicherheitsregeln f r tischkreiss gen 24 Symbole 25 installation 25 spezifikationen 25 montage...

Страница 4: ...1203 1996 07 Les valeurs cit es sont des valeurs d mission calcul es selon les normes en vigueur et non des valeurs li es l utilisation sur le lieu de tra vail Bien qu il y ait une corr lation entre c...

Страница 5: ...it de transporter les outils lectriques avec un doigt sur l interrupteur ou de les bran cher lorsque l interrupteur est en position marche peut engendrer des accidents d Enlevez les cl s de r glage av...

Страница 6: ...es avancer uniform ment le long du guide 15 VITER les positions des mains malais es dont le r sultat serait un glissement sur l outil tranchant 16 NE JAMAIS utiliser de solvants pour nettoyer les pi c...

Страница 7: ...d vacuation des poussi res 17 Vis de fixation du couteau diviseur 18 Rail du guide parall le 19 Graduation du guide parall le 20 Guide parall le 21 Profil du guide parall le 22 Vis molet e du guide pa...

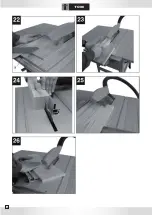
Страница 8: ...8 4 26 19 25 32 17 28 24 20 20 22 23 20 7 21...

Страница 9: ...9 31 29 30...

Страница 10: ...10...

Страница 11: ...paragraphe du montage du pi tement de la scie pour ter la protection de transport situ e au niveau du moteur de cette derni re 1 Retournez la scie circulaire de table et posez la sur le sol comme ill...

Страница 12: ...er ATTENTION Assurez vous que la scie est teinte et d branch e de toute source de courant avant de proc der au montage ou d effectuer tout autre r glage 1 R glez la lame 4 la profondeur de coupe maxim...

Страница 13: ...ement des dispositifs de protection DANGER REMPLACER TOUT INSERT DE TABLE ABIME OU ENTAILLE 1 Pour d marrer la scie appuyez sur le bouton vert I de l interrupteur 11 Fig 4 Avant de commencer couper la...

Страница 14: ...ir Resserrez ensuite la vis molet e 24 Fig 9 Cette machine est quip e d un bouton de r armement ou disjoncteur thermique qui s enclenche en cas de surcharge lectrique Il se situe c t de l interrupteur...

Страница 15: ...Ne d lignez jamais de pi ce de bois sans le guide parall le parfaite ment bloqu en position sur la table Toutes les coupes de d lignage avec la lame inclin e ou non se font en utilisant le guide paral...

Страница 16: ...r paration l exception du remplacement des balais du moteur ne peuvent tre accomplis que par un service de r paration agr par PSP Outillage Toute d faillance des protecteurs ou de la lame doit tre r p...

Страница 17: ...parts list 38 conformity and warranty 43 deutsch allgemeine sicherheitsregeln 23 zus tzliche sicherheitsregeln f r tischkreiss gen 24 Symbole 25 installation 25 spezifikationen 25 montage 26 einrichte...

Страница 18: ...lated according to applicable standards and not values relating to use in the workplace Although correlation between those different emission levels does exist this cannot be reliably used to determin...

Страница 19: ...nger on the switch or connecting them with the switch set to on can lead to injuries d Remove any adjustment keys or wrenches before starting up the power If a key or wrench remains attached to a movi...

Страница 20: ...immediately so as to not damage the motor 13 PROVIDE SUPPORT on the rear or sides of the saw for wide or long workpieces 14 AVOID KICKBACKS piece thrown back towards you by A keeping the blade sharp...

Страница 21: ...Lightly fasten the 4 legs 29 to the saw using the hex head screws and the nuts 3 Next screw the 4 cross pieces 30 with the hex head screws and the nuts provided Fig 17 4 You may now attach the rubber...

Страница 22: ...rew 17 Fig 8 5 Adjust the riving knife then re tighten the fastening screw 17 6 Reposition the table insert 6 and reinstall the blade guard 2 Fit the blade height adjustment wheel 8 Fig 4 to the shaft...

Страница 23: ...e surfaces of different heights Depending on the thickness of the material to be cut the guide stop 20 Fig 11 and 12 must be used for thick workpieces as shown in Fig 11 and for thin workpieces as in...

Страница 24: ...is fence can be used in one of the table grooves ANGLED CROSS CUTS For angled cuts set the cutting angle of the mitre fence by loosening the screw and re tightening the mitre fence screw and then appl...

Страница 25: ...disconnected from the power source before working on the machine to maintain or repair it After each use check the machine and replace any defective or broken parts Remove all the sawdust or chips tha...

Страница 26: ...list 36 deutsch allgemeine sicherheitsregeln 23 zus tzliche sicherheitsregeln f r tischkreiss gen 24 Symbole 25 installation 25 spezifikationen 25 montage 26 einrichten des werkzeugs 28 anschlu an di...

Страница 27: ...n DIN EN ISO 3744 1995 11 DIN EN ISO 11203 1996 07 Bei den angegebenen Werten handelt es sich um gem den geltenden Normen berechnete Emissionspegel und nicht um mit der Verwendung der Maschine am Arbe...

Страница 28: ...Tragen von Elektrowerkzeugen mit einem Finger auf dem Schalter oder das Anschlie en bei eingeschaltetem Ger t kann Unf lle verursachen d Vor dem Einschalten des Elektrowerkzeugs Einstellschl ssel abzi...

Страница 29: ...kte Haltungen der H nde vermeiden die zum Abgleiten auf das Schneidwerkzeug f hren k nnen 16 Zum Reinigen der Kunststoffteile keinesfalls L sungsmittel verwenden Diese k nnten das Material angreifen u...

Страница 30: ...ehzahl 4800 min Schnitth he bei 90 70 mm Schnitth he bei 45 60 mm Tischabmessungen 595 x 440 mm Tischverl ngerung 595 x 944 mm H he der Maschine 890 mm Nettogewicht 31 kg Bruttogewicht 35 kg GEBRAUCH...

Страница 31: ...von 2 bis 5 mm verbleibt Siehe Abb 12 Die Aus richtung des Spaltkeils mit dem S geblatt mit einem Lineal berpr fen 3 Die Sechskantschrauben wieder anziehen Anschlie end erneut berpr fen ob das S gebla...

Страница 32: ...er Drehrichtung des S geblatts drehen 4 Die Befestigungsmutter des S geblatts und den Au enflansch entfernen Anschlie end das alte S geblatt abnehmen 5 Sicherstellen dass die S geblattflansche vor der...

Страница 33: ...kelanschlags ist das S geblatt in seiner Position zu sichern Vor Beginn der Arbeiten stets berpr fen ob das S ge blatt ordnungsgem gesichert wurde Den Winkelanschlag 14 Abb 15 von seiner Halterung abn...

Страница 34: ...r gew nschten Position auf dem Tisch gesichert ist S mtliche L ngsschnittarbeiten auch bei geneigtem S geblatt sind mit dem Parallelanschlag auszuf hren Den Parallelanschlag auf die gew nschte Schnitt...

Страница 35: ...an den Schutzvorrichtungen oder am S geblatt m ssen sofort repariert werden 1 Netzstecker ziehen 2 Die Abdeckungen der Kohleb rsten mit einem geeigneten Schraubendreher abschrauben Die andere Kohleb...

Страница 36: ...vue clat e exploded view 36...

Страница 37: ...tions The warranty shall not under any circums tances cover repairs carried out by a non authorised repairer The equipment should not be dismantled under any circumstances during the warranty period 1...

Страница 38: ......

Отзывы: