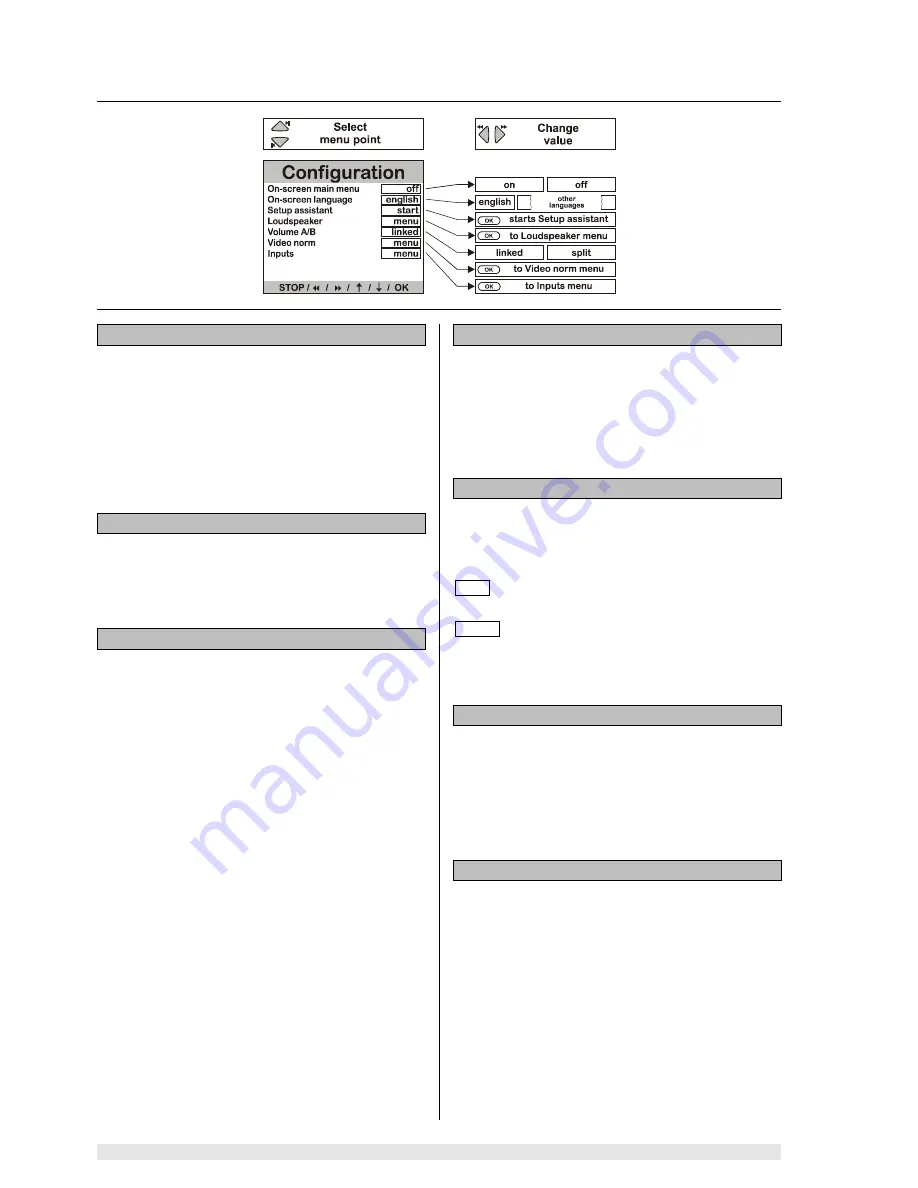
background image

Basic settings

34


Configuration Menu

Switch TV output for On-Screen main menu on / off:

If  you  just  wish  to  adjust  the  balance  or  tone  controls
temporarily,  it  is  not  essential  to  access  the  main  menu
(see 

'Menu  control  system, 

Main  Menu

'

)  on  the  TV

screen, as this would superimpose it on the film you are
watching.  In  most  cases  displaying  the  menu  on  the
integral  screen  is  perfectly  adequate.  This  menu  point
enables you to switch the TV screen display of the Main
Menu on and off.

On-Screen Language:

The on-screen menus can be displayed on the screen in
various  languages.  In  this  menu  point  you  select  the
language you wish to see.

Setup assistant:

The 

'

Setup assistant

'

 menu point represents an alterna-

tive  to  the  manual 

'

Loudspeaker  Menu

'

  (see  below).

Calling up the Assistant invokes an automated routine for
correctly  setting  up  the  individual  loudspeaker  channels
of your surround system.

Loudspeaker:

The purpose of the 

'

Loudspeaker Menu

'

 is to control the

distribution of the output signals to the loudspeaker sys-
tem  in  your  room.  This  menu  is  also  used  to  adjust  the
loudspeakers  to  suit  the  spatial  and  acoustic  character-
istics of your listening room.

Volume A/B:

This  menu  point  allows  you  to  decide  whether  the  vol-
ume controls for 


A

 and 


B

 are to  work  separately  or

linked together ( see 

'

Typical wiring diagram, Adjacent

Room Operation

'

). Select one of the following settings:

 split 

if  you  wish  to  have  independent  control

of the volume of 

 A

 and 

 B

 (

A/B

).

 linked 

if you prefer to control the volume of 

 A

and


 B

 (

A+B

) together.

Video norm:

The 

'

Video Norm Menu

'

 enables you to set all the video

inputs  and  outputs  of  the 

K6

  to  the  appropriate  video

norm to suit the picture sources connected to it.

The 

'

Video Norm Menu

'

 also allows you to adjust the 

K6

to suit the characteristics of your TV set.

Inputs:

Some  AV  source  devices  supply  a  digital  output  signal.
Alternative  input  sockets  on  the 

K6

  can  be  assigned  to

these source devices; these inputs are designed specifi-
cally for digital signals (coaxial or optical).

If you do this, the assigned digital signal is accepted and
processed by the decoder instead of the analogue stereo
input signal.

The alternative inputs are assigned in the 

'

Inputs Menu

'

.

Содержание K 6 CV

Страница 1: ...V 7 0 Order No 9103 0302 USER MANUAL K 6 CV ...

Страница 2: ...ough these operating instructions It is especially important to ob serve the instructions regarding setting up and operating the equipment and the safety notes We are grateful to you for placing your faith in us and hope that you will enjoy many hours of pleasure with your K6 surround receiver elektroakustik All components used in this device meet the current German and European safety norms and s...

Страница 3: ...apter 27 Search Slow motion 28 Camera angle Switching audio channels 29 Sub title language Playback variants Repeat Chapter Repeat Title Repeat Disc and Shuffle 30 Disc Menu Function 31 Player Setup Menu Audio language Sub title language Aspect ratio PBC 32 Using the Disc Player to play other media Video CDs Photo CDs MP3 Basic settings for the K6 33 Configuration Menu 34 Switching On screen Menu ...

Страница 4: ... gramme material set top box video recorder to the TV set are not available if the unit is turned off at the primary switch Emergency buttons To the right of the primary switch on the underside of the K6 you will find three small buttons which can be used to control the machine in an emergency These buttons can be used to operate the essential functions directly Select button Change button Press t...

Страница 5: ...ch on again a Main display The main display provides context sensitive infor mation regarding the program source or the cur rently active process b Tuner reception mode FM VHF c Tone control settings These symbols indicate the current settings of the tone controls d Menu symbol Indicates that a device menu is open e Timer symbol Indicates that the timer is active f Alarm time When the timer is act...

Страница 6: ...self on automatically at the programmed alarm time press for 2 sec Activates screen angle adjustment The angle is adjusted using the and buttons press again for 2 sec Activates screen brightness adjustment The brightness is adjusted by pressing the and buttons briefly Source select Selects the integral CD DVD player as programme source Selects the integral tuner as programme source press repeatedl...

Страница 7: ...ing Press the button briefly to open the Main Menu All changes take effect immediately If the TV set connected to the system is switched on the menu appears on the TV screen At the same time the integral screen displays the first menu point STOP OK Select menu point Change value Matrix mid mid 00 00 off 00 off maximum Pro Logic II mode Balance Left Right Srnd Front Tone Treble Bass Tone control Su...

Страница 8: ...subwoofer is switched off in the Loudspeaker Menu this menu point in the Main Menu is also set to Off and the subwoofer level cannot be adjusted Note It is essential to set the balance between the other chan nels front surround and center in the Loudspeaker Balance Menu before you change this setting Loudness The term Loudness refers to an automatic volume sensitive tone control designed to compen...

Страница 9: ... K6 remembers the setting for each input and re verts to the mode of operation which was last used when you switch from one input to another For the internal disc player the settings for CD and DVD are stored independently Multi channel mode surround Mode of operation for the reproduction of multi channel programmes e g DOLBY Pro Logic DOLBY DIGITAL dts etc A digital multi channel signal is detect...

Страница 10: ... loudspeakers selected in the Loudspeaker Menu SOUND FIELD SIMULATION The surround processes already described require pro gramme material which is encoded using the appropriate system but the K6 also offers a facility to enhance the spatial effect available with conventional unencoded stereo recordings CD MC VHF radio etc This it does by offering a range of artificial sound field simulations incl...

Страница 11: ...ro grams Calling up additional tuner information Operation With the tuner selected press briefly Brief display of program number and reception fre quency e g P01 98 00 P01 98 00 P01 98 00 P01 98 00 Switch radio text display on Switch radio text display off RADIOTEXT RADIOTEXT RADIOTEXT RADIOTEXT or RTEXT OFF RTEXT OFF RTEXT OFF RTEXT OFF Explanation The integral screen can display three different ...

Страница 12: ... will be received at opti mum quality when the cross symbol is in the center After carrying out fine tuning the program must be stored again manually see Manual storing of radio pro grams Setting the reception mode Operation With Tuner selected press briefly Call up Tuner Menu e g MODE NORM MODE NORM MODE NORM MODE NORM Select reception mode MODE NORM MODE NORM MODE NORM MODE NORM or MODE ATTEN MO...

Страница 13: ...ss briefly Call up Tuner Menu e g MODE NORM MODE NORM MODE NORM MODE NORM Call up Program Menu PROGRAM PROGRAM PROGRAM PROGRAM Confirm selection e g P01 90 60 P01 90 60 P01 90 60 P01 90 60 Call up Autostore menu point e g P01 AUTO P01 AUTO P01 AUTO P01 AUTO Change initial Program Number if necessary to Optional enter Program Number directly e g P01 90 60 P01 90 60 P01 90 60 P01 90 60 then Start Au...

Страница 14: ...the buttons or enter the number directly using the numeric buttons Press the button to clear the Program Press the button to close the Tuner menu Notes If you attempt to clear an invalid Program Number XX the screen will display an appropriate error message PXX PXX PXX PXX ERROR ERROR ERROR ERROR The Tuner Menu then closes The tuner is unable to assess the quality at which indi vidual stations are...

Страница 15: ... out exchanging pro grams if desired The Tuner Menu and the Program Menu are also displayed on the screen of a TV set connected to the system see illustrations on previous page Explanation All the Tuner s Programs are stored in the order in which the Autostore function detected them You can re arrange the order to suit your preference using the Exchange function The process involves exchanging pai...

Страница 16: ...t the station name and in such cases the integral screen displays the tuning indi cator and the reception frequency instead of the station name Other transmitters broadcast the station name as a moving script which is at variance with the RDS norm If you wish to display a program name on the integral screen in such cases you can use the K6 s Rename function This process enables you to assign any n...

Страница 17: ... the time of day manually in the Clock menu point by RDS The time of day is read automatically from the RDS signal and accepted by the K6 this only works if a high quality RDS signal is present If you pick this option you can not change the time of day manually Alarm The alarm function can be switched on and off in this menu point on Alarm function switched on off Alarm function switched off Note ...

Страница 18: ...title language plus dif ferent viewing angles also depending on DVD type are available You will soon discover that the disc player is amazingly simple to operate thanks to the On Screen Display func tion i e on screen menus and the clearly legible inte gral screen In addition to DVDs you can also play audio CDs in cluding CD R and CD RW and Photo CDs You can recognise the media which can be played...

Страница 19: ... of tracks track times etc then the CD starts playing Notes The drawer can also be opened and closed by moving your hand close to the sensor under the front panel Calling up additional CD player information Operation Select Disc mode DISC DISC DISC DISC then e g CD 16 CD 16 CD 16 CD 16 press briefly Switches integral screen display between track display and display of playing time CD 16 CD 16 CD 1...

Страница 20: ... a track During playback you can jump from one track to another using the or buttons However you can also enter the number of the desired track directly using the numeric buttons Search To search forward or back at higher speed press the or buttons during playback The search starts with reduced volume To switch to the next higher speed press the or button again The search increases speed and the s...

Страница 21: ...semble the track select program with the help of the on screen menu Ensure that the TV set is switched on first Selecting tracks Operation with CD inserted but stopped press for 2 sec Switch to programming mode Explanation You can program the desired tracks in the desired se quence under the point INPUT Note The machine remembers the track select program you last created and activates it automatic...

Страница 22: ... passage press briefly Set start marker e g A A A A 1 1 1 1 or If necessary search for the end of desired passage press briefly Set end marker e g A A A A B 1 B 1 B 1 B 1 press briefly Interrupt play A B and re sume normal playback from current position e g A A A A B 1 B 1 B 1 B 1 or End Play A B and switch to Stop mode e g STOP 1 STOP 1 STOP 1 STOP 1 Explanation In Play A B mode you set two time ...

Страница 23: ...23 Operation ...

Страница 24: ... but ton The K6 initially gathers information about the inserted DVD then the DVD starts playing Notes The drawer can also be opened and closed by moving your hand close to the sensor under the front panel Important notes All the playing characteristics of the DVD are determined by the manufacturer of the disc Different DVDs may exhibit marked differences from each other in terms of menu operation...

Страница 25: ... integral screen shows which passage of the inserted DVD is currently being played The information can be displayed in two different ways 1 Title and Chapter number 2 Title time display of minutes and seconds of the current title Press the button repeatedly to switch from one type of display to the other The selected display mode is retained until you press the button again even if you insert anot...

Страница 26: ...ual picture To resume normal playback press the button Ending playback To end playback press the button at any time A select list appears when you stop playback with the last played title rack highlighted To restart this title press the button You can directly select a title other than the last one played by entering its number in the title select list using the numeric buttons Selecting a Chapter...

Страница 27: ...on is displayed on the screen for 2 seconds every time you press the or button To end the search press one of the buttons or as desired Slow motion Operation With DVD playing press for 2 sec Switch on slow motion for different playback speeds press repeatedly for about 2 seconds Optional end slow motion by pressing Switch on playback or Pause mode or Search or Stop mode Explanation Slow motion pla...

Страница 28: ...can be brought up on the screen at any time by a long press approx 2 seconds on the button It stays on the screen for about five sec onds allowing you to select the camera angle Switching audio channels Operation with the DVD playing press briefly Open the audio channel select option then press briefly Repeated short presses switch to the available audio channels Explanation Generally speaking the...

Страница 29: ... must use the Disc Menu Function to select a different sub title lan guage Playback variants Repeat Chapter Repeat Title Repeat Disc and Shuffle Operation With DVD playing press repeatedly if required Press repeatedly until the desired playback variant appears on the screen Activate displayed play back variant Explanation The K6 offers several playback variants for the DVD cur rently in the drive ...

Страница 30: ... playback so that you can change settings Pressing the button to close the Disc Menu Function takes you back to the film Alternative operation press for 2 sec Call up manual menu control system NAV NAV NAV NAV then operate the Disc Menu as described above then press for 2 sec Terminate manual menu control system Explanation Some manufacturers plough their own furrow with Disc Menus i e their discs...

Страница 31: ...en language provided that it is available on the DVD in the disc drawer If not the sub title display switches to the first available language on the DVD Aspect ratio Default setting 16 9 wide screen If you have a con ventional TV set 4 3 you can select either of the fol lowing settings Letterbox giving a wide screen view with black bars at top and bottom of the screen recommended set ting Or Pan S...

Страница 32: ...us chapter page to Optional enter the desired picture in the chapter directly using the numeric but tons Return to album The picture is displayed Picture mirror Picture rotation Return to chapter page Playing MP3 CDs An MP3 CD can hold up to 32 album directories To select an album directory press the buttons on the front panel buttons on the remote control handset To select a title track in an alb...

Страница 33: ...t ments at the TV Set Video Norm Menu and Trou ble Shooting STOP OK STOP OK STOP OK STOP OK 00 00 00 00 00 00 00 00 00 00 STOP OK 2 40 m 1 80 m 2 10 m 2 40 m 2 40 m 1 80 m STOP OK 00 dB 00 dB 00 dB 00 dB 00 dB STOP OK OK OK OK OK OK OK OK OK OK OK STOP OK Source STB AUX AV start Inputs Spk position FL SL Center SUB FR SR Spk balance FL SL Center FR SR Tone adjust FL TRB BAS SL TRB BAS Center TRB B...

Страница 34: ...the loudspeaker sys tem in your room This menu is also used to adjust the loudspeakers to suit the spatial and acoustic character istics of your listening room Volume A B This menu point allows you to decide whether the vol ume controls for A and B are to work separately or linked together see Typical wiring diagram Adjacent Room Operation Select one of the following settings split if you wish to ...

Страница 35: ...e currently set volume following by a flashing indicator informing you which button to press VOL means that the volume is too low VOL means that it is too high The calibra tion process is initiated by pressing the button but this will not work until you see OK on the screen The K6 will now carry out the automatic calibration proc ess During this period you will hear various test signals from your ...

Страница 36: ...ettings satellite for small speakers whose bass re sponse is necessarily limited The low frequency bass signals below 80 Hz of the main channels are mixed onto the subwoofer if present full range for larger speakers The full frequency range is reproduced via the main channels without restriction Center speaker Set the size and bass capability of the center loud speaker Select one of the following ...

Страница 37: ...elow 80 Hz are mixed onto the main loudspeakers Note If you switch on the subwoofer in the Loudspeaker Menu you can adjust its level in the Main Menu within the range 10 dB and 10 dB so that its volume matches that of the other channels Satellite high pass In this menu point you can set the cross over frequency according to the requirements of your loudspeaker sys tem 50 60 70 80 90 100 120 150 18...

Страница 38: ...tions in the following fixed sequence Output channels which are not in use see Loud speaker Menu cannot be edited Main loudspeaker front left FL Center loudspeaker front center Center Main loudspeaker front right FR Surround loudspeaker rear right SR Surround loudspeaker rear left SL Active subwoofer any position SUB Enter the measured distances using the change buttons the increment is 0 3 m In s...

Страница 39: ...y output channels which are not in use see Loudspeaker Menu The menu indicates the corresponding input when the hiss sounds from each channel in turn The value can be adjusted using the change buttons within the range 20 to 10 Any change takes effect immediately The hiss continues to sound from the same channel for a further two seconds after you have corrected the volume before moving on to the n...

Страница 40: ...e 06 to 06 Any change you make is immediately audible Use the select buttons to choose the input position you wish to adjust As can be seen in the diagram the select buttons access the input positions in the following fixed sequence Output channels which are not in use see Loud speaker Menu cannot be edited Main loudspeaker front left FL Treble TRB Main loudspeaker front left FL Bass BAS Center lo...

Страница 41: ... switching between 4 3 and 16 9 in S Video mode The switching voltage for this must be present at the C pin of the YC signal and the K6 generates this for the sources DVD and STB AV signals fed in at the VCR input are not available at the VCR output If compatibility problems occur between the picture dis play devices and AV source devices connected to the system we recommend setting all the device...

Страница 42: ...utput level of the source device The K6 features an automatic calibration function to carry out this process This is the calibration procedure 1 Select the desired analogue audio or AV source device and play a fortissimo extremely loud pas sage of music 2 Call up the Inputs Menu move to Calibration start and press the button 3 The screen displays the active message as long as the calibration proce...

Страница 43: ...ty notes This section describes all those matters which are of fundamental importance when setting up and first using the equipment This information is not relevant in daily use but you should nevertheless read and note it be fore using the equipment for the first time ...

Страница 44: ...stance The only permissible method of disposing of this product is to take it to your local collec tion centre for electrical waste General notes on setting up the K6 Carefully unpack the K6 and store the original packing materials carefully The carton and packing are specially designed for this unit and will be needed again if you wish to move the equipment at any time Please be sure to read the ...

Страница 45: ...ide the case Mains voltage is present inside the unit and there is a risk of lethal electric shock Do not exert undue force on the mains connectors Protect the unit from drips and splashes of water never place flower vases or fluid containers on the unit This device should never be used without proper super vision The K6 should be set up well out of the reach of small children This applies to all ...

Страница 46: ... DIGITAL INPUT OPTISCH and COAXIAL Inputs for digital source devices Both inputs can be assigned to the AV inputs VCR TV B SET TOP BOX TV or AUX AV see Inputs Menu TAPE 2 DIGITAL CINCH Input output sockets for connecting a digital recorder MD DAT CD recorder etc RC IN E2000 Input socket for the E 2000 remote control receiver optional accessory for use in an adjacent room RLINK Control output socke...

Страница 47: ...speakers to be used as front speakers in the main listening room Note This socket also supplies a switching signal which can be used to activate other devices e g projectors pro jection screens etc automatically via the K6 see Ap pendix B A REAR Terminals for surround loudspeakers A CENTER Terminals for center loudspeaker Note If the loudspeakers are to be used in countries outside the EU the red ...

Страница 48: ...Setting up 48 Typical wiring diagram Connecting passive loudspeakers Use of banana plugs see the section entitled Back panel connections ...

Страница 49: ...49 Setting up Typical wiring diagram Connecting active loudspeakers ...

Страница 50: ...omponent Video In sockets and the picture display device connected to Component Video Out Component Video can only be used if both de vices use the same colour norm In this case the com mon colour norm must be set in the K6 s picture norm menu to ensure that DVDs play back correctly and that the OSD menus are displayed properly If the AV source and the picture display device do not share a common ...

Страница 51: ...Vs with standard composite video input Note Audio connections can be omitted if the monitor has no audio in outputs Connection diagram for monitors TVs with S Video inputs Note Audio connections can be omitted if the monitor has no audio in outputs ...

Страница 52: ...Setting up 52 Connection diagram for monitors TVs with component YUV inputs Note Audio connections can be omitted if the monitor has no audio in outputs ...

Страница 53: ...Setting up Typical wiring diagrams Source device connection Connecting a digital recorder Connecting an analogue recorder Phono module type PHE MM or MC optional acces sory required Connecting a turn table ...

Страница 54: ...Setting up 54 If a digital output is present Use a Cinch digital cable or an optical cable Connecting a set top box ...

Страница 55: ... in Room B and connect it to the RC IN remote control input socket on the K6 You now need to access the Loudspeaker Menu and set the split mode for volume in the menu point Vol ume A B This makes it possible to alter the volume in the adjacent room only in the main room you can only alter the volume in that room A TV set in the adjacent room can also be connected to an unused Monitor TV output soc...

Страница 56: ...ccessories may be connected to the decoder or such auxiliary equipment which is itself ap proved and fulfils all currently valid legal requirements When used in conjunction with auxiliary devices or as part of a system this unit may only be used for the pur poses stated in the section entitled Approved usage FCC Information to the user for use in the United States of America only Class B digital d...

Страница 57: ... remote control address Now you must set up the address of the F6 RC handset to match the K6 Hold the button and the numeric button pressed in simultaneously After about 10 seconds the LED will flash Now press the numeric button or Pressing the numeric button sets the remote control system to the standard RC address RC ADR 1 whereas button sets the alterna tive address RC ADR 2 The LED goes out to...

Страница 58: ...roblem No output signal at the loudspeak ers the speaker indicators A B on the integral screen flash Cause 1 The unit is overheating and the protec tion circuit has tripped Remedy Reduce volume and wait for about 20 seconds If the unit does not switch on again automatically it has become too hot and should be left switched off for a few minutes to cool down Cause 2 Short circuit in the speaker cab...

Страница 59: ...e from some or all source devices Cause Source devices not supplying the switching signal which the TV set re quires to switch over to AV mode Remedy Set television to constant AV opera tion mode Problem Neither on screen menu nor other external programs appear on the TV screen TV only shows those sta tions which are received via its own aerial Cause 1 Video cable not connected properly Remedy Pus...

Страница 60: ...akers are switched off Remedy Switch on the speakers using the button Problems in DVD CD mode Problem The disc does not play after the drawer is closed Cause 1 Disc not correctly inserted Remedy Insert disc centrally printed face up Cause 2 Disc dirty Remedy Carefully wipe disc with a soft cloth working from the center to the edge Insert and try again Cause 3 Disc damaged in Table of Contents area...

Страница 61: ...amage and no kinks in the cable If necessary fit a new aerial cable Problem After a house move the integral screen still displays the old program names but the stations can no longer be picked up Cause Programs with station names and re ception frequencies are still stored in the K6 but they can no longer be re ceived in the new locality Remedy 1 Clear the programs which cannot be received individ...

Страница 62: ... 62 Appendix B Pin assignments PRE OUT CONTROL View from outside Pin Signal 1 2 Pre out Gnd 3 Pre out Front left 4 Speaker mute control signal 0 8V 5 Pre out Front right 6 7 Control Gnd 8 On control signal 0 5V ...

Страница 63: ...room 2 for adjacent room Nominal output channel 4 Ω 8 Ω 80 W 45 W 15 W 10 W Peak output 4 Ω 8 Ω 90 W 50 W 20 W 15 W Frequency response 0 3dB 2 Hz 150 kHz Slew rate 30 V µs Damping factor 300 Total harmonic distortion 0 015 Tuner Sensitivity mono stereo 1 5 µV 45 µV Signal noise ratio A w St Mo 68 73 dB Frequency response 5 Hz 15 kHz Total harmonic distortion St Mo 0 2 0 15 RDS functions Station na...

Страница 64: ... elektroakustik GmbH Co KG Herford Deutschland Germany ...

Отзывы: