background image

26

Setting Up the DVD 1240 R HD


Carefully  unpack  the 

DVD 1240 R (HD)

  and  store  the

original  packing  materials  carefully.  The  carton  and
packing  are  specially  designed  for  this  unit  and  will  be
needed  again  if  you  wish  to  move  the  equipment  at  any
time.  Please  be  sure  to  read  the  safety  notes  in  these
instructions.


If  the  unit  gets  very  cold  (e. g.  when  being  transported),
condensation  may  form  inside  it.  Please  do  not  switch  it
on  until  it  has  had  plenty  of  time  to  warm  up  to  room
temperature,  so  that  any  condensation  evaporates
completely.


Before  placing  the  unit  on  a  sensitive  surface,  please
check  the compatibility  of  the  lacquer  and  the  unit’s  feet
at  a  non-visible  point.  Fit  a  layer  of  protective  material  if
necessary.


The unit should be set up on a rigid, level base. If you are
placing  the  unit  on  resonance  absorbers  or  de-coupling
components, make sure that they do not com-promise its
stability.


The unit should be set up in a dry, well-ventilated site, out
of  direct  sunlight  and  away  from  radiators  and  other
heaters.  It  must  not  be  located  close  to  heat-producing
objects  or  devices,  or  anything  that  is  heat-sensitive  or
highly inflammable.


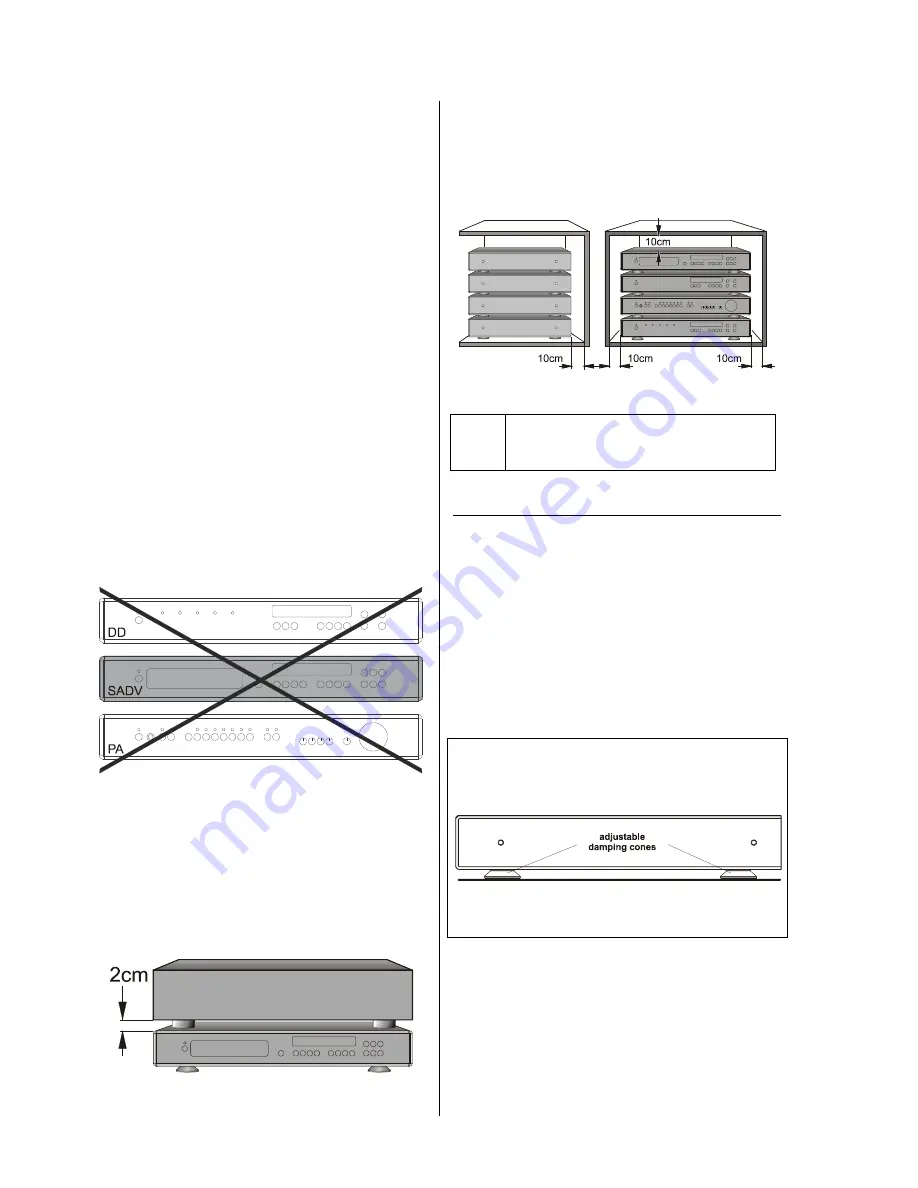
The 

DVD 1240 R (HD)

  player  must  never  be  set  up

between  heat-generating  devices  such  as  integrated
amplifiers  (PA),  power  amplifiers  or  surround  decoders
(DD).


The 

DVD 1240 R (HD)

 should never  be  placed  on  top  of

an  amplifier  or  any  other  device  that  can  become  hot
during operation.


Either place the device at the side of other equipment or
on top of cool devices like tuners, pre-amps etc.


'R'

  series  devices  dissipate  some  of  their  heat  via  the

case  cover.  For  this  reason  units  of  any  other  make
which are placed on top of a 

 'R'

 series device must

stand on feet at least 2 cm high.


When installing  the  unit  on  a  shelf  or  in  a  cupboard  it  is
essential  to  provide  an  adequate  flow  of  cooling  air,  to
ensure  that  the  heat  produced  by  the  unit  is  dissipated
effectively.  For this  reason  there  must  be  at  least  10 cm
free  space 

to  both


sides 

and 

behind

  the  units.  There

should  also  be  10 cm 

above

  the  case  to  the  next  cup-

board or shelf.


Any  heat  build-up  will  shorten  the  life
of  the  DVD  player,  and  could  be  a
source of danger!

Mechanical de-coupling

The  area  on  which  you  set  up  your  high-quality  Hi-Fi
equipment,  and  the  actual  surface  on  which  it  stands,
have an influence on the achievable sound quality which
should not be under-estimated. The surface should be as
heavy,  stable,  hard  and  flat  as  possible.  The  unit  is
supplied with the newly developed 

 conical absorber

feet.  These  feet  feature  internal  damping  characteristics
which de-couple the player extremely effectively from the
base surface.

Note:

The 

  absorber  cones  can  be  screwed  in  or  out  to

compensate exactly for any unevenness of the base sur-
face.

The  unit  must  be  adjusted  carefully  so  that  it  is  exactly
horizontal  in  all  directions.  All  the  feet  must  make  firm
contact with the base surface; the unit must not 

'

wobble

'

!

Содержание DVD 1240 R

Страница 1: ...V1 0 Order No 9103 0362 USER MANUAL DVD 1240 R DVD 1240 R HD...

Страница 2: ...2...

Страница 3: ...ma picture quality All the unique features of DVD video are available such as selecting the sound channel and sub title language and choosing different angles of view also depending on DVD type The un...

Страница 4: ...your device Rear panel CLASS 1 LASER PRODUCT On the inner protective housing of the DVD mechanism CAUTION VISIBLE AND INVISIBLE LASER RADIATION WHEN OPEN AVOID EXPOSURE TO BEAM VORSICHT SICHTBARE UND...

Страница 5: ...Audio Setup 20 Video Setup 21 Basic settings Preference page 22 Installation using the unit for the first time Back panel connections 24 Setting up the DVD player 26 Wiring 27 Wiring diagrams DVD 1240...

Страница 6: ...quency video signals can not influence the susceptible audio signals Switching off the video section is recommended for highest possible audio reproduction quality This button switches the phase of th...

Страница 7: ...t to the unit so that you can see the new setting Selection of the REPEAT mode see chapter Operation of the DVD 1240 R HD A short keypress opens the disc menu of a video DVD see chapter Menu Functions...

Страница 8: ...CD is played MCH Glows when a multi channel SACD is present this indicator is leit if the video output is switched OFF pure high quality AUDIO Mode P indicates that the P scan mode progressive scan is...

Страница 9: ...ters of the DVD 1240 R HD and the short direct and audiophile signal paths of your stereo amplifier To play back CDs and SACDs in ProLogic or NEO 6 surround mode choose CD as source and switch your sy...

Страница 10: ...l of the DVD 1240 R HD are marked All other buttons are without function for the DVD 1240 R HD The DVD 1240 R HD receives remote control commands from the RLINK Master device amplifier or surroundrece...

Страница 11: ...CH SCAN long press Switches to cursor control see Manual cursor control MP3 CD Start playback brief press Interrupt playback Next individual DVD frame long press Slow motion 1 2 1 4 1 8 speed brief pr...

Страница 12: ...ack can be continued at the position where the playback was interrupted before Please press the button while the RESUME icon is displayed on the screen Note Some discs suppress the resume function in...

Страница 13: ...ilable CD R RW discs or from comercially available CDs A MP3 CD may contain up to 32 album files directories with music titles To select an album file use buttons on the front panel or the buttons of...

Страница 14: ...lso play pure multi channel SACDs in which case they are reproduced as a two channel down mix This means that all sound information including that for the rear channels is reproduced via the stereo lo...

Страница 15: ...e instructions given on the screen The disk menu is opened by a brief press of the button on the front panel or the button of the remote control The Setup Menu is intended for the control of special f...

Страница 16: ...closing the menu using the F1 remote control handset Press the blue rocker to call up the Disc Menu Press the blue rocker again to leave the menu Manual CURSOR control The CURSOR buttons on the remot...

Страница 17: ...17 Setup menu Menu overview...

Страница 18: ...own desired sequence by programming the order of the tracks to be played In this menu point you can create your own playback program for the disc in the drawer You can program the desired tracks in t...

Страница 19: ...played back through a conventional stereo amplifier provides an artificial impression of spatial sound in your living room Note The setup facilities LT RT and V Surr Virtual Surround are only availab...

Страница 20: ...f processing Dolby and dts digital audio signals LPCM output At this point you can activate the 96 kHz setting for the digital output If you activate the 96 kHz output audio signals from DVDs featurin...

Страница 21: ...ormat which you select must be available on the disc If this is not the case the selected picture format settings will have no effect on the picture during playback 4 3 Pan Scan This produces a pictur...

Страница 22: ...and CD discs do not feature this categorisation and the same applies to most illegal DVD discs Some DVDs do not feature categorisation even though the film category is printed on the disc sleeve In t...

Страница 23: ...s chapter describes all the matters of fundamental importance for setting up and operating your DVD player This information is not relevant to your daily handling of the system but should still be rea...

Страница 24: ...ystem Both sockets are wired identically either of the two sockets can serve as input while the other can then be used as output to the next RLINK device RLINK 2nd ADDR Toggle switch for the selection...

Страница 25: ...log switch determines the type of signal present at the YUV analogue output Schalter switches 6 OFF YUV ON RGB YUV video output This video output deliveres high quality YUV P Pb Pr output signals Use...

Страница 26: ...mplifier or any other device that can become hot during operation Either place the device at the side of other equipment or on top of cool devices like tuners pre amps etc R series devices dissipate s...

Страница 27: ...r problems when using the player for the first time please note that they often have simple causes that are equally simple to correct Read the chapter entitled Trouble shooting in these instructions L...

Страница 28: ...e also Back Panel Connections RLINK 2nd ADDR 3 S Video 2channel audio is needed for VCR recordings and Zone 2 4 additional YUV ComponentVideo cable for Video monitors projectors with component video i...

Страница 29: ...ed if the DVD1240R shall also be used as audio CD player see also Back Panel Connections RLINK 2nd ADDR Note Please make the following assignments in the configuration menus of the DD 1535 R Audio Inp...

Страница 30: ...t if you wish to remote control the player In this configuration the DVD 1240 R HD is switched ON with the source button The switch RLINK 2 nd ADDR must be set to position CD Wiring diagram 3 DVD 1240...

Страница 31: ...vessels containing fluids on top of the case Do not exert undue force on the mains connectors Caution The mains button is not a mains isolation switch Even when the green LED is not glowing parts of...

Страница 32: ...n and European regulations It is approved for use as stipulated within the EC By attaching the symbol to the machine declares its conformity with the EC directives 89 336 EEC amended by 91 263 EEC and...

Страница 33: ...ient access to any title or chapter by means of the on screen control bar Important notes The actual behaviour of any particular DVD is determined by the disc manufacturer Different DVDs may vary cons...

Страница 34: ...our multi norm TV set Speech barriers are a thing of the past thanks to sound tracks in up to eight languages and sub titles if present on the disc in up to 32 languages And whether you watch DVDs on...

Страница 35: ...tandard FIR filter suppresses background noise more effectively and is primarily recommended for vocal and chamber music The DVD 1240 R HD therefore provides a means of matching the system s reproduct...

Страница 36: ...system is about 8 metres Position the remote control receiver so that it is not subjected to direct sunlight or excessively bright lighting Fluorescent lamps and energy saving bulbs are powerful sourc...

Страница 37: ...ame picture name PAL NTSC as the disc or cannot process its picture norm Remedy 1 chose PAL NTSC according to your TV set in the menu Preferences Remedy 2 Use a multi norm TV set These sets automatica...

Страница 38: ...decoder or surround receiver the DVD 1240 R HD also responds Cause E 2000 connected to the DVD 1240 R HD Remedy Connect the E 2000 to the pre amplifier integrated amplifier or receiver Problem MP3 CD...

Страница 39: ...Hz 44 kHz 2 Hz 22 kHz 2 Hz 44 kHz Total harmonic distortion Intermodulation 0 002 Effective system dynamics CD SACD DVD V DVD 96 24 96 dB 105 dB 100 dB 105 dB Signal noise ratio 110 dB Channel separa...

Страница 40: ...elektroakustik GmbH Co KG Herford Germany...

Отзывы: