background image

8-11

Applications: Mail

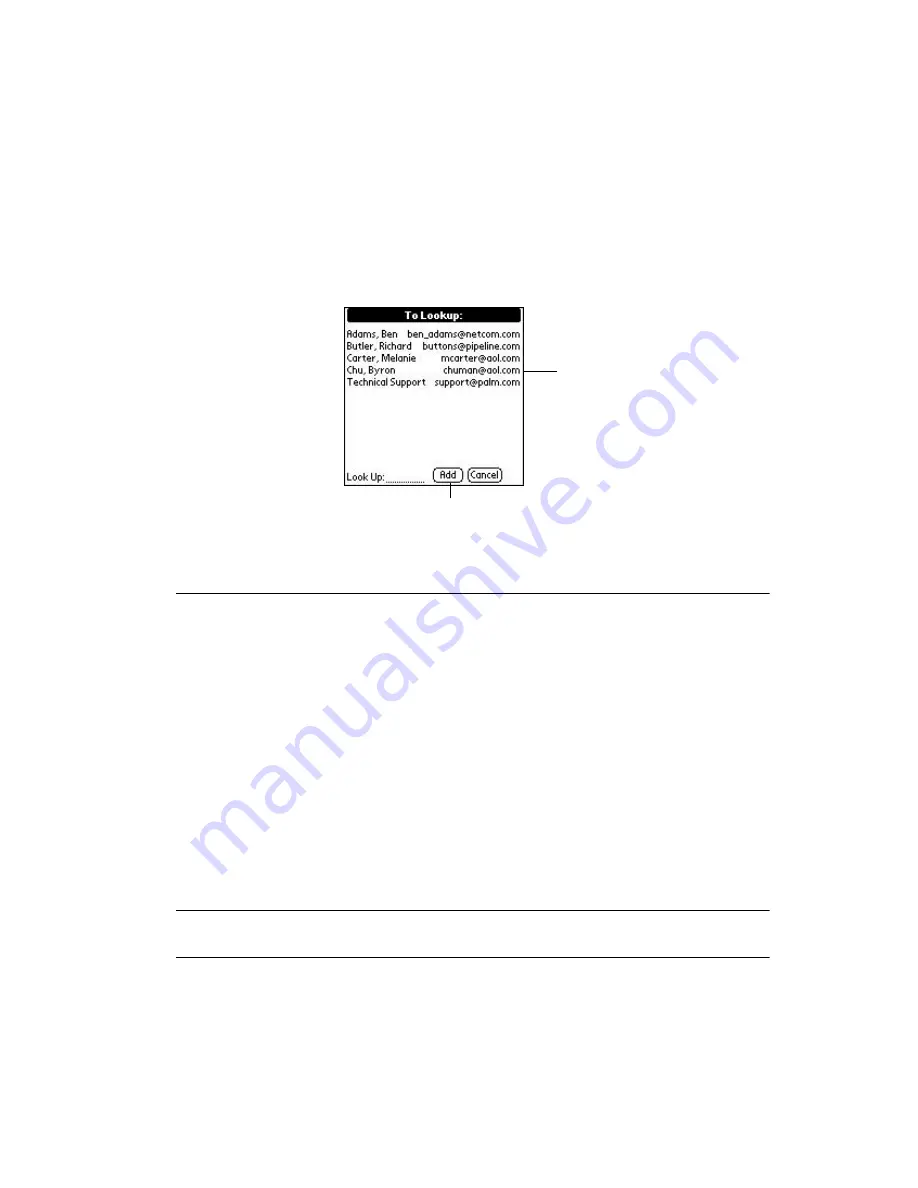
starts with those two letters. For example, writing a “c” might scroll to “Carter,” and 
writing “ch” might scroll farther to “chu.”

6.

Tap an address to select it, then tap the 

Add

 button to enter the address in the field.

7.

Tape 

Done

 to return to the New Message screen.

Adding Message Details

Before you send your message, you can attach additional attributes (called message 
details) to your message, such as a blind carbon copy, or flagging the message as high-
priority. These features are dependent on the desktop e-mail application you use. If your e-
mail application does not support the message detail you select, your SPT 1550 terminal 
cannot attach that attribute to your message.

Note:

The Priority and BCC settings are valid only for the current message 
and must be set with each subsequent message you create.

Priority

Flags a message as high, normal or low priority.

BCC

Creates a blind carbon copy field in the New Message screen. 

Signature

Attaches previously defined text as a signature block. Refer to 

Adding a 

Signature to Your Message

 on page 8-13 for details.

Confirm 
Read

Requests a confirmation telling you when the message was read.

Confirm 
Delivery

Requests a confirmation telling you when the message was delivered.

Tap here to enter address in field

Tap to select

Содержание ORG SPT 1550

Страница 1: ...SPT 1550 Product Reference Guide...

Страница 2: ...2 72 51531 01 Revision A March 2001 Symbol Technologies Inc One Symbol Plaza Holtsville N Y 11742 1300 SPT 1550 Product Reference Guide...

Страница 3: ...SPT 1550 Product Reference Guide 72 51531 01 Revision A March 2001...

Страница 4: ...e work from a licensed program or use a licensed program in a network without written permission from Symbol The user agrees to maintain Symbol s copyright notice on the licensed programs delivered he...

Страница 5: ...1 Introduction 1 3 Unpacking the Terminal 1 3 Parts of the SPT 1550 1 4 Installing the Batteries 1 6 Starting the SPT 1550 1 7 Recalibrating the Screen 1 10 Using the Backlight Feature 1 10 Adjusting...

Страница 6: ...ed Characters 2 14 Writing Accented Characters 2 14 Accent Strokes 2 15 Additional Non English Characters 2 15 Navigation Strokes 2 15 Graffiti ShortCuts 2 16 Using the On Screen Keyboard 2 17 Using A...

Страница 7: ...pter Contents 5 1 Introduction 5 3 Opening the Calculator 5 3 Using the Calculator Screen 5 3 Special Calculator Buttons 5 3 Calculator Menu Commands 5 4 Recent Calculations 5 5 Chapter 6 Applications...

Страница 8: ...net Cradle for HotSync 7 16 Installing NetSync 7 16 Creating a CRD1500 4000E Modem Sync Service 7 17 Configuring the Remote Host PC for Use with the Ethernet Cradle 7 18 The Ethernet HotSync Process 7...

Страница 9: ...9 3 Reviewing Memos 9 5 Arranging Memos 9 5 Manually Arranging the Memo List 9 6 Choosing a Memo Category 9 6 Marking a Private Memo 9 6 Deleting a Memo 9 7 Memo Pad Menu Commands 9 8 Record Menu 9 8...

Страница 10: ...y and Secondary DNS 10 22 IP Address 10 23 Creating a Login Script 10 24 Deleting a Service Template 10 26 Network Preferences Menu Commands 10 27 Service Menu 10 27 Options Menu 10 27 TCP IP Troubles...

Страница 11: ...1550 13 3 SScan Application 13 3 SScan Menu Commands 13 3 Demo Scan Application 13 4 Demo Scan Menu Options 13 6 Scanning Bar Codes Using Demo Scan 13 7 Barcode Application 13 7 Scanning Problems 13...

Страница 12: ...r 16 Maintaining Your SPT 1550 Terminal Chapter Contents 16 1 Introduction 16 3 Caring for Your SPT 1550 Terminal 16 3 Battery Considerations 16 3 Resetting Your SPT 1550 Terminal 16 4 Performing a So...

Страница 13: ...your SPT 1550 terminal for the first time and set up your Symbol PalmTerminal SPT Desktop software Chapter 2 Working with Your SPT 1550 Terminal explains how to open applications use the on screen key...

Страница 14: ...Do List describes the To Do List application which is a convenient place to create reminders and prioritize the things that you have to do Chapter 13 Applications Laser Scanner covers laser scanner a...

Страница 15: ...quential steps i e those that describe step by step procedures Tap refers to selecting an option on the display using the stylus Service Information If you have a problem with the SPT 1550 equipment c...

Страница 16: ...4 208 945 7529 Outside UK Asia Pacific Symbol Technologies Asia Inc 230 Victoria Street 04 05 Bugis Junction Office Tower Singapore 188024 337 6588 Inside Singapore 65 337 6588 Outside Singapore Austr...

Страница 17: ...0 Trezzano S N Navigilo Milano Italy 2 484441 Inside Italy 39 02 484441 Outside Italy Latin America Sales Support 7900 Glades Road Suite 340 Boca Raton Florida 33434 USA 1 800 347 0178 Inside United S...

Страница 18: ...s been subjected to unusual physical or electrical stress misuse abuse power shortage negligence or accident or iv which has been used other than in accordance with the product operating and handling...

Страница 19: ...the exchange Customer accepts full responsibility for its software and data including the appropriate backup thereof Repair or replacement of a product during warranty will not extend the original wa...

Страница 20: ...xviii SPT 1550 Product Reference Guide...

Страница 21: ...ting the SPT 1550 1 7 Recalibrating the Screen 1 10 Using the Backlight Feature 1 10 Adjusting Contrast 1 10 Using the SPT 1550 1 11 Writing with the Stylus 1 11 Using the Onscreen Keyboard 1 11 Icon...

Страница 22: ...1 2 SPT 1550 Product Reference Guide...

Страница 23: ...mbol Palm Terminal Desktop software Unpacking the Terminal Carefully remove all protective material from around the terminal and save the shipping container for later storage and shipping Verify that...

Страница 24: ...arts of the SPT 1550 Left Scan Trigger Decode LED Scroll Button Reset Button Battery Door Serial Port IR Port Scan Window Right Scan Trigger Touchscreen Display Graffiti Writing Area Application Butto...

Страница 25: ...ion above the viewing area Power backlight control button Turns your SPT 1550 terminal on or off and controls the backlight feature If your SPT 1550 terminal is turned off pressing the power button tu...

Страница 26: ...of the batteries When correctly installed the clips in the battery compartment secure the batteries in place 3 Insert the battery door back into place so that it is flush with the back of the SPT 155...

Страница 27: ...when re placing the battery door make sure the door is aligned with the slots on the back of your SPT 1550 terminal and that the batteries are firmly seated in the battery compartment Starting the SP...

Страница 28: ...setup screen prompts you to set your country time and date Tap the time open the Set Time screen a Tap the up or down arrows to change the number for the hour b Tap the minutes numbers and then tap t...

Страница 29: ...t month d Tap the current date to set the date and close the Set Date screen 4 When finished tap Next to continue to the fourth setup screen 5 Tap Next if you d like to learn about how to enter data o...

Страница 30: ...t down for about two seconds Release the button when the backlight turns on To turn off the backlight feature press and hold the green power button for about two seconds The backlight feature also tur...

Страница 31: ...ntly recognized as letters or numbers Refer to Writing Graffiti with the Stylus on page 2 6 for more information Using the Onscreen Keyboard You can activate the on screen keyboard any time you need t...

Страница 32: ...the SPT 1550 terminal cradle into the serial communications port on your computer Note You may require a 9 pin to 25 pin adapter Figure 1 2 Connecting the Cradle Applications Icon Tap to exit the cur...

Страница 33: ...th your SPT 1550 terminal applications on your computer The Symbol Palm Terminal Desktop software duplicates the Date Book Address Book To Do List and Memo Pad applications on your SPT 1550 terminal s...

Страница 34: ...SPT 1550 terminal in the cradle remove it during software installation Exit all programs including those that run automatically at startup such as fax software virus protection software screen saver s...

Страница 35: ...Pad 2 6 Writing Letters With Graffiti 2 7 The Graffiti Alphabet 2 11 Writing Numbers With Graffiti 2 12 Writing Punctuation Marks With Graffiti 2 13 Writing Symbols and Extended Characters 2 14 Writi...

Страница 36: ...ce Guide Using Categories in Lists 2 25 Defining a New Category 2 26 Renaming Categories 2 27 Attaching Notes 2 29 Marking Private Entries 2 30 Beaming Information to Other SPT 1550 Terminals 2 30 Sca...

Страница 37: ...ttons on the front panel of your SPT 1550 terminal Tip The buttons on the front panel provide instant access to the selected application You don t need to turn on your SPT 1550 terminal first The Appl...

Страница 38: ...uncher 2 Tap the icon to open the Applications Launcher menus 3 Tap Preferences from the Options menu to open the Preferences screen 4 Tap the View By pick list and select the List option Note Tap the...

Страница 39: ...hat display on the screen You can assign your applications to categories and then choose to display a single category or all your applications To display applications by category 1 Tap the icon on the...

Страница 40: ...tering text and numbers Graffiti is a system where simple strokes you write with the stylus are instantly recognized as letters or numbers This section explains the basics of Graffiti and how to make...

Страница 41: ...i Most people find they can enter text quickly and accurately with only minutes of practice Graffiti includes any character you can type on a standard keyboard The Graffiti strokes closely resemble th...

Страница 42: ...SPT 1550 terminal recognizes and displays the text character immediately The Graffiti writing area is divided into two parts one for writing the letters of the alphabet and one for writing numbers The...

Страница 43: ...aw the dot shape itself The heavy dot is there to show the starting point of the stroke 5 Lift the stylus from the screen at the end of the stroke shape That s all there is to it When you lift the sty...

Страница 44: ...e Graffiti writing area To delete characters simply set the insertion point to the right of the character you want to delete and make the backspace stroke a line from right to left in the Graffiti wri...

Страница 45: ...2 11 Working with Your SPT 1550 Terminal The Graffiti Alphabet Letter Strokes Letter Strokes A N B O C P D Q E R F S G T H U I V J W K X L Y M Z Space Back Space...

Страница 46: ...rd as a capital letter use the Caps Shift stroke Tip When Caps Shift is active an up arrow symbol displays in the lower right corner of the SPT 1550 terminal screen To enter only capital letters Caps...

Страница 47: ...arks begin with a single tap on the Graffiti writing area When you make this tap you activate Punctuation Shift and a dot displays to show it is active The next stroke you make with the stylus creates...

Страница 48: ...extended characters begin with the stroke in the Graffiti writing area of your SPT 1550 When the Symbol Shift is active a slanted shift symbol displays in the lower right corner of the screen The nex...

Страница 49: ...on English Characters You can write the following characters in the lowercase alphabet mode without any special punctuation or shifting Note You must write these non English characters in the left sid...

Страница 50: ...For example you might create a ShortCut for your name or for the header of a memo Refer to ShortCuts Preferences on page 10 29 to learn about creating your own ShortCuts To use a ShortCut draw the Sh...

Страница 51: ...me you need to enter text or numbers on your SPT 1550 terminal as an alternative to Graffiti Note that you cannot enter Graffiti characters while using the on screen keyboard To use the on screen keyb...

Страница 52: ...nal characters You can switch among the three dialogs at any time to enter the exact text you need After you finish tap the Done button to close the on screen keyboard and place the text in your SPT 1...

Страница 53: ...me function as pressing the upper and lower portions of the scroll button on the front panel of the SPT 1550 terminal Pick list Tap the arrow to display a list of choices and then tap an item on the l...

Страница 54: ...ction other menu commands are described in the chapters about each SPT 1550 terminal application To activate the menus 1 Open an SPT 1550 terminal application such as the Memo Pad as described earlier...

Страница 55: ...just above the Graffiti writing area to indicate that you are in Command mode For example to activate the Select All command in the previous diagram draw the Command stroke followed by the letter s No...

Страница 56: ...terminal You can paste the copied text into another area of the application or into a different application Paste Inserts the text that you cut or copied at the selected point in your SPT 1550 termin...

Страница 57: ...can even choose a different font style for each application that supports this feature To change the font style 1 Open a SPT 1550 terminal application 2 Tap the icon to open the menus at the top of t...

Страница 58: ...ersonal category is displayed the record is assigned to the Personal category If a record is created while the All category is displayed it will be designated as Unfiled which means it does not belong...

Страница 59: ...ap the category that you want to assign to the entry 5 Tap the OK button to close the Details screen and activate your setting Using Categories in Lists After you assign categories to your entries you...

Страница 60: ...1550 terminal comes with two default categories Business and Personal In addition the Address Book contains the QuickList category designed as a quick reference of commonly used names addresses and p...

Страница 61: ...it Categories screen 5 Tap the OK button to close the first Edit Categories screen and view your new category in the pick list Note You can edit any of your records and file them in the new categories...

Страница 62: ...that you want to assign to the category and tap the OK button to close the Edit Categories screen 5 Tap the OK button to close the first Edit Categories screen and view the new name in the pick list...

Страница 63: ...ere you want to add a note 2 Tap the Details button to open the Details screen Note In the Address Book only the Edit button is used 3 Tap the Note button to open the Note screen 4 Write Graffiti char...

Страница 64: ...tion to Other SPT 1550 Terminals Your SPT 1550 terminal is equipped with an IR infrared port that can beam information to other compatible printers and terminals The IR port is located at the top of t...

Страница 65: ...5 inches apart and the path between the two devices must be clear of obstacles 5 Wait for the Beam Status screen to indicate that the transfer is complete before you continue working on your SPT 1550...

Страница 66: ...th the SPT 1550 The SPT 1550 has an integrated laser bar code scanner which allows you to collect data by scanning bar codes To scan bar codes with the SPT 1550 1 Start your scanning application 2 Aim...

Страница 67: ...3 1 Chapter 3 Finding Information With Your SPT 1550 Terminal Chapter Contents Introduction 3 3 Using the Find Command 3 3 Using Phone Lookup 3 4 Phone Lookup Tips 3 5...

Страница 68: ...3 2 SPT 1550 Product Reference Guide...

Страница 69: ...nt to find a particular name but aren t sure where you stored it The Find command immediately lists all instances of that name and enables you to jump directly to the name To use the Find command 1 Ta...

Страница 70: ...ou can search for and display phone numbers with the Phone Lookup menu command After you find a phone number you can paste it directly into an SPT 1550 terminal application For example if you want to...

Страница 71: ...ffiti Command stroke L to activate the Phone Lookup feature You can use Phone Lookup while entering text For example to insert the full name and phone number for someone with the last name Williams wr...

Страница 72: ...3 6 SPT 1550 Product Reference Guide...

Страница 73: ...4 3 Address Book Entries 4 4 Creating an Address Book Entry 4 4 Deleting an Address Book Entry 4 6 Duplicating an Address Book Entry 4 6 Working with Address Book Entries 4 6 Beaming Address Entries t...

Страница 74: ...4 2 SPT 1550 Product Reference Guide...

Страница 75: ...hich phone numbers appear in the Address List screen for each Address Book entry Attach a note to each Address Book entry where you can enter additional information about the entry Assign categories t...

Страница 76: ...puter and download the entries to your SPT 1550 terminal with the next HotSync operation Refer to Chapter 7 Applications HotSync for details Note The Symbol Palm Terminal Desktop software also has dat...

Страница 77: ...the other information that you want to include in this Address Book entry 7 Tap the arrows to move to the next page of information 8 After you finish entering information tap the Done button to return...

Страница 78: ...e people from a single organization When you duplicate an entry the word Copy displays next to the name in the First Name field To duplicate an entry 1 Tap the name you want to duplicate 2 Perform one...

Страница 79: ...isplay the Address List screen 2 Enter the first letter of the name you want to find Note The letter displays on the Look Up line and the list scrolls to the first entry that begins with that letter I...

Страница 80: ...ing the Categories pick list in the Details screen Refer to Using Categories on page 2 24 for a complete description of categories To assign a category to an Address Book entry 1 Tap the Address Book...

Страница 81: ...p the OK button to display the Address List screen with your new setting Note Entries with no company name sort by last name Editing Address Entry Details The Address Entry Details screen provides a v...

Страница 82: ...riend Note For more on the IR port refer to Beaming Information to Other SPT 1550 Terminals on page 2 30 To select a business card 1 Create an Address Book entry containing the information you want on...

Страница 83: ...try Refer to Pen Preferences on page 10 5 for details To beam the current category 1 Display the Address List screen 2 Tap the pick list in the upper right corner and tap the category you want to beam...

Страница 84: ...n create a Note for the current entry Delete Note Opens an alert screen prompting you to confirm deletion of the Note attached to the entry Tap the OK button to delete the Note or tap the Cancel butto...

Страница 85: ...the Address Book Preferences screen Remember last category Determines how the Address Book displays when you return from another Palm application Memo Pad To Do List etc If you select this check box...

Страница 86: ...e custom field names Each Address Book entry contains four custom fields that you can rename Any changes you make to the names of the custom fields display in all of your Address Book entries About Ad...

Страница 87: ...pter 5 Applications Calculator Chapter Contents Introduction 5 3 Opening the Calculator 5 3 Using the Calculator Screen 5 3 Special Calculator Buttons 5 3 Calculator Menu Commands 5 4 Recent Calculati...

Страница 88: ...5 2 SPT 1550 Product Reference Guide...

Страница 89: ...ms general mathematical functions including addition subtraction multiplication and division To use the Calculator screen tap the Calculator buttons that appear on the screen Special Calculator Button...

Страница 90: ...a new calculation Toggles the current number between a negative and positive value If you want to enter a negative number enter the number first and then press the button Places the current number int...

Страница 91: ...ly useful for confirming a series of chain calculations To display the Recent Calculations 1 Tap the icon to open the Calculator menus 2 Tap Recent Calculations from the Options menu to display the Re...

Страница 92: ...5 6 SPT 1550 Product Reference Guide...

Страница 93: ...Event 6 4 Rescheduling an Event 6 8 Setting an Alarm for an Event 6 8 Scheduling Repeating Events 6 10 Marking a Private Event 6 12 Deleting an Event 6 12 Changing the Date Book View 6 13 Working in...

Страница 94: ...6 2 SPT 1550 Product Reference Guide...

Страница 95: ...uling overlaps or conflicts They can also be displayed by Day Month or Agenda Display a monthly calendar to quickly spot days where you have morning lunch or afternoon appointments Set an alarm to sou...

Страница 96: ...ude events in your Date Book that occur on a particular date but have no specific start or end times such as birthdays holidays and anniversaries These are referred to as untimed events Untimed events...

Страница 97: ...x and then tap the time columns to set the End Time 6 Tap the OK button to confirm your selection and close the Set Time screen 7 Tap a blank area of the screen to de select the event A vertical line...

Страница 98: ...ss the scroll button on the front panel of the SPT 1550 terminal to scroll to another day Press the upper half of the button to move to the previous day or the lower half to move to the next day 2 Aft...

Страница 99: ...Set Time screen 3 Tap OK so that no start or end times are defined for the new event Note You can also create a new untimed event by making sure no event is selected then writing letters in the Graff...

Страница 100: ...earlier in this chapter 4 To change the date tap the Date box and select the new date as described earlier in this chapter 5 Tap the OK button to close the Event Details screen and return to the Date...

Страница 101: ...triggers at the specified period of minutes hours or days before midnight beginning of the day of the untimed event No audible alarm sounds for an untimed event instead the reminder message displays o...

Страница 102: ...uld be a weekly guitar lesson that falls on the same day of the week and the same time of day After you enter a repeating event a icon displays to the far right of the event To schedule a repeating ev...

Страница 103: ...t interval e g daily to weekly of a repeating event past occurrences prior to the day on which you change the setting are left alone and your SPT 1550 terminal creates a new repeating event If you cha...

Страница 104: ...g an Event There are three ways to delete an event from the Date Book application simply delete the text of the event use the Menu Commands described in the Record Menu section later in this chapter o...

Страница 105: ...w seconds the title bar reverts to show the date Working in Week View The Week View shows a chart of your events for an entire week This view lets you quickly review your appointments and available ti...

Страница 106: ...ew to move directly to that day without selecting an event The Week View shows the time span defined by the Start Time and End Time in the Date Book Preferences settings If you have an event before or...

Страница 107: ...View displays bracketed bars to the left of the conflicting times Working in Month View The Month View screen shows which days have events scheduled Dots and lines in the Month View indicate events r...

Страница 108: ...the Month View Refer to Options Menu later in this chapter Working in Agenda View The Agenda view shows your appointments untimed events and To Do List items in a single screen You can also use the Ag...

Страница 109: ...delete the current event You must tap an event before you use the Delete Event command Tap the OK button to delete the event from your SPT 1550 terminal or tap the Cancel button to close the alert sc...

Страница 110: ...default setting for the Purge alert is to Save archive copy on PC This setting removes events from the Date Book but retains copies and transfers them to an archive file on your computer during the n...

Страница 111: ...t and end times for the Date Book screens If the time slots you select do not fit on one screen you can tap the arrows to scroll up and down Alarm Preset Automatically sets an alarm for each new event...

Страница 112: ...for each event but blank time slots toward the bottom of the screen disappear to minimize scrolling Month View settings These check boxes apply to the Month View of the Date Book You can activate any...

Страница 113: ...k 7 11 Conducting a HotSync Operation via Modem 7 12 Preparing Your Computer for a Modem HotSync Operation 7 12 Preparing Your SPT 1550 Terminal for a Modem HotSync Operation 7 13 Selecting the Condui...

Страница 114: ...7 2 SPT 1550 Product Reference Guide...

Страница 115: ...synchronizes only the needed portions of files thus reducing synchronization time You can synchronize your data by connecting your SPT 1550 terminal directly to your computer with either the single o...

Страница 116: ...click the Symbol Palm Terminal Desktop icon on the Windows desktop or select Symbol Palm Terminal Desktop from the Start menu to start the Symbol Palm Terminal Desktop software 2 Click the icon in th...

Страница 117: ...on on the front of the SPT 1500 cradle and open the New User dialog 6 Enter a user name for your SPT 1550 terminal and click the OK button to open the HotSync Progress dialog and start the synchroniza...

Страница 118: ...al in the cradle 2 Start the HotSync Manager 3 Press the button on the front of the cradle to start the HotSync process 4 Wait for the Symbol Palm Terminal Desktop to display a message indicating that...

Страница 119: ...to the Startup folder and constantly monitors the communication port for SPT 1550 terminal synchronization requests With this option the HotSync Manager conducts synchronizations even when the Symbol...

Страница 120: ...chronization charging cable Note Your SPT 1550 terminal cannot share this port with an internal modem or other device If you have trouble determining the correct serial port refer to Troubleshooting o...

Страница 121: ...he Windows Control Panel Speed Determines the speed at which data is transferred We suggest you try the As Fast As Possible rate first and adjust downward if you experience problems This setting allow...

Страница 122: ...don t use it In addition to the standard application conduits the Symbol PalmTerminal Desktop includes System and Install conduits The System conduit backs up the system information stored in your SP...

Страница 123: ...nc Action dialog and activate your settings Using File Link The File Link feature enables you to synchronize the Address Book and Memo Pad information on your SPT 1550 terminal with a separate externa...

Страница 124: ...able The cradle is not used for a modem HotSync operation The Symbol Palm Terminal Desktop software configured for use with a modem as described in Selecting HotSync Setup Options on page 7 6 Preparin...

Страница 125: ...pick list Note This will vary dependent upon the SPT terminal you are using SPT 1733 terminals use Merlin SPT 1734 terminals use GSM modem and SPT 174x terminals use Spectrum24 4 Tap Enter Phone to op...

Страница 126: ...to open the HotSync menus 11 Tap Modem Sync Preferences from the Options menu to display the Modem Sync Preferences screen 12 Select Direct to Modem 13 Click OK Selecting the Conduits for a Modem Hot...

Страница 127: ...c Operation via Modem To perform a Modem HotSync operation Note If you are not using a PalmPilot modem you need a special modem cable and an external modem Connect one end of the special modem cable t...

Страница 128: ...SPT 1550 terminals and is available at http www palm com custsupp downloads netsync html Follow the instructions to install the network HotSync software on your host PC then perform a HotSync to inst...

Страница 129: ...SPT 1550 terminal communicates with the CRD1500 4000E via a Modem Sync The Modem Sync offers many options which must be configured for use with the CRD1500 4000E Create a separate CRD1500 4000E netwo...

Страница 130: ...single host database additional software available from Symbol is required Terminals inserted into daisy chained cradles are HotSync d in a round robin fashion simultaneously with any HotSyncs from lo...

Страница 131: ...8 7 Looking Up an Address 8 10 Adding Message Details 8 11 Setting a Priority 8 12 Sending a Blind Carbon Copy 8 12 Adding a Signature to Your Message 8 13 Sending Messages 8 14 Editing an Unsent Mes...

Страница 132: ...8 2 SPT 1550 Product Reference Guide Defining Filter Strings 8 24 High Priority Messages 8 26 Truncating Messages 8 26 Mail Menu Commands 8 27 Message Menu 8 28 Options Menu 8 29...

Страница 133: ...hat you can complete later Create simple or complex filters which allow you to decide the type of e mail that your SPT 1550 terminal retrieves from your desktop e mail application Setting Up Mail on t...

Страница 134: ...heck box Synchronize the files Synchronizes the mail on your SPT 1550 terminal and your desktop e mail application Desktop overwrites handheld Replaces the mail on your SPT 1550 terminal with the mail...

Страница 135: ...utton to confirm your changes and close the Change HotSync Action dialog Synchronizing Mail with Your E Mail Application After you have enabled and configured Mail perform a HotSync operation to synch...

Страница 136: ...close the message and return to the Message List Message Fonts You can modify the way messages display by changing the font text style Refer to Choosing Fonts on page 2 23 for details Displaying Full...

Страница 137: ...3 To display the abbreviated header tap the Abbreviated Header icon Creating Messages Create messages with your SPT 1550 terminal the same way you create messages with your desktop e mail application...

Страница 138: ...ew on the Message menu 2 Use the on screen keyboard or Graffiti character strokes to enter the e mail address of the recipient The cursor indicates where new text will display Note Enter the address a...

Страница 139: ...text To reply to a message 1 Tap a message in the Message List to display it on the screen 2 Tap the Reply button to open the Reply Options screen 3 Select who you want to receive the reply only the S...

Страница 140: ...ddress Book To look up an address 1 On the New Message screen tap either the To or CC field and expand it 2 Enter a few letters of the address you want to find 3 Tap the Lookup button 4 If the letters...

Страница 141: ...ou use If your e mail application does not support the message detail you select your SPT 1550 terminal cannot attach that attribute to your message Note The Priority and BCC settings are valid only f...

Страница 142: ...button to confirm your selection and return to the New Message screen Note Your SPT 1550 terminal can flag messages with a specific priority only if your desktop e mail application supports this featu...

Страница 143: ...or your company such as your name address phone and fax numbers and any other text you want to include Adding a signature to your message is a two part process first you must create your signature th...

Страница 144: ...irm your selection and return to the New Message screen To receive a confirmation when your message is delivered 1 Tap the Details button in the New Message screen to open the Message Details screen 2...

Страница 145: ...essage and resend it save it as a draft or cancel it To retrieve a message 1 In the Message List screen tap Outbox from the pick list in the upper right corner to display the messages contained in the...

Страница 146: ...the message If you tap the Yes button your SPT 1550 terminal saves a draft of your message To save a message as a draft 1 Create a message in the New Message screen 2 Tap the icon to open the Mail me...

Страница 147: ...Filed folder 1 In the Message List screen tap Filed from the pick list in the upper right corner to display the contents of the Filed folder 2 Tap the message you want to restore 3 Tap the Edit butto...

Страница 148: ...created from the Deleted folder 1 In the Message List screen tap Deleted from the pick list in the upper right corner to display the contents of the Deleted folder 2 Tap the message you want to resto...

Страница 149: ...folder you select Folders provide an efficient way to manage the mail you send and receive Tap the pick list in the upper right corner to open the following list of folders Inbox Contains the mail fro...

Страница 150: ...Sorting the Message List You can sort the Message List by the date it was sent by sender or by subject Note High priority messages always display first no matter how you sort your message list To sor...

Страница 151: ...e synchronization Once defined your SPT 1550 terminal determines if synchronization is occurring locally or remotely and uses the appropriate HotSync Options settings To activate the HotSync Options s...

Страница 152: ...in the To From and Subject header fields to single out certain messages All During synchronization all messages in your desktop e mail Inbox synchronize with your SPT 1550 terminal and all messages i...

Страница 153: ...tap the pick list in the middle of the HotSync Options screen and select one of the following settings Ignore Messages Containing Tells your SPT 1550 terminal to exclude the messages that meet the def...

Страница 154: ...messages from John Smith jsmith aol com or Jack Jones jjones aol com concerning the Apollo Project You would create the following filter strings To field filter string jsmith aol com jjones aol com Su...

Страница 155: ...exceeds the length of the field tap the name of the field to display the Notes screen for that header field For more information about header field Notes screens refer to Creating Messages on page 8 7...

Страница 156: ...y 3 Tap OK to confirm your selection and close the HotSync Options screen Note This setting is applicable only if your e mail application has the capacity to flag high priority messages Truncating Mes...

Страница 157: ...truncation value you will have more room on your SPT 1550 terminal to store messages 3 Tap OK to confirm your selection and return to the HotSync Options screen Mail Menu Commands The Mail application...

Страница 158: ...form a HotSync operation which permanently removes deleted messages Purge Deleted Empties purges the contents of the Deleted folder Your SPT 1550 terminal stores deleted messages in the Deleted folder...

Страница 159: ...elect different ways to filter messages synchronized between your desktop e mail application and your SPT 1550 terminal You can create simple or complex filters to control the type of messages downloa...

Страница 160: ...8 30 SPT 1550 Product Reference Guide...

Страница 161: ...9 3 Opening the Memo Pad 9 3 Creating a New Memo 9 3 Reviewing Memos 9 5 Arranging Memos 9 5 Manually Arranging the Memo List 9 6 Choosing a Memo Category 9 6 Marking a Private Memo 9 6 Deleting a Mem...

Страница 162: ...9 2 SPT 1550 Product Reference Guide...

Страница 163: ...personal memos or any other category that you define Quickly jot down phone numbers and other types of information Later you can copy and paste this information to other applications Opening the Memo...

Страница 164: ...screen you can also begin writing in the Graffiti writing area to create a new memo The first letter is automatically capitalized and begins your new memo 3 Enter the text you want to appear in the m...

Страница 165: ...sage is more than one page a scroll bar will display for easy navigation If the message is longer than one page use the Options menu items to navigate 3 Tap the Done button to save your changes to the...

Страница 166: ...der defined in the Memo Preferences setting To rearrange the order of your memos 1 Select the Manual option in the Preferences screen as described in the previous procedure 2 In the Memo List screen t...

Страница 167: ...e memo screen Deleting a Memo There are three ways to delete a memo simply delete the text of the memo use the Menu Command as described in the Record Menu on page 9 8 or use the Memo Details screen T...

Страница 168: ...memo Delete Memo Opens an alert screen prompting you to confirm that you want to delete the current memo Tap the OK button to delete the memo from your SPT 1550 terminal or tap the Cancel button to c...

Страница 169: ...s the Memo Preferences screen and enables you to define the sort order for your memos Security Opens the Change Security screen where you can change the security of the open memo Refer to Chapter 11 A...

Страница 170: ...9 10 SPT 1550 Product Reference Guide...

Страница 171: ...10 Setting the Current Time 10 10 Setting the Current Date 10 11 Auto Off 10 12 Stay On In Cradle 10 12 Trigger Wake 10 12 Overall System Alarm and Game Sounds 10 13 Beam Receive 10 13 Network Prefer...

Страница 172: ...eating a Login Script 10 24 Deleting a Service Template 10 26 Network Preferences Menu Commands 10 27 Service Menu 10 27 Options Menu 10 27 TCP IP Troubleshooting 10 28 Owner Preferences 10 28 ShortCu...

Страница 173: ...terminal for use with a network To open the Preferences screens 1 Tap the icon to open the Applications Launcher 2 Tap the icon to display the last Preferences screen you used 3 Tap the pick list in t...

Страница 174: ...ttons from the pick list This displays a list of all the applications installed on your SPT 1550 terminal 2 Tap the pick list next to the application you want to re assign a button 3 Select the new bu...

Страница 175: ...tons Preferences screen to open the Pen screen 2 Tap the pick list and select one of the following settings for the full screen pen stroke Backlight Activates the backlight feature of the SPT 1550 ter...

Страница 176: ...n in the Buttons Preferences screen to open the HotSync Buttons screen 2 Tap the pick list next to the button you want to assign to display a list of all the applications installed on your SPT 1550 te...

Страница 177: ...ommunications To define the Connection Preferences 1 Tap the icon to display the last Preferences screen you used 2 Tap the pick list in the upper right corner and select Connection The following scre...

Страница 178: ...tion is new enter the name of the modem connected to the SPT 1550 terminal using the onscreen keyboard If it is an existing configuration the modem name displays Connection Method The preferred method...

Страница 179: ...50 terminal Country Default The country default sets date time week start day and number conventions based on geographic regions where you might use your SPT 1550 terminal For example in the United Ki...

Страница 180: ...1550 terminal 3 Tap the Week starts pick list and select whether you want the first day of the week to be either Sunday or Monday 4 Tap the Numbers pick list and select the format that you want for y...

Страница 181: ...AM or PM box to select the time of day Note Your SPT 1550 terminal can also display time based on a 24 hour clock Refer to the Formats Preferences on page 10 9 5 Tap the OK button to close the Set Tim...

Страница 182: ...etting of the automatic shutoff feature To set the Auto off delay 1 Tap Auto off After in the General Preferences screen to open the pick list 2 Tap the setting you want to use for the automatic shuto...

Страница 183: ...do not respond to this setting Beam Receive The Beam Receive preference controls the IRDA receiving Refer to Beaming Information to Other SPT 1550 Terminals on page 2 30 for details Network Preference...

Страница 184: ...Protocol or CSLIP Compressed Serial Line Internet Protocol connection with your ISP or dial in server by using menu commands from the Network Preferences screen or by using a third party application...

Страница 185: ...in the Network Preferences screen to move the cursor to that field If you select the Spectrum24 option it does not request a user name 2 Enter your user name Note Most dial in servers do not accept s...

Страница 186: ...Enter the password you use to log into your server 3 Tap OK to confirm your entry and return to the Network Preferences screen Note The Password field updates to display the word Assigned Adding Conne...

Страница 187: ...Phone field to open the Phone Setup screen 2 Enter the phone number you use to reach your ISP or dial in server Entering a Prefix A prefix is a number that you dial before the telephone number to acc...

Страница 188: ...eature 2 Enter the code to disable Call Waiting on the Disable call waiting line Note Each telephone company assigns a code to disable Call Waiting Contact your local telephone company for the code th...

Страница 189: ...at you need a third party application such as a web browser or news reader to take advantage of this connection Check the Symbol website http www symbol com palm for the latest information about third...

Страница 190: ...template 1 Tap the Service pick list in the Network Preference screen to open a list of all the predefined service templates 2 Tap the service you want to duplicate 3 Tap the icon to open the Network...

Страница 191: ...e Timeout setting defines how long your SPT 1550 terminal waits before dropping the connection with your ISP or dial in server when you switch out of a TCP IP application To set the Idle Timeout 1 Tap...

Страница 192: ...d blank Note that if your ISP or dial in server requires a DNS number and you did not enter that information in the Network Preferences screen it will appear that you successfully logged into your net...

Страница 193: ...urn to the Network Preferences screen IP Address Everyone who logs on to the Internet needs to have a unique identifier an IP address whether permanent or temporary Some networks dynamically assign a...

Страница 194: ...your selection and return to the Network Preferences screen Creating a Login Script A login script is a series of commands similar to an autoexec bat file that automates logging into your ISP You can...

Страница 195: ...1550 terminal to wait for a prompt before executing the next command Send Transmits specific characters to the TCP IP server to which you are connecting Send CR Transmits a carriage return or LF char...

Страница 196: ...ap the service you want to delete 3 Tap the icon to open the menus for the Network Preferences screen 4 Tap Delete from the Service menu to display the Delete Service alert 5 Tap the OK button to conf...

Страница 197: ...tion about menu commands that are common to all of your SPT 1550 terminal applications Service Menu When you select the Service menu its commands display on screen Options Menu When you select the Opt...

Страница 198: ...dial in server look at the Network Log The Network Log lists all communication that occurs between your modem and your dial in server during the login procedure The information in the Network Log can...

Страница 199: ...Unlock button displays at the bottom of the screen To unlock the Owner Preferences screen 1 Tap the Unlock button in the Owner Preferences screen The Unlock Message screen displays 2 Enter the passwo...

Страница 200: ...ortCut 3 Tap the ShortCut Text area and enter the text that you want to appear when you write the ShortCut characters Tip You may want to add a space space character after the last word in your ShortC...

Страница 201: ...y the ShortCut Name and ShortCut text in the ShortCut Entry screen 3 Make the changes you want and tap the OK button Deleting a ShortCut If you no longer need a ShortCut you can delete it from the lis...

Страница 202: ...10 32 SPT 1550 Product Reference Guide...

Страница 203: ...ontents Introduction 11 3 Assigning a Password 11 3 Hiding Private Entries 11 4 Showing Private Entries 11 4 Masking Private Entries 11 5 Locking Your SPT 1550 Terminal 11 6 Changing or Deleting a Pas...

Страница 204: ...11 2 SPT 1550 Product Reference Guide...

Страница 205: ...ust enter the password to view the private entries Turn off and lock your SPT 1550 terminal so that it does not operate until you enter the correct password To open the Security application 1 Tap the...

Страница 206: ...n a password you must enter it to show entries you mark as private Note that your SPT 1550 terminal merely hides the entries it does not delete them To hide Private entries 1 Select Hide Records from...

Страница 207: ...nd display Private entries in your SPT 1550 terminal applications Masking Private Entries When a private record is masked a visual placeholder appears where a record would normally be displayed To mas...

Страница 208: ...r you can restore all synchronized data at the next HotSync operation For information about how to use the reset button Performing a Hard Reset on page 16 5 To lock your SPT 1550 terminal with a passw...

Страница 209: ...password before you can change or delete it To change or delete your password 1 Tap the Assigned box in the Security screen to open the Password screen 2 Enter the current password 3 Tap the OK butto...

Страница 210: ...nd files marked as Private Important If you synchronize with your computer before deleting a lost password your SPT 1550 terminal restores your private entries the next time you perform a HotSync oper...

Страница 211: ...th To Do Items 12 4 Setting Priority Optional 12 4 Checking Off a To Do Item 12 5 To Do Item Details 12 6 Choosing a To Do Category 12 7 Setting a Due Date 12 7 Marking a To Do Item Private 12 8 Delet...

Страница 212: ...12 2 SPT 1550 Product Reference Guide...

Страница 213: ...ssign a category for any or all of your To Do items You can then view your To Do List based on category Business Personal etc Sort your To Do items by due date priority level or category Attach notes...

Страница 214: ...iting area automatically creates a new To Do item 3 Tap anywhere on the screen to de select the To Do item Note You can add a name address and phone number to a To Do List item using the Phone Lookup...

Страница 215: ...e 2 Tap the Priority number that you want to set for the To Do item 1 is most important and 5 is least important Note You can also change the Priority setting for a To Do item with the To Do Details s...

Страница 216: ...To Do Show Options on page 8 for details 3 Tap the check box on the left side of the item To Do Item Details The To Do Item Details screen enables you to change individual To Do item settings To activ...

Страница 217: ...ils screen to open the Due Date pick list 2 Tap the Due Date pick list to view potential due dates for theTo Do item The following are available 3 Tap the OK button to confirm your selection and close...

Страница 218: ...e the To Do Details screen To delete a To Do item with the To Do Details screen 1 Tap anywhere in the text area of the To Do item that you want to delete 2 Tap the Details button to open the To Do Ite...

Страница 219: ...how Only Due Items Shows only the To Do items that are currently due past due or have no due date specified in the To Do List When this setting is active To Do items that are not yet due do not displa...

Страница 220: ...Cancel button to close the alert screen and keep the To Do item Note By default your SPT 1550 terminal removes the item from the To Do list but retains a copy of the item and transfers it to an archi...

Страница 221: ...s the current To Do item to another SPT 1550 terminal through the IR port Beam Category Beams all To Do Items in the current category to another SPT 1550 terminal through the IR port Font Displays the...

Страница 222: ...12 12 SPT 1550 Product Reference Guide...

Страница 223: ...Scanning with the SPT 1550 13 3 SScan Application 13 3 SScan Menu Commands 13 3 Demo Scan Application 13 4 Demo Scan Menu Options 13 6 Scanning Bar Codes Using Demo Scan 13 7 Barcode Application 13 7...

Страница 224: ...13 2 SPT 1550 Product Reference Guide...

Страница 225: ...istributor To add SScan prc or ScanDemo prc to the SPT 1550 use the SPT Install Tool to designate the files to be added to the SPT 1550 during the next HotSync SScan Application The SScan application...

Страница 226: ...The Demo Scan application allows you to customize your scanner s features and scan bar codes To open the Demo Scan application 1 Tap the icon to open the Applications Launcher 2 Tap the icon to open D...

Страница 227: ...LED test tap the LED box again Trigger Mode Level only the SPT 1550 scan trigger initiates the scan the laser is turned off when the trigger is released or the decode was successful Pulse only the SP...

Страница 228: ...es redundancy Linear Security Defines the linear security level to be used by the scanner level 1 2 3 or 4 Scan Angle Defines the scan angle to be used by the scanner narrow or wide Only narrow is ava...

Страница 229: ...r the right left or center scan trigger or tap the Scan Button The scan LED lights red Make sure the red scan beam covers the entire bar code The scan LED lights green and a beep sounds to indicate a...

Страница 230: ...is gently clean it using a tissue or other non abrasive material Do not spray any cleaner directly on the scanner window Try another bar code It is possible that your bar code is bad Item Code Contain...

Страница 231: ...oding your bar codes please contact Symbol Technologies Technical Support Center Refer to Symbol Support Centers on page xvi for contact information Battery Implications While Using the Laser Scanner...

Страница 232: ...13 10 SPT 1550 Product Reference Guide...

Страница 233: ...14 1 Chapter 14 Installing and Removing Applications Chapter Contents Introduction 14 3 Installing Applications 14 3 Removing Applications 14 6 Removing the Symbol Palm Terminal Desktop Software 14 7...

Страница 234: ...14 2 SPT 1550 Product Reference Guide...

Страница 235: ...pplications on your SPT 1550 terminal The SPT Install Tool makes it quick and easy to install software on your SPT 1550 terminal during a HotSync operation Note Any application that you install on you...

Страница 236: ...ble click the Symbol Palm Terminal Desktop icon on your Windows desktop or select Symbol Palm Terminal Desktop from the Start menu to open the Symbol Palm Terminal Desktop software 3 Click the Install...

Страница 237: ...p program group or by double clicking any file with a prc file extension 4 Select the user name that corresponds to your SPT 1550 terminal in the User drop down list 5 Click the Add button to open the...

Страница 238: ...es and extensions that you install you cannot remove the applications that reside in the ROM portion of your SPT 1550 terminal including Date Book Address Book To Do List Memo Pad Calculator and Mail...

Страница 239: ...from your computer To remove the Symbol Palm Terminal Desktop software 1 Select Settings then Control Panel from the Start menu to open the Windows Control Panel 2 Double click the Add Remove Program...

Страница 240: ...14 8 SPT 1550 Product Reference Guide...

Страница 241: ...15 3 Displaying Online Tips 15 3 SPT 1550 Diagnostics Utility 15 4 System Information 15 5 Bar Code Scanner Test 15 6 Serial Port Test 15 7 Digitizer Alignment Test 15 8 System Diagnostics Test 15 8 T...

Страница 242: ...15 2 SPT 1550 Series Product Reference Guide...

Страница 243: ...pport This chapter provides details on each of these methods Displaying Online Tips Many of the screens that display on your SPT 1550 terminal contain an online tips icon in the upper right corner Onl...

Страница 244: ...ter The Diagnostics Utility tests the various features of the terminal and reports whether or not they are operating properly To run the Diagnostics Utility run the Diag Application which displays on...

Страница 245: ...lays the System Information screen Manufacturer The manufacturer of the terminal RAM Size The amount of Random Access Memory RAM Free Used The amount of free and used Random Access Memory ROM Used The...

Страница 246: ...he Bar Code Scanner Diagnostics Screen To test the scanner 1 Select the Scanner Enabled checkbox 2 Page down to the second page by pressing the down button on the terminal or by tapping on the arrow i...

Страница 247: ...on the HotSync icon in your computer s icon tray and select Exit 6 On your computer run HyperTerminal which displays in the Accessories directory in the Windows Programs menu 7 Start a new connection...

Страница 248: ...utton results in a series of short high pitched sounds denoting proper functioning Pressing an incorrect button or having the system timeout results in a low tone denoting failure The test then produc...

Страница 249: ...tached to one of your serial ports Do not place your SPT 1550 terminal in the cradle while installing the software Serial Cradle LEDs do not light when the cradle is plugged in Cradle is not receiving...

Страница 250: ...y rise to full This is normal It takes a few minutes for the battery gauge to accurately show the condition of the battery No sound The System Sound option may not be set correctly in the General Pref...

Страница 251: ...ecalibrated Recalibrate the digitizer Choose Digitizer from the Preferences application pick list and follow the directions on the screen When I tap the icon nothing happens Not all applications or sc...

Страница 252: ...heck the Security application and make sure that the Private Records setting is set to Show private records HotSync Operations A Local HotSync operation does not complete successfully HotSync Manager...

Страница 253: ...Make sure the modem connected to your computer is turned on and is connected to the outgoing phone line Make sure you selected Modem from the HotSync Manager menu Security I forgot the password SPT 15...

Страница 254: ...d then perform a HotSync operation the memos on your SPT 1550 terminal still appear in the order defined in the Memo Preferences setting In other words the sort settings that you use with Symbol Palm...

Страница 255: ...are Online Help For further assistance contact your regional technical support office by e mail phone or fax Before requesting support experiment a bit to reproduce and isolate the problem When you do...

Страница 256: ...15 16 SPT 1550 Series Product Reference Guide...

Страница 257: ...ing Your SPT 1550 Terminal Chapter Contents Introduction 16 3 Caring for Your SPT 1550 Terminal 16 3 Battery Considerations 16 3 Resetting Your SPT 1550 Terminal 16 4 Performing a Soft Reset 16 4 Perf...

Страница 258: ...16 2 SPT 1550 Product Reference Guide...

Страница 259: ...he touch sensitive screen of your SPT 1550 contains glass Do not drop your SPT 1550 or subject it to any strong impact Protect your SPT 1550 from temperature extremes Do not leave your SPT 1550 on the...

Страница 260: ...your SPT 1550 terminal does not operate it stores your data safely for an indefinite period of time In this case there is enough residual energy in the battery to store the data but not enough to tur...

Страница 261: ...ard reset 1 Hold down the green power button on the front panel of the SPT 1500 terminal 2 While holding down the power button use the tip of an unfolded paper clip or similar object without a sharp t...

Страница 262: ...16 6 SPT 1550 Product Reference Guide...

Страница 263: ...he character is automatically translated to a single byte value between 0 and 31 For example M is converted to a carriage return If char is a value between a and z the character sequence is translated...

Страница 264: ...efore executing the next command in the script Literal Characters The backslash character defines that the next character is transmitted as a literal character and is not subject to any special proces...

Страница 265: ...6 4 Scheduling Repeating Events 6 10 Setting Alarm for an Event 6 8 Working in Agenda View 6 16 Working in Week View 6 13 Demo Scan Application menu commands 13 6 font style 2 23 HotSync 7 1 7 7 7 11...

Страница 266: ...re 1 10 Batteries auto off delay 10 12 battery considerations 16 3 Beaming Address Book categories 4 11 Address Book entries 4 11 business card 4 10 Business Card beaming 4 10 selecting 4 10 C Calcula...

Страница 267: ...epeat 6 10 setting alarm 6 8 start and duration 6 4 untimed 6 4 F File messages 8 17 File Link 7 11 using 7 11 filing a message 8 17 Finding Address Book entries 4 7 Finding information with 3 1 Full...

Страница 268: ...age fonts 8 6 messages high priority 8 26 Modem 7 13 10 6 10 13 HotSync 7 12 modem conduit setup 7 14 Month Date Book view 6 15 N Network password 10 15 primary DNS 10 22 TCP IP 10 13 New Address Book...

Страница 269: ...ting the Screen 1 7 Diagnostics 15 4 Bar Code Scanner test 15 6 Digitizer Alignment test 15 8 Serial Port test 15 7 system information test 15 5 Systems Diagnostics test 15 8 Getting Help with 15 1 ha...

Страница 270: ...Index 6 SPT 1550 Product Reference Guide...

Страница 271: ...uct before using this manual Did this manual meet your needs If not please explain ___________________________________________________________ _________________________________________________________...

Страница 272: ......

Отзывы: