WinFax PRO Fax Sharing
14
4
Click the General tab.
5
Enable Use This WinFax PRO Station As A Fax Sharing Host.
6
If you want to protect the Fax Sharing Host station with a
password, enable Use Password then type a password in the
Password field.
7
In the Host Computer Information section, type the appropriate
information.
8
In the After Sending Client Events section, click the option that
best describes what you want WinFax to do with messages that
Fax Sharing Client users send and receive through your computer.
9
Enable automatic reception by doing one of the following:
Q
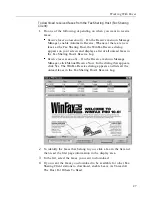
Using the Controller
– Right click the Controller icon in the
Windows taskbar and enable Automatic Receive on the menu
that appears.
Q
Using Message Manager
– On the Receive menu, enable
Automatic Receive.
Installing the Fax Sharing Client Automatically
To automate the installation process, you can use a scripted installation. A
scripted installation installs WinFax using the settings contained in two
files: an InstallShield silent response file (SETUP.ISS) and a script file
(WFSCRIPT.SPT). The InstallShield silent response file contains all options
you would normally specify during the WinFax installation. The script file
contains options that you would configure after installing WinFax (for
example, the modem or communications device you want to use).
The following flow chart illustrates the scripted installation process including
the preparatory steps and how to run the scripted installation. For step-by-step
instructions on how to use the scripted installation feature, see the procedure
following the flow chart.
Содержание Fax Sharing
Страница 1: ...Fax Sharing User s Guide February 2000 ...
Страница 4: ...Contents iv ...
Страница 30: ...WinFax PRO Fax Sharing 30 ...


