background image

-4-

Figure 1

Figure 1

Figure 1

Figure 2

Figure 3

Figure 2

Figure 2

Figure 3

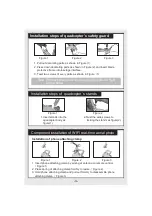
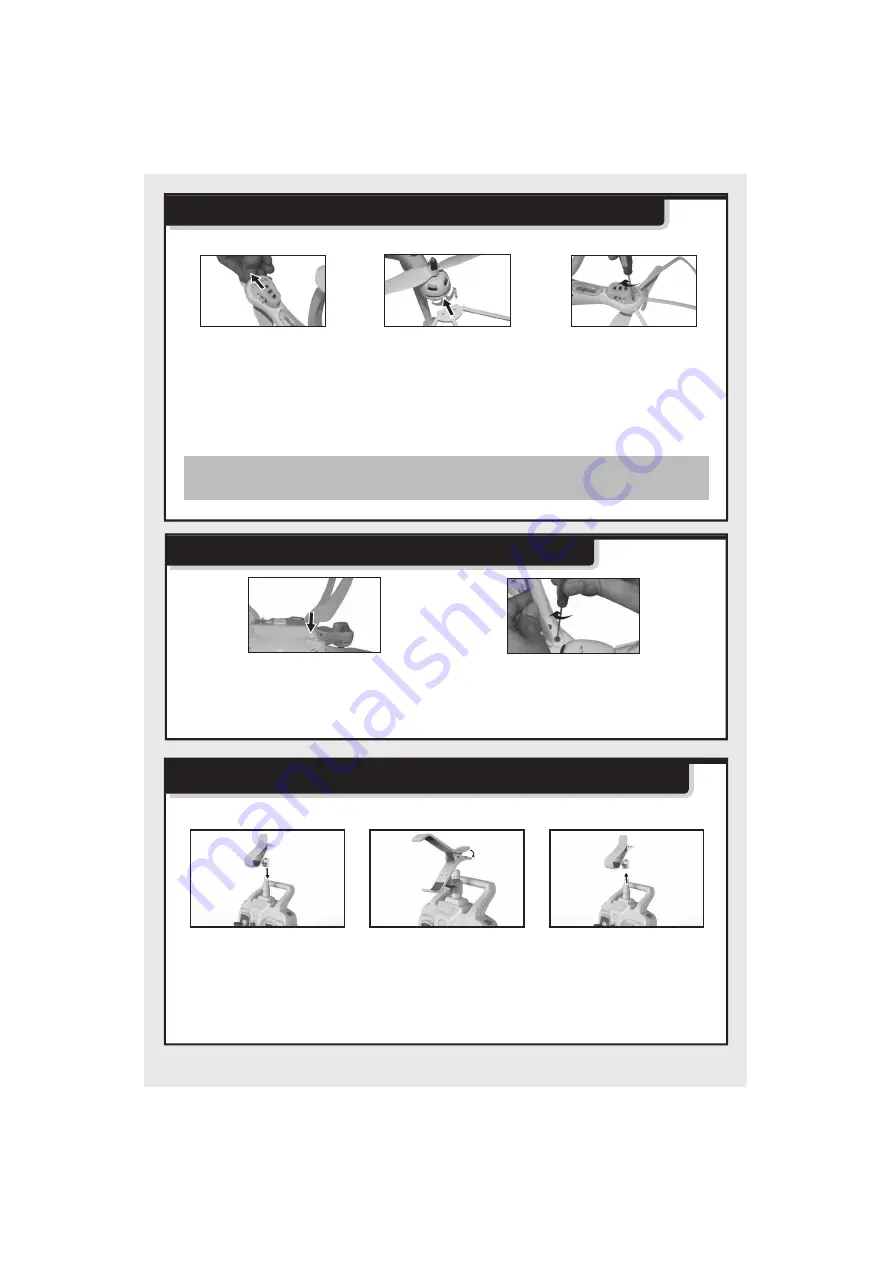
Component installation of WIFI real-time aerial photo

Installation of phone attaching clamp

1. Insert phone attaching clamp by aiming at antenna on remote control.
   

Figure 1

2. Press spring of attaching clamp forcibly to resize.

Figure 2


3. Hold phone attaching clamp and pull out forcibly to disassemble phone 
    attaching clamp.

Figure 3


1. Pull out decorating parts as shown in Figure (1).
2. Press down decorating parts as shown in Figure (2) and insert blade 
    protective frame into fuselage interface.

3. Twist two screws of every parts as shown in Figure

3

.

Installation steps of quadcopter’s safety guard

Note: Without blade protective frame,rolling effect in flight 
          will be better. 

Installation steps of  quadcopter’s  stands

1.Insert stands into the 
   quadcopter body as 
   figure(1).

2.Twist the wide screws to 
    locking the stands as figure(2).

Содержание X8W

Страница 1: ...d in advance Any information updates or changes please be subject to our website Four axis structure is applied which makes the quadcopter more flexible and rapid when flying It has the characteristic...

Страница 2: ...wly avoiding from collisions caused by rising quadcopter rapidly 3 After flying please turn off the power of quadcopter and controller also take out the batteries from controller 4 Please don t put ba...

Страница 3: ...battery cover of remote control and put 4 No 5 alkaline batteries in the middle place correctly according to battery box s pole indication battery should be available separately Battery Cover 4 X AA L...

Страница 4: ...the lowest level At the center spuare 08 Turn left Pull left function lever to left it will be higher than quad copter turn left faster 09 Turn right Pull left function lever to right it will be high...

Страница 5: ...ut forcibly to disassemble phone attaching clamp Figure 3 1 Pull out decorating parts as shown in Figure 1 2 Press down decorating parts as shown in Figure 2 and insert blade protective frame into fus...

Страница 6: ...ight of FPV is green light Red light flashes slowly after 20 seconds for waiting to connect with the phone Click setting of the phone open WIFI find out FPV WIFI in WIFI searching list click connectio...

Страница 7: ...structions Sideward fly Turn Left and Right Pull the direction lever left or right the quadcopter flies to left side or right side Pull the throttle left or right the quadcopter turns to left or right...

Страница 8: ...ht left When the quadcopter keeps rotating to left right you can correct it by pressing the fine tuning button right left MODE 2 Operating direction Hover up and down Forward and backward Push the thr...

Отзывы: