background image

13 

  Push the M button. The hour display stops blinking and the minute display starts blinking. Push the S 

button to adjust the tens place in the minute display. 

Push the M button. The tens place stops blinking and the units display starts blinking. Push the S button 
to adjust the units place in the minute display.  

  Push M button to finish clock setting.  

Battery Voltage Gauge 

The battery voltage display shows current battery voltage. It is forced display approximately 10 seconds 

when the ignition switch is turned on.  

  Display range: 9~18 V. 

Odometer


This odometer shows the total distance in kilometers the scooter has been ridden. It cannot be reset. 

NOTE : 

 When the battery is disconnected, the clock is reset to 12:00 and starts working again when the battery is

reconnected.

 If the clock is idled about 30 seconds while setting, it will exit setting mode automatically and starts

working again.

 The clock setting will be finished when the clock is idled about 30 seconds while setting the minute

display.

 If the ignition switch is turned off while setting the clock, the clock will exit setting mode when the ignition 

switch is turned on again.

 The clock works normally by the backup power even the ignition switch is turned off.

NOTE : 

 The data is maintained in the combination instrument even when the battery is disconnected.

 When the figures come to 99999, they will return to 0 and the odometer starts working again.

 This odometer only shows in kilometers.

Содержание LZ40W1-EU

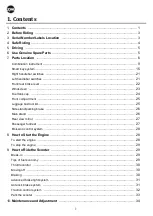
Страница 1: ...Fuel tank cap 24 Front compartment 25 Luggage box tool kit 25 Side stand parking brake 26 Main stand 26 Rear view mirror 27 Passenger footrest 27 Emission control system 28 8 How to Start the Engine 2...

Страница 2: ...elt case air cleaner inspection 45 Headlight adjustment 46 Rear shock absorber adjustment 47 General lubrication 47 Vehicle data recorder 47 11 Taking Care of Your Scooter 48 Washing 48 Storage 48 12...

Страница 3: ...letely carried out We recommend that after riding your new scooter for the first 300 kilometers you should take your scooter to the original dealer for an initial inspection and to have your scooter i...

Страница 4: ...rm periodical maintenance and inspection in accordance with the schedule WARNING To avoid getting burned by exhaust pipe when taking a passenger Make sure your passenger has put his her feet on the pe...

Страница 5: ...amage to the tires and rims as well as it may change the center of gravity which could result in an accident that could cause injury or death Do not exceed the maximum authorized load CAUTION Do not p...

Страница 6: ...inspection window 7 Coolant reserve tank 8 Side stand 9 Oil filter 10 V belt case air cleaner 11 Oil drain bolt 12 Transmission oil drain bolt 13 Transmission oil filler bolt 14 Engine air cleaner 15...

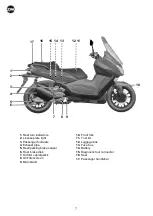
Страница 7: ...pipe 5 Rear parking brake caliper 6 Rear brake disk 7 Oil filler cap dipstick 8 Oil Filter screen 9 Main stand 10 Front fork 11 Tool kit 12 Luggage box 13 Fuse box 14 Battery 15 Diagnostic tool conne...

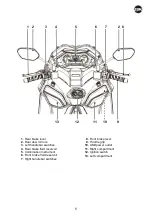
Страница 8: ...hes 4 Rear brake fluid reservoir 5 Combination instrument 6 Front brake fluid reservoir 7 Right handlebar switches 8 Front brake lever 9 Throttle grip 10 USB power outlet 11 Right compartment 12 Ignit...

Страница 9: ...turn signal switch is pushed to the right or left B EFi Warning Indicator When turn the ignition switch to ON position the EFi warning indicator remains on initially It should go off immediately after...

Страница 10: ...checked by an authorized SYM dealer Refer to page 50 for more information J TCS Indicator This indicator blinks when traction control is intervening If the traction control system is turned off this i...

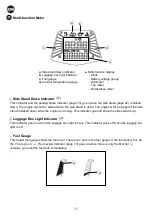
Страница 11: ...This indicator goes on when the luggage box light is lit up This indicator goes off when the luggage box light is off c Fuel Gauge This digital fuel gauge shows the fuel level There are 7 bars in the...

Страница 12: ...ton Push M button to switch the below display mode Clock This clock displays only 24 hour mode To set the clock do the below steps Turn the ignition switch on and wait for approximately 10 seconds unt...

Страница 13: ...en It cannot be reset NOTE When the battery is disconnected the clock is reset to 12 00 and starts working again when the battery is reconnected If the clock is idled about 30 seconds while setting it...

Страница 14: ...ge 35 In oil distance mode quickly push S button twice to reset the oil distance meter Display range 0 9999 9 km NOTE When the figures come to 999 9 they will return to 0 and the trip meter starts wor...

Страница 15: ...transmitted by the antenna may affect the operation of such devices when close by NOTE The smart key system may not work in the below situations The smart key is placed in a location that exposed to...

Страница 16: ...at lock A is located near NOTE When the smart key s battery is discharged the smart key may not work or the operating range may become very narrow Placing the smart key in the front compartment or the...

Страница 17: ...stall a battery before you use it Do not store the smart keys in the front compartments or the luggage box the smart keys may be damaged by vibration or engine heat Do not drop bend or hit the smart k...

Страница 18: ...inner cover A and replace the old battery with a new one face the positive terminal side up Battery type CR2032 Reverse the above steps to install make sure the ring B is correctly mounted and do not...

Страница 19: ...ert C Off Position Engine can be turned off in this position Electrical circuits will be turned off The ignition switch ring goes off in this position If you push the ignition switch knob without turn...

Страница 20: ...h is in On position the ignition switch ring slowly flashes when the smart key is out of the operating range NOTE The seat open button can only be operated in On position CAUTION Never operate the ign...

Страница 21: ...ator goes on to signal the driver of the vehicle ahead that you are about to pass The passing light is shut off as soon as the button is released NOTE Even though the engine stop switch can stop the e...

Страница 22: ...itch is turned on the horn sounds F TCS Button This scooter is equipped with traction control system TCS The traction control system can be turned off on by pushing this button for approximately 3 sec...

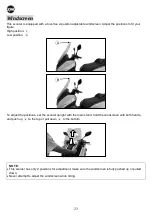
Страница 23: ...Low position B To adjust the positions set the scooter upright with the main stand hold the windscreen with both hands and push up a to the top or pull down b to the bottom NOTE This scooter has only...

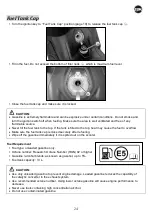
Страница 24: ...not smoke and turn the ignition switch off when fueling Make sure the area is well ventilated and free of any flammable source Never fill the fuel tank to the top If the tank is filled to the top hea...

Страница 25: ...box Some helmets may not fit in the space due to the size or design This scooter is equipped with a luggage box light B The luggage box light goes on when the seat is opened Maximum load 10 kg The to...

Страница 26: ...he scooter and let down the main stand Hold the left handlebar grip and the left side of the passenger handlebar Press down the tip of the stand B with your right foot make sure the 2 contact points C...

Страница 27: ...on A before riding Passenger Footrest This scooter is equipped with 2 passenger footrests A Tap a to release the footrests for passenger to use push the footrests to fold up NOTE If it is necessary to...

Страница 28: ...in the position Make sure the side stand is up Turn the ignition switch to ON position Pull the rear or front brake lever and push the starter button with the completely closed throttle to start the...

Страница 29: ...when accelerating CAUTION Check the oil and the fuel volume before starting the engine Release the starter button immediately after starting the engine If the engine cannot be started after activatin...

Страница 30: ...nerally speaking the front brake should be applied a bit more than the rear Never lock the brakes or it will cause the tires to skid When turning a corner reduce your speed before getting into the cor...

Страница 31: ...on of brakes You must take the same care as with scooters not equipped with ABS ABS is not designed to shorten the braking distance On loose uneven or downhill surfaces the stopping distance of a scoo...

Страница 32: ...enes by regulating engine power until traction is recovered TCS Indicator When the ignition switch is turned on the traction control system is automatically turned on The traction control system can b...

Страница 33: ...control system is turned on When traction control is intervening you may notice changes in engine response or exhaust sound This traction control system cannot detect sideward slide in the rear wheel...

Страница 34: ...age Fuel Sufficient fuel no leaking Brakes Front and rear brakes are effective Parking brake is effective Tires Air valve caps are fitted No puncture Enough tire pressure Handlebar Any abnormal vibrat...

Страница 35: ...ing A from damaging Please check the oil level every 1 000 km Oil Change The oil change should be done by an authorized SYM dealer The genuine SYMOIL are designed and recommended for your scooter Plea...

Страница 36: ...kgf m Although SAE 10W 40 oil is recommended for most conditions the oil viscosity may need to be changed to accommodate climate conditions in your riding area Cleaning of Oil Filter Screen The oil f...

Страница 37: ...recommendation SYMOIL Gear Oil 85W 140 GL 5 Tightening torque Transmission oil drain bolt 1 2 kgf m Transmission oil filler bolt 1 2 kgf m Fuel Inspection Make sure the fuel is enough for the trip Tur...

Страница 38: ...ion The coolant inspection window A is located under the left floor panel The coolant level must be between the FULL a and LOW b marks Top up the coolant carefully when the level is at the LOW mark Pu...

Страница 39: ...wheel If there is something wrong when applying the brakes have the brake system checked by an authorized SYM dealer Front Rear Brake Fluid Level Inspection Set the scooter upright To inspect the righ...

Страница 40: ...pads replaced by an authorized SYM dealer NOTE Brake fluid may harm painted surfaces and plastic parts Spilled fluid must be cleaned up immediately Refill with the same type of brake fluid WARNING Us...

Страница 41: ...Inspection Remove the air valve cap Measure the tire pressure with a tire pressure gauge A often and inflect the tires to the recommended tire pressure Recommended air pressure for standard tire MAXXI...

Страница 42: ...ted smoothly Check that the steering axle locknut is tightened If any irregularity is found on the handlebar front fork contact your authorized SYM dealer WARNING Insufficient tire tread depth can mak...

Страница 43: ...nnect the luggage box light coupler A on the left side then remove the luggage box Open the fuse box to check the fuses A Reverse the above steps to restore If a fuse fails inspect the electrical syst...

Страница 44: ...nce Keeping the battery fully charged is the owner s responsibility If you failed to do so it can cause battery failure and leave you stranded If you ride the scooter rarely inspect the battery voltag...

Страница 45: ...ended spark plug NGK CPR8EA 9 Spark plug gap 0 8 0 9 mm Tightening torque 1 1 kgf m WARNING Beware of the engine heat when inspecting the spark plug Engine Air Cleaner V belt Case Air Cleaner Inspecti...

Страница 46: ...he V belt case air cleaner element A is damaged or too dirty have it changed by an authorized SYM dealer To install the element do in the reverse order of the above instructions Tightening torque Left...

Страница 47: ...enever the vehicle has been operated under wet or rainy conditions Clean off rusty spots and wipe off any oil or grease Side stand pivot Main stand pivot Front rear brake lever pivots Throttle cables...

Страница 48: ...roughly Run the engine for several minutes and shut it off then drain out the engine oil Add new engine oil Fill up the fuel tank with fuel add fuel stabilizer if available to prevent the fuel tank fr...

Страница 49: ...aler for further inspection WARNING Replacing fuses can cause wiring to overheat Use only standard fuses of the correct specifications or have the fuses replaced by an authorized SYM dealer Overheatin...

Страница 50: ...ny of the above symptoms occurs Low Oil Pressure Indicator On If the low oil pressure indicator goes on stop the scooter safely at road side and turn off the engine and check engine oil level page 35...

Страница 51: ...M dealer as soon as possible Smart Key System Please check the following situations when the smart key system does not work Is the smart key battery discharged page 18 Is the vehicle battery discharge...

Страница 52: ...replace the license plate light follow the below instructions Turn the ignition switch off and set the scooter upright with the main stand and cool down the license plate light Remove the screw A to...

Страница 53: ...ooling system I I I I I 13 Coolant level I I I I I 38 14 Coolant water hoses and O rings R every 3 years I 15 Throttle control system I I I I I I 41 16 CVT system rollers shafts drive pulley cushion I...

Страница 54: ...icate Service more frequently when riding in severe conditions such as dusty wet muddy high speed etc Service annually or at indicated odometer reading intervals whichever comes first Should be perfor...

Страница 55: ...Note 1 000 km 5 000 km 10 000 km 15 000 km 20 000 km 25 000 km 30 000 km 35 000 km 40 000 km 45 000 km 50 000 km 55 000 km 60 000 km 65 000 km 70 000 km 75 000 km 80 000 km 85 000 km 90 000 km 95 000...

Страница 56: ...399 cm3 Bore stroke 83 mm 73 8 mm Max horse power 34 PS 6750 rpm Max torque 4 03 kg m 5250 rpm Idle speed 1 650 150 rpm Starting system Electric starter Fuel system EFi fuel injection Fuel Unleaded 9...

Страница 57: ...m J15 MT 3 5 J14 MT 4 5 Rim material Aluminum alloy Front brake disk 275 mm 2 Rear brake disk 275 mm Front brake caliper 4 piston ABS 2 Rear brake caliper 1 1 piston AB Brake fluid DOT 4 Suspension Sy...

Страница 58: ......

Страница 59: ......

Страница 60: ......

Страница 61: ......

Страница 62: ......

Страница 63: ......

Страница 64: ......

Отзывы: