background image


4070176 

Safety Precautions: 


Important:


Read carefully before installing the fixture. Retain for future reference.


General: 

Upon receipt of the fixture, thoroughly inspect for any freight damage which should be brought to the attention of the delivery carrier. 
Sensor is located under the lens (all models ship preset at 4000K). 


Installation: 

 
Standard Installation 

Wall mount 

1.  Before starting, ensure that the power is disconnected.  
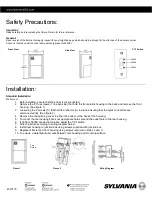
2.  Remove the 2 Torx screws (1 on each side) that hold the front plastic housing to the back and remove the front 

housing. (See figure 1) 

3.  Loosening the 2 screws (C) that hold the reflector (A) in place, ensuring that the quick connectors are 

disconnected (B). (See figure 2) 

4.  Remove the conduit plug cover in either the bottom or the back of the housing.  
5.  To mount the rear housing knock out appropriate holes around the outlet hole in the rear housing. 
6.  If 3000 or 5000K are desired, please adjust the CCT switch 
7.  Wire the fixture according to wiring diagram below. 
8.  Install rear housing to junction box using screws supplied with junction box. 
9.  Replace reflector and front housing using screws removed in steps 2 and 3. 
10.  To ensure a watertight seal caulk between rear housing and mounting surface. 


Front View 


Side View 

Figure 2 

Wiring Diagram 

Figure 1 

Torx 
Screw 

CCT Switch  

(located 
inside the 
fixture) 

3000K 
4000K 
 
5000K 

Содержание ValueLED CCT

Страница 1: ...ECT POWER BEFORE ATTEMPTING INSTALLATION OR SERVICING THIS PRODUCT MUST BE INSTALLED IN ACCORDANCE WITH THE NATIONAL ELECTRIC CODE NEC AND ALL APPLICABLE FEDERAL STATE AND LOCAL ELECTRIC CODES AND SAFETY STANDARDS USE CAUTION WHEN HANDLING THIS PRODUCT DURING OR AFTER OPERATION AS IT MAY BECOME HOT AND CAUSE BURNS DISCONNECT PRODUCT AND ALLOW COOLING PRIOR TO SERVICING ANY ALTERATION OR MODIFICATI...

Страница 2: ... the 2 screws C that hold the reflector A in place ensuring that the quick connectors are disconnected B See figure 2 4 Remove the conduit plug cover in either the bottom or the back of the housing 5 To mount the rear housing knock out appropriate holes around the outlet hole in the rear housing 6 If 3000 or 5000K are desired please adjust the CCT switch 7 Wire the fixture according to wiring diag...

Страница 3: ...TION OU L ENTRETIEN 4 CE PRODUIT DOIT ÊTRE INSTALLÉ CONFORMÉMENT AU CODE NATIONAL DE L ÉLECTRICITÉ NEC ET À TOUS LES CODES ET NORMES DE SÉCURITÉ ÉLECTRIQUE FÉDÉRAUX ÉTATIQUES ET LOCAUX APPLICABLES 5 SOYEZ PRUDENT LORSQUE VOUS MANIPULEZ CE PRODUIT PENDANT OU APRÈS LE FONCTIONNEMENT CAR IL PEUT DEVENIR CHAUD ET CAUSER DES BRÛLURES DÉBRANCHEZ LE PRODUIT ET AUTORISEZ LE REFROIDISSEMENT AVANT L ENTRETI...

Страница 4: ... en place en veillant à ce que les connecteurs rapides soient déconnectés B Voir la figure 2 4 Retirez le couvercle du bouchon du conduit dans le bas ou à l arrière du boîtier 5 Pour monter le boîtier arrière éliminez les trous appropriés autour du trou de sortie dans le boîtier arrière 6 Si vous avez besoin de 3000K ou 5000K veuillez changer l interrupteur sous la lentille 7 Câblez le luminaire s...

Отзывы: