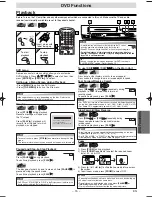
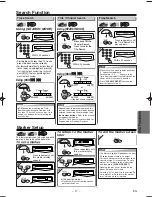
Sylvania SRDD495 Скачать руководство пользователя страница 6

– 6 –

EN

Setup

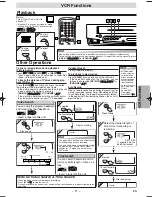
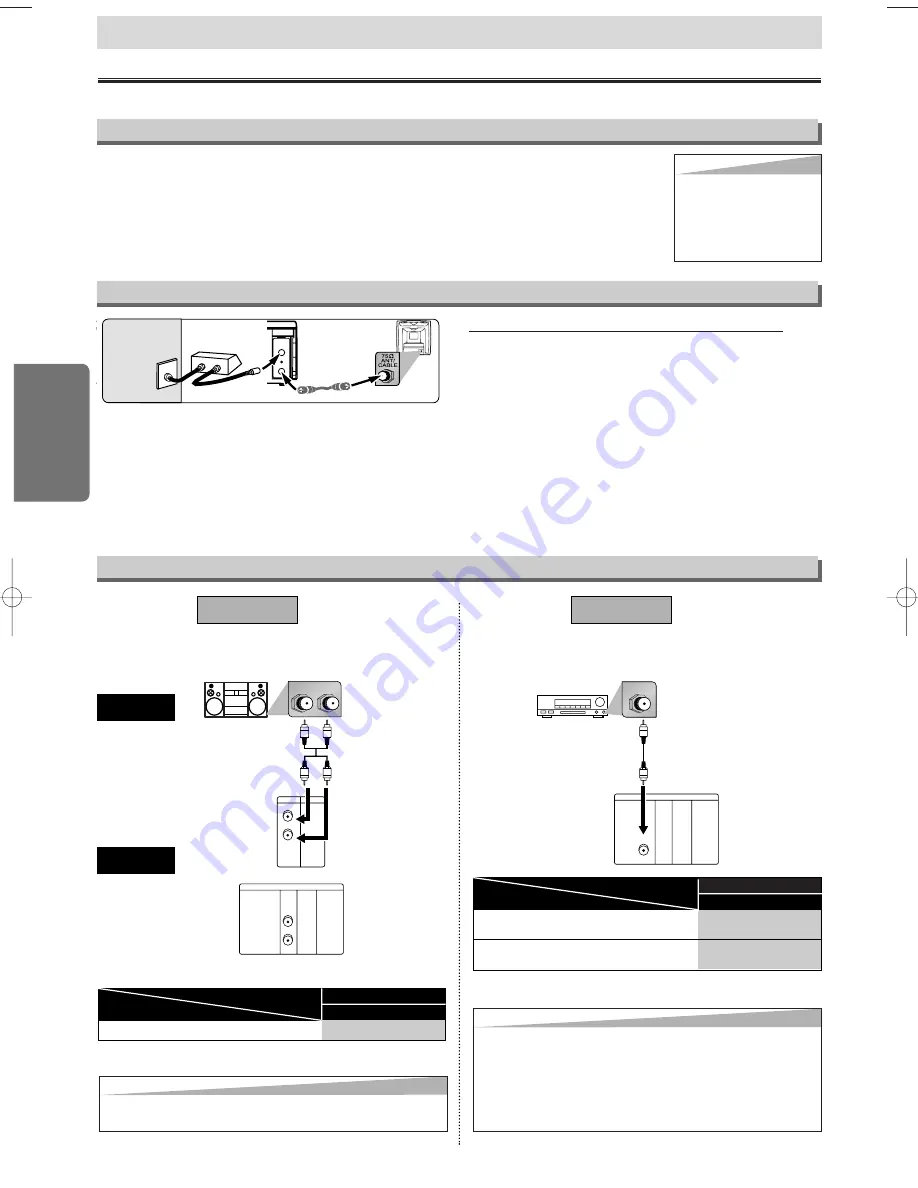
Hint for Cable Box or Satellite Box

L

R

VCR

DVD/VCR

AUDIO OUT

L

R

DIGITAL

AUDIO OUT

or

AUDIO

OUT

DVD

S-VIDEO

OUT

COMPONENT

VIDEO OUT

L

R

Stereo system

DIGITAL

AUDIO OUT

COAXIAL

AUDIO

OUT

DVD

S-VIDEO

OUT

COMPONENT

VIDEO OUT

COAXIAL

AUDIO

DVD/VCR

Method 1

Analog audio
input jacks

Digital audio
input jack

(Analog)
AUDIO OUT

DIGITAL
AUDIO OUT

Method 2

Connection to an Audio System

Audio cable

(supplied)

Audio Coaxial

Digital cable

(commercially

available)

Dolby Digital decoder,

MD deck or DAT deck

BITSTREAM

PCM

SETUP > QUICK >

DOLBY DIGITAL

PCM

SETUP > QUICK >

DOLBY DIGITAL

Connecting to a Dolby Digital decoder
for Dolby Digital audio output.
Connecting to the other equipment (an MD deck
or DAT deck etc.) without Dolby Digital decoder.

* To complete these settings, refer to pages 20-21.

Hint

Hint

• The audio source on a disc in a Dolby Digital 5.1 channel surround

format cannot be recorded as digital sound by an MD or DAT deck.

• By hooking this unit up to a Multi-channel Dolby Digital

decoder, you can enjoy high-quality Dolby Digital 5.1
channel surround sound as heard in the movie theaters.

• Playing a DVD using incorrect settings may generate

noise distortion and may also damage the speakers.

Connecting to Stereo System.

Setting

Connection

* To complete these settings, refer to pages 20-21.

Connection

Setting

(DVD mode only)

If channel 3 is already occupied for broadcasting,

1) Set your TV to channel 4.
2) Insert a pre-recorded tape into this unit.
3) Press 

[OUTPUT]

on the unit so that the VCR

OUTPUT light is lit.

• If noise appears on the TV screen, press

[VCR/TV]

on the remote control.

4) Press 

[PLAY 

B

]

once.

5) 

After a few seconds, hold [PLAY

B

] on

the unit for 3 seconds.

• The RF output channel will change to channel 4

from channel 3 and you will see a playback pic-
ture.

• When a picture does not appear on the TV

screen, repeat step 4).

6) Press 

[STOP

C

]

to stop playback.

RF Output Channel

Connections

Please refer to “Basic TV Connection” on the front page before you use this unit.

Hint

Hint

• The RF output channel may

not change when you adjust
tracking during playback. In this
case, stop the playback, and
start the playback again. After
that, hold 

[PLAY 

B

B

]

on the

unit for 3 seconds again.

Setup

Select this connection when you want to view or record a
scrambled channel. With this connection, channels cannot be
changed on the unit. You can view or record ONLY the chan-
nels you have selected on the cable box or the satellite box.
• While you are recording, only the recorded channel can be

viewed.

To select channels of the cable box or satellite box

1) Turn on the unit by pressing 

[POWER]

, then press

[VCR/TV]

. The “POWER” light on the front panel will

appear, then press 

[SKIP/CH.

G

G

/

K

K H

H

/

L

L

]

to select chan-

nel 3 or 4 (the same channel as the output channel of the
cable box or satellite box).

• If you use the channel 4, you need to change the unit’s

RF output to channel 4. Refer to “RF Output Channel”.

2) At the TV, select channel 3 or 4 (the same channel as you

have selected at step 1).

3) On the cable box or satellite box, select the channel you

want to view or record.

ANT-OUT

ANT-IN

RF cable

(supplied)

(Back of DVD/VCR)

IN

OUT

(Back of TV)

Satellite or

Cable TV

signal

(Cable box or 

Satellite box)

Hint

Hint

• Playing a DVD using incorrect settings may generate

noise distortion and may also damage the speakers.

 H9805UD_EN/SP.qx3  2005.06.10  15:17  Page 6

Содержание SRDD495

Страница 1: ...ection to an Audio System 6 Connection to a TV 7 Front Rear Terminals 7 Preparation for Use 8 Turn On the Unit for the First Time 8 To Add Delete Channels 8 Clock Setup 8 Function Overview 9 Front Pan...

Страница 2: ...G This equipment may generate or use radio frequency energy Changes or modifications to this equipment may cause harmful interference unless the modifications are expressly approved in the man ual The...

Страница 3: ...a Grounding If an outside antenna or cable system is connected to the video product be sure the antenna or cable system is grounded so as to provide some protection against voltage surges and built up...

Страница 4: ...ll our help line mentioned on the front page to locate an Authorized Service Center CLEANING THE CABINET Use a soft cloth slightly moistened with a mild deter gent solution Do not use a solution conta...

Страница 5: ...nonstandardized discs this unit may not play them back Even if they are played back the sound or video quality will be compromised 7 You may play back the unfinalized DVD R RW disc recorded in the vi...

Страница 6: ...V screen press VCR TV on the remote control 4 Press PLAY B once 5 After a few seconds hold PLAY B on the unit for 3 seconds The RF output channel will change to channel 4 from channel 3 and you will s...

Страница 7: ...ally near channel 0 for viewing the picture from this unit If the picture does not appear also refer to the manual accompanying your TV Input modes for common TV brands Example Listed below are inputs...

Страница 8: ...AR 1 0 0 3 HOUR MINUTE AM PM Select the current month Select the current day If the clock is not set the CLOCK SET screen appears when you press MENU In this case go to step 2 VCR VCR VCR or or or or...

Страница 9: ...SKIP CH PLAY STOP REC OTR MENU SETUP TOP MENU MODE ZOOM SUBTITLE T SET ANGLE ENTER RETURN SEARCH MODE REPEAT A B OPEN CLOSE EJECT SPEED AUDIO CLEAR C RESET 1 2 3 4 5 6 7 8 9 0 10 OUTPUT button DVD OUT...

Страница 10: ...ks To change channels To adjust the tracking manually during playback To begin disc playback To begin disc playback To begin tape playback To call up the DVD setup menu To call up the index or time se...

Страница 11: ...e and 3 minutes for SLP mode To rewind To fast forward Hints f Hints for Inde or Index Sear x Searc ch h Time Sear Time Searc ch h These functions are not available during recording Press STOP C C to...

Страница 12: ...he video head VCR CHANNEL OPEN STOP EJECT PLAY REC OTR POWER F FWD REW VIDEO AUDIO 1 1 6 6 2 2 4 4 Recording OTR One Touch Recording 1 1 M E N U TIMER PROGRAMMING B AUTO REPEAT OFF CHANNEL SET UP CLOC...

Страница 13: ...ding Press SUBTITLE T SET so that the TIMER light disappears Press VCR TV to choose the VCR position Select either VCR or DVD mode then continue with the other features as described in this manual Aft...

Страница 14: ...t the L1 or L2 position on the recording unit To use the input jacks on the back of this unit select L1 position by pressing 0 0 1 on the remote control or CHANNEL K K L L To use the input jacks on th...

Страница 15: ...s different depending on the disc Approximate speed is 1 1 16 2 1 8 3 1 2 Set STILL MODE to FIELD in the Display menu if pictures in the slow playback mode are blurred Refer to pages 20 21 Zoom 1 Pres...

Страница 16: ...nt playback status 1 1 2 2 3 3 Hint Hint When you are playing a disc in PROGRAM or RANDOM mode PROGRAM or RANDOM will be displayed instead of 2 2 CH Chapter Current chapter number Total chapters TT Ti...

Страница 17: ...automatically For example 0 0_ __ appears in the Time Search display if the total time of the title or track is less than 10 minutes Press CLEAR C RESET to erase the incorrect input at step 2 Hint Hi...

Страница 18: ...other title chapter or track Repeat playback are not available with all discs or during repeat A B playback Hint Hint Press CLEAR C RESET at step 2 to erase the most recently entered track To erase al...

Страница 19: ...DVD V 1 1 1 8 ANGLE ON OFF Black Level Setting Adjust the Black Level Setting to make the dark areas of the TV picture brighter DVD DVD V DVD V Virtual Surround You can enjoy stereophonic virtual worl...

Страница 20: ...SPECT or DOLBY DIGITAL on page 20 or 21 SETUP MENU Confirm that QUICK is selected You can select the PLAYER MENU TV ASPECT or DOLBY DIGITAL from the QUICK SETUP menu quickly ENTER ENTER Select the des...

Страница 21: ...6 6 To exit the menu TV ASPECT Default 4 3 LETTER BOX See Hint to the right QUICK TV ASPECT 4 3 LETTER BOX 4 3 PAN SCAN 16 9 WIDE TV ASPECT 4 3 LETTERBOX STILL MODE AUTO Select the desired setting or...

Страница 22: ...current password Enter your desired four digit password except for 4737 or SETUP PARENTAL PASSWORD Please enter a 4 digit password PARENTAL menu 5 5 OTHERS Setting You can change the other functions...

Страница 23: ...G Make sure the VCR is not in the Menu mode Change the RF output channel to CH4 Then select the same channel on the TV Fine tune your TV Re check the ANT IN and ANT OUT connections See pages 1 and 6 P...

Страница 24: ...workmanship as follows DURATION PARTS FUNAI CORP will provide parts to replace defective parts without charge for one 1 year from the date of original retail purchase Certain parts are excluded from...

Страница 25: ...PROGRAMAR AUTOREPETIR OFF AJUSTE CANAL B AJUSTE DE RELOJ SELEC IDIOMA AJUSTE DE RELOJ MES DIA A O 1 0 HORA MINUTO AM PM AJUSTE DE RELOJ MES DIA A O 1 0 0 3 HORA MINUTO AM PM Seleccione el mes actual...

Страница 26: ...rar los n meros entrados incorrectamente Para borrar el punt para la repetici n A B Para salir del men de la grabadora de v deo Para reponer el contador de cinta Para buscar en avance retroceso en un...

Страница 27: ...T B ENGLISH ON FRANCAIS ESPA OL 1 1 Turn on the TV and set it to channel 3 If channel 3 is already occupied for broadcasting see RF Output Channel section 3 3 CH 01 AUTO SET UP No No Please wait for a...

Страница 28: ...entered incorrectly To cancel the point for A B repeat To clear the numbers entered incorrectly To cancel the point for A B repeat To exit the VCR Menu To reset the tape counter To search forward back...

Отзывы: