


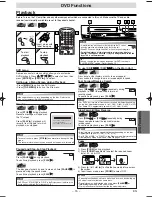


STOP/EJECT
PLAY
REC/OTR
POWER
F.FWD
REW
VIDEO
AUDIO
3
3
BB
ss
TIME SEARCH
2 : 5 0
TIME SEARCH
– : – –
BB
INDEX SEARCH
0 3
INDEX SEARCH
– –
– 11 –
EN
VCR Functions
Hint
Hint
• When a tape without record tab is inserted, the unit will start playback automatically.
• Tracking will be automatically adjusted upon playback. To adjust the tracking manually, press
[SKIP/CH.
G
G
/
K
K H
H
/
L
L
]
(or
[CHANNEL
K
K
/
L
L
]
).
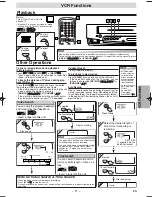
Playback
POWER
DISPLAY
VCR
DVD
PAUSE
SLOW
VCR/TV
SKIP/CH.
PLAY
STOP
REC/OTR
OPEN/CLOSE
/EJECT
SPEED
AUDIO
1
2
3
4
5
6
7
8
9
0
+10
Before:
Turn on the TV and set it to
channel 3.
• If channel 3 is already occupied for broad-
casting, see “RF Output Channel” section.
1
1
2
2
3
3
4
4
4
4
PLAY
STOP
OPEN/CLOSE
/EJECT
3
3
2
2
Other Operations
Hint
Hint
• Still/Slow mode
will be automati-
cally cancelled
after 5 minutes to
prevent damage
to the tape and
the video head.
• To return to play-
back from the
Picture
Search/Still/
Slow mode,
press
[PLAY
B
B
]
.
VCR Functions
VCR
VCR
VCR
1
1
2
2
3
3
4
4
4
4
After searching,
PLAY
B
3
3
To rewind
To fast forward
You can skip the program backward
and forward by the Index Mark.
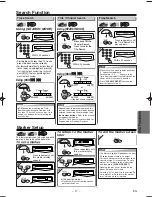
• Insert a tape into this unit.
VCR
VCR
VCR
1
1
Index Search
Press once.
SEARCH
MODE
2
2
Pro.1
Pro.2
Pro.3
Pro.4
Pro.5
02
01
01
02
03
Beginning
of the tape
End of
the tape
CURRENT PROGRAM
INDEX MARK
01 ~ 20
or
4
4
After searching,
Hint
Hint
• The Index Mark will be made automatically
at the beginning of each recording.
• The time gap between Index Marks should
be greater then 1 minute for SP mode, 2
minutes for LP mode and 3 minutes for
SLP mode.
To rewind
To fast forward
Hints f
Hints f
or Inde
or Inde
x Sear
x Sear
c
c
h &
h &
Time Sear
Time Sear
c
c
h
h
• These functions are not available during recording.
• Press
[STOP
C
C
]
to stop the search.
• If a tape ends during a search, your search will be cancelled and the tape will rewind to the
beginning.
PLAY
B
Time Search
You can search backward and for-
ward a specific length of time on a
tape.
• Insert a tape into this unit.
VCR
VCR
VCR
1
1
SEARCH
MODE
2
2
Select the desired length of
time for fast forwarding or
rewinding.
Press twice.
0:01~ 9:59
(1 minute~9 hours
and 59 minutes)
or
ss
To cue or review picture during playback
(Picture Search)
Press
[
g
g
/
h
h
]
(
[F.FWD
g
g
]
or
[REW
h
h
]
)
.
• Press it again and the unit will search in super high
speed. (in the SLP mode only)
To freeze the picture on TV screen during play-
back (Still mode)
Press
[PAUSE
k
k
]
. Each time you press the button,
the picture will be forwarded by one frame.
• If the picture begins to vibrate vertically during the still
mode, stabilize the picture by pressing
[SKIP/CH.
G
G
/
K
K H
H
/
L
L
]
(or
[CHANNEL
K
K
/
L
L
]
).
• If the picture is distorted or rolling vertically, adjust
the vertical hold control on your TV if equipped.
Counter Reset
Press
[CLEAR/C.RESET]
.
To play back in slow motion
Press
[SLOW]
during playback or the still mode.
• If the noise bars appear on the TV screen, you can
reduce it by pressing
[SKIP/CH.
G
G
/
K
K H
H
/
L
L
]
(or
[CHANNEL
K
K
/
L
L
]
).
Auto Rewind
When a tape reaches its end during playback, fast-for-
ward or recording (except Timer Recording and One
Touch Recording), the tape will automatically rewind
to the beginning. After rewinding finishes, the unit will
eject the tape.
To start
playback
To stop
playback
To eject
H9805UD_EN/SP.qx3 2005.06.10 15:17 Page 11


